
Time flies by, each post takes a bit of time, but here we are! Another part of our series, were the final goal is to show how to utilize Kale in the current Kubeflow version of 1.1! What is all the fuzz about? Get an overview in the latest blogpost!
What to expect
Expect to do some work by yourself! Unfortunately, we’ve not enough time to guide you through each of the steps step by step! Rather, this post is more or less an explanation of the vSphere-extension we’ve already built. The installation guide is found at the end of the post.
We will apply our first Admission Controller written in Java with Quarkus. I’m happy, you’re still with me!
- Problems
- Solutions
- What is an admission controller?
- Implementation
1) The problems (PSP)
Yes, it’s correct, we’ve got two problems, which we’ll fix one by one. The first one is an improvement of an already posted solution here.
A brief overview: TKG has pod security policies (PSPs) activated. This is used for improving security. For example, a service account in the default namespace can’t create pods when no PSP is attached to this service account. A rolebinding is necessary, to overcome this issue. Kubeflow ties user accounts to namespaces for multi-tenancy.
Who creates new PSPs for new namespaces or service accounts?
2) The solution (PSP)
Our first solution was to ask the AD which accounts exist (and therefore could log in). Each account was tied to a namespace and a profile. This process would’ve been run periodically.
The current solution:
It’s not just possible to list each resource, it’s also possible to watch a resource. Unfortunately, the profile gets created first, and then the namespace is created.
We’ll watch the namespace for new creations. If a new namespace is found, check if a corresponding profile exists. Finally, check whether or not a rolebinding already exists. If the final step yields false, we’ll create a new rolebinding.
It’s not necessary to clean up, because if a namespace is deleted, all corresponding resources are deleted.
1) The problem (persistent volume claims (PVCs))
Kubeflow, or rather Kale, utilizes read write many (RWM) PVCs. Some research has shown, it’s not yet possible to utilize them in a TKG cluster within vSphere with Kubernetes by vSphere itself.
2) The solution (PVC)
It’s still possible to define new storage classes. Therefore, it’s possible to
- change the default storage class or
- change the storage class for read write many PVCs
1) Changing the default storage class is not possible. The CSI of TKG overwrites this periodically, because we’ve declared another storage class as desired state within the supervisor cluster (in the TanzuKubernetesCluster resource).
2) We can change the utilized storage class at all the places, where it’s utilized… But what happens, when it’s in a place, where we can’t access the source code? We need a more sophisticated way. Intercept each created PVC, and exchange the storage class, if necessary. This is a use-case for an admission controller.
3) What is an admission controller?
A call against the kube-apiserver must pass some controllers.
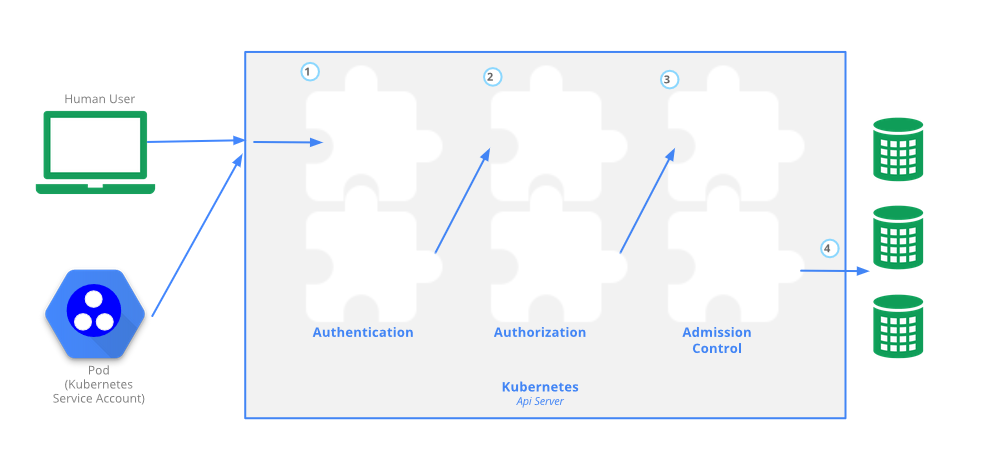
three phases of a kube-apiserver call (kubernetes.io, https://kubernetes.io/docs/concepts/security/controlling-access/, 05.11.2020)
We’ll skip to the admission control, where each controller can either validate or mutate the api-call. For example a pod is created, the call was authenticated etc. and now an admission controller should do it’s deed with the following process:
- Kube-apiserver sends json encapsulated data to a REST endpoint
- The REST endpoint inspects data and answers, if the call is allowed or not (validating webhook) and additionally a JSON-patch (or not) is added (mutating webhook)
- the kube-apiserver validates the answer and persists the object in its database
Why can’t we change the storage class after creation with e.g. a watch? If the object is persisted, the manipulation of some fields is not longer allowed, e.g. the storage class. Therefore we can’t utilize another watch and just change the field after creation
4) The implementation (PVC)
The PSP fixer is rather simple, mostly code, we’ll focus on additional infrastructure requirements regarding the fix.
- a RWM storage provider is necessary
- install a NFS-client
- a new storage class is necessary
- the kubeflow-fix must be deployed in the cluster.
RWM storage provider
These are found in many colors and variations. You can create your own storage provider within the cluster. This will install a NFS-server and create a NFS storage class. Although helm is necessary.
You can set up your own NFS-server outside of your cluster, and a NFS-client provisioner within your cluster, which utilizes / talks to the server.
These are just two solutions… We’ve utilized our existing NFS-server with a NFS-client-provisioner.
(if you do not have helm installed, follow this guide)
helm install --set nfs.server=<ip-or-fqdn-of-nfs-server> --set nfs.path=/exported/path stable/nfs-client-provisioner
- set the correct ip address of the NFS-server
- the path must be set up within the NFS-server
- make sure, that subdirectories can be mounted, too
- allow non root mount
- allow access from within the cluster (egress ip address CIDR of your supervisor cluster; vSphere client -> Hosts & Clusters -> Cluster, where your workload management was installed into -> Configure -> Namespaces -> Network -> Workload-Network -> Egress CIDRs)
Test your installation with the following yaml
kubectl apply -f - << EOF
apiVersion: v1
kind: PersistentVolumeClaim
metadata:
  name: test-pvc
  namespace: kubeflow
spec:
  storageClassName: "nfs"
  default StorageClass will be set
  volumeName: test-pv
EOF
Check if everything worked, with the following command:
kubectl get pvc test-pvc -n kubeflow
This will show you, whether or not the PVC was bound, a bound PVC is a good sign.
Troubleshooting help
- read the log files of the NFS-client (kubectl logs …)
- ssh into your NFSNFS-server and read the log files, there you’ll see e.g. if root mount is enfored, but a non root mount was utilized.
- allow access from your own machine (ip address), and mount the directory by hand
The code
I’ll briefly explain the code which you can find here: https://github.com/SoeldnerConsult/vSphere-extensions
The code utilizes Quarkus, a framework for Java. It provides everything we need, namely REST, kubernetes client (fabric8) and security (SSL / TLS).
The PVC
Our project is based upon the great work of vsevel, which you can find here. The steps performed by the admission controller itself are the following:
- Establish mutual SSL between kube-apiserver and the application
- Create a REST endpoint
- Mutate the object
- Return an anwser
Please refer to the README.md of the already linked project, if you want to understand how each step is done.
We need to modify the second step; mutate the object, which is rather easy in this part of our project. Fabric8 provides all commonly used resources, i.e. namespaces, rolebindings etc.
Mutate the object (PVC)
The code can be found in vSphere-extensions/src/main/java/de/keeyzar/pvcmutator/
A brief overview on what we’re doing:
- deserialize the object
- check whether or not it’s a CREATE operation
- now check whether or not it’s a PVC
- if it’s a PVC, inspect the type
- is it of type RWM? then change the storage class
- create a jsonpatch based on the change
- send back the approval with the jsonpatch to apply
RBAC rolebinding for PVC
No RBAC is needed! Why? We’ll tell within the admission controller, which resource may be modified by our application!
The PSP fix
Our implementation is found in the following package:
- Register a NamespaceListener in the NamespaceController
- When a new Namespace is created: check whether or not a corresponding profile does exist, utilize ProfileController
- Does a profile exist? If yes, check for a missing rolebinding with the RolebindingController
- If no rolebinding exists, create one with the RolebindingController
That’s it. fabric8 provides great support for already existing resources. We’ll bleed later, in another blogpost.
RBAC rolebinding for PSP
This application will be deployed within the kubernetes cluster, and the default service account will be utilized for execution. Therefore, we need to set up RBAC correctly and create a PSP, or our service won’t start. You can find the applied resources in additional/initial-resources.yaml and additional/resources.yaml
- Create a namespace
- Now create a PSP
- Finally, create RBAC rolebindings for the default service account, allowing access to mission critical resources (i.e. profile, namespaces… etc. etc.
Installation
This is a simple deployment with the image from docker.io: keeyzar/vsphere-extensions-jvm
Ofcourse you can build the project on your own; this is described in the README.md of the project.
Let us deploy the pre built vSphere extension, based on the readme of our vSphere project.
- Make sure, you can mount RWMany with the given storage class, based on one of the tutorials above.
- Utilize the following instructions for a succesful installation of vSphere-extensions
(for the signing request you’ll need go and cfssl + cfssljson)
#clone the repository:
git clone https://github.com/SoeldnerConsult/vSphere-extensions

#cd into the repository:
cd vSphere-extensions

#create the namespace vSphere-extension
kubectl apply -f additional/initial-resources.yaml

#setup your nfs storage class for read write many
readWriteManyStorageClass=nfs-client
resourcePath=additional/resources.yaml
sed -i "s/nfs-client/$readWriteManyStorageClass/" $resourcePath

#create a certificate request and sign it
#make sure, go; cfssl cfssljson are installed
pushd .
cd additional
chmod +x create-cert.sh
./create-cert.sh
popd

#create all necessary resources
k apply -f $resourcePath

#wait for deployment of the vSphere extension pods
controller=$(kubectl -n vsphere-extensions get pods --selector=app=vsphere-extensions -ojsonpath='{.items[*].metadata.name}')
kubectl -n vsphere-extensions wait --for=condition=Ready --timeout=300s pod/$controller

#obtain the ca-bundle of the controller, so the api-server can establish trust
cert=$(kubectl -n vsphere-extensions exec $controller -- cat /var/run/secrets/kubernetes.io/serviceaccount/ca.crt | base64 | tr -d '\n')

#exchange the certificate within the webhook resource files
webhookResource=additional/webhook.yaml
sed -i.bak -E "s/caBundle:.*?/caBundle: $cert/" $webhookResource
kubectl apply -f $webhookResource

#check functionality
kubectl apply -f additional/example-pvc.yaml

#compare storageclasses
kubectl get pvc -n default test-pvc -o=jsonpath="{.spec.storageClassName}"
echo $readWriteManyStorageClass
kubectl delete pvc -n default test-pvc
Final words:
It’s nearly impossible to thoroughly explain each step, but I hope you got a good overview on what is done and why it’s done. Please feel free to write us on twitter or in the comment section, when something is not clear enough.
Recent Comments