
Welcome to the third part in this series. This series has the target to finally deploy Kubeflow in vSphere, but the post is only one of the steps required for our destination.
Don’t forget to catch up if you missed how we set up Workload Management (the supervisor cluster) or this brief differentiation between TKG Cluster and the Workload Management supervisor cluster.
What you’re going to learn
We’ll set up a TKG cluster within vSphere 7 in the supervisor cluster created by the Workload Management. For this to successfully work we need to create a content library, authenticate with the kubectl vSphere plugin and utilize TKG for obtaining all necessary information. Finally, we’ll make sure to deploy a NGINX. I give you an example on how to overcome the Pod Security Policy, which is enabled on TKG Clusters.
Necessary for completion:
For a successful NGINX Deployment, you’ll need the vSphere admin account, not the admin role, this is NOT enough. Theoretically it’s not necessary, for CREATING the TKG cluster, but you will have to guess some parameters. Unfortunately, you can’t access crucial information without the admin account. When you have obtained this information, each configured user later on may be enabled to create the TKG cluster on their own.
Additional make sure to download this binary TKG CLI . This is also technically not necessary, but it’ll ease the access to information.
Breaking down this tutorial
All steps for your TKG Cluster and the NGINX Deployment:
- Subscribe the content library from VMware (for obtaining OVF Templates)
- Create a namespace, where you want to deploy your TKG Cluster
- Create a TKG Cluster
- Create NGINX Deployment
1. Subscribing the content library from VMware
In the first post I explained, that the TKG Cluster is realized as VMs i.e. the Kubernetes control planes and worker nodes are VMs. Therefore, we need OVF templates, so TKG can set up these VMs. This step is solely needed, when you want to utilize TKG, otherwise this is not necessary.
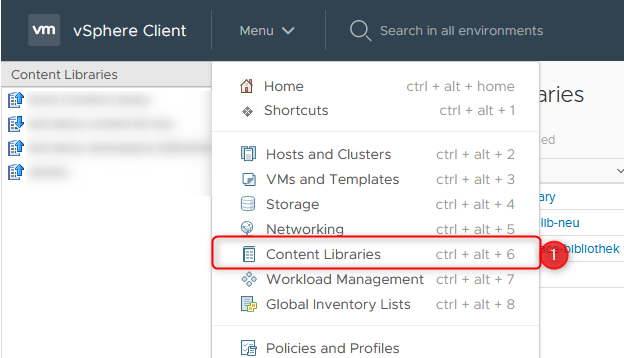
- Connect to vSphere Client and select Content Libraries via the Menu
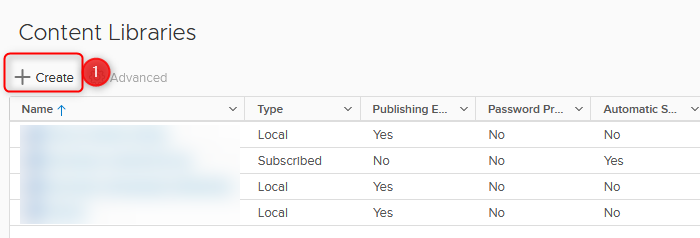
- Create a new Content Library
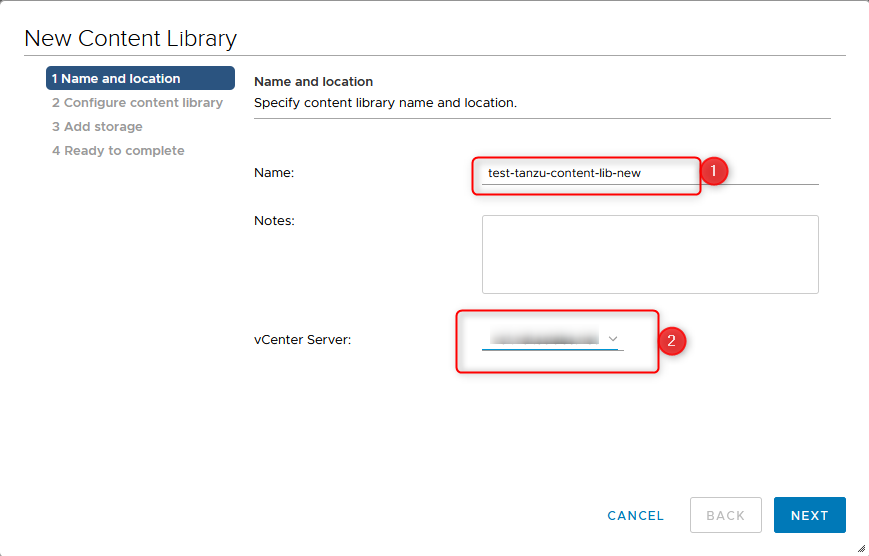
- Choose a name, and on which vCenter Server to save, click next
- Subscribe to the following URL:
https://wp-content.vmware.com/v2/latest/lib.json
Make sure that you select “immediately”, because if not, TKG won’t find the OVF templates, and when applying the TKG Cluster .yaml file, Kubernetes will throw an error!

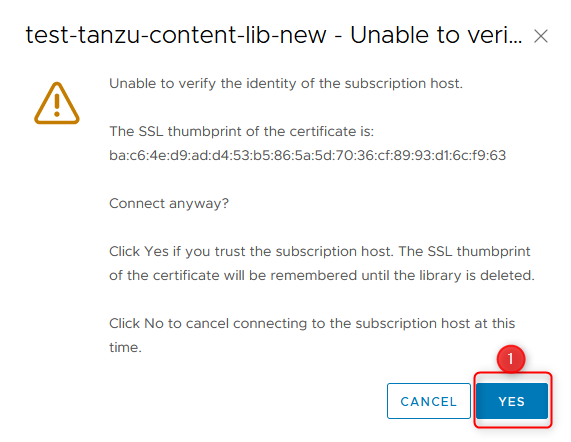
- Ignore this warning. The chosen URL is from VMware and a check via the browser against that URL shows no certificate problems. Click Yes!
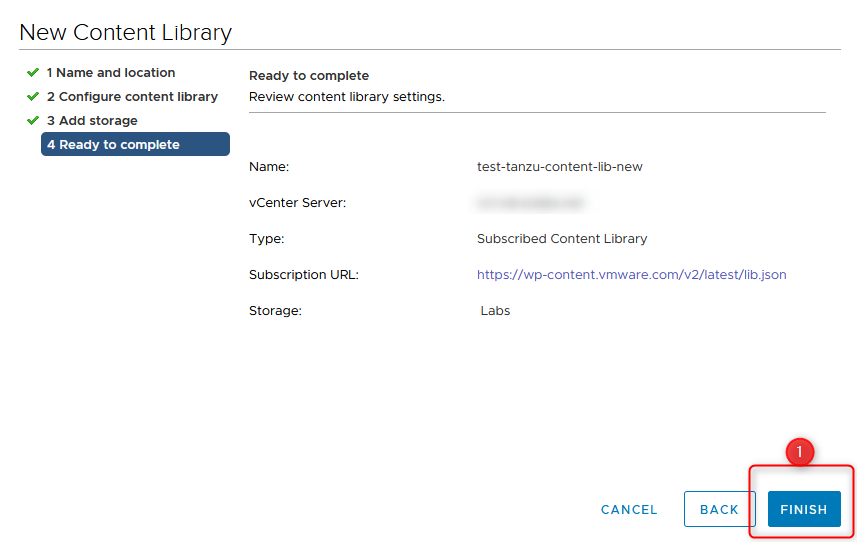
- Finally select the Storage Location and visit the last configuration step.

- One last check. Pressing FINISH creates the Content Library
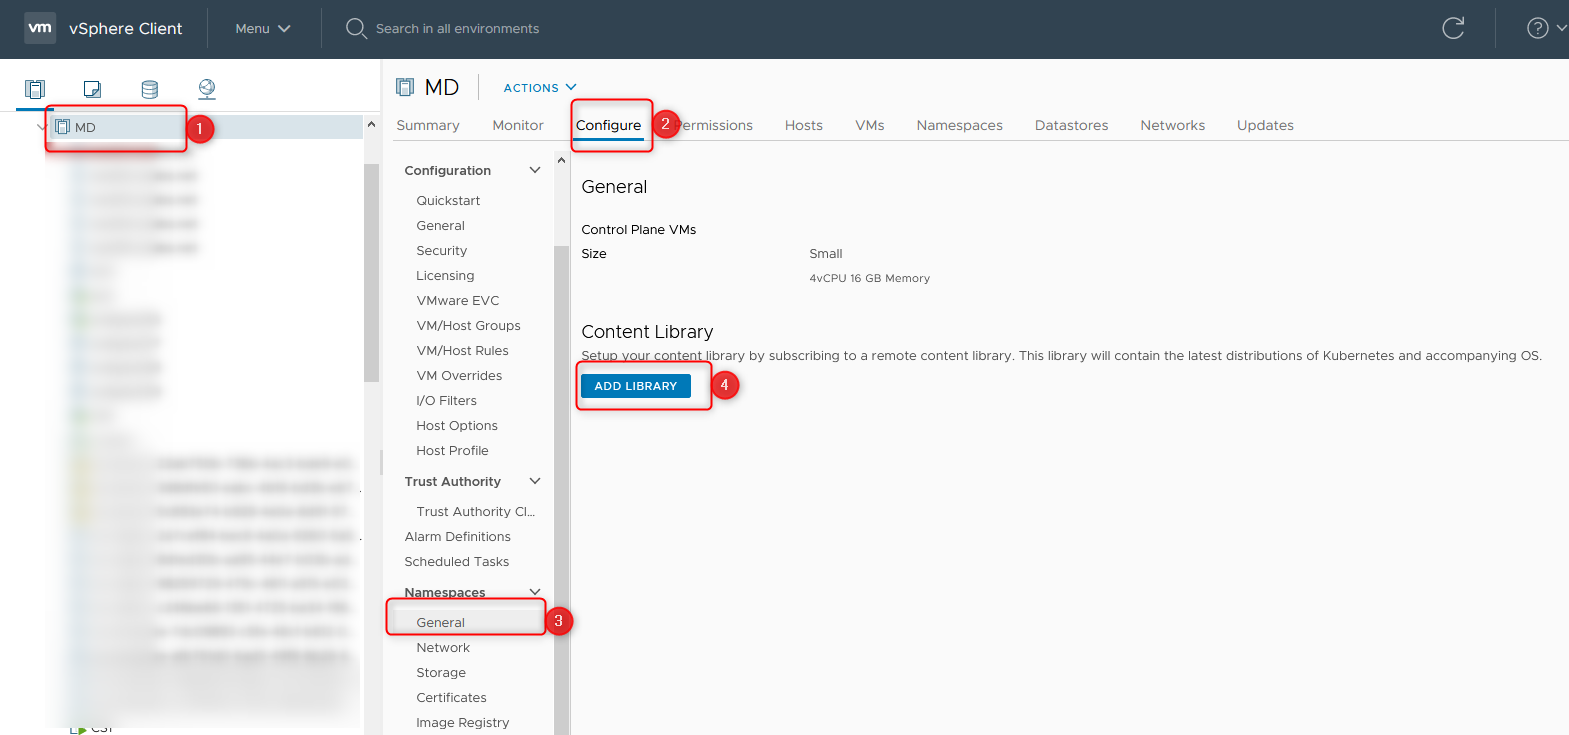
- Choose your Cluster, where the Workload Management is configured in. Within Configuration > Namespaces > General you’ll set up the Content Library, solely needed for TKG.
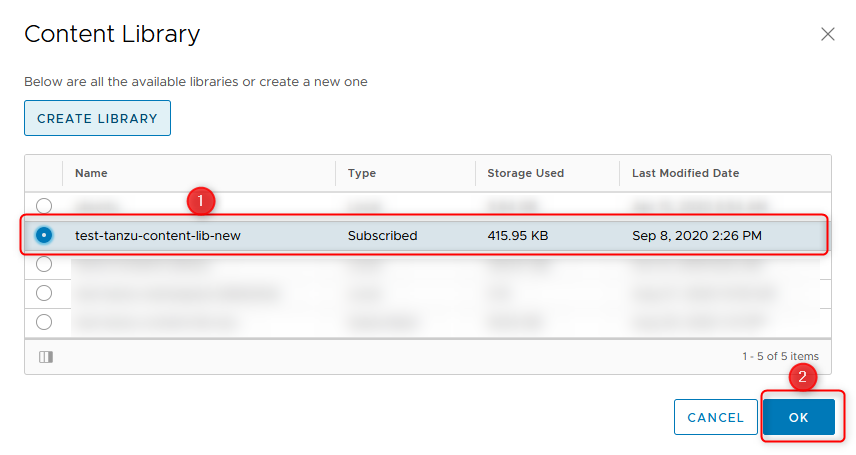
- The last step! Select your freshly created Content Library and Finish with OK.
2. Creating a namespace
A namespace in Workload Management is not exactly the same as a namespace in Kubernetes. You can’t create namespaces in the supervisor cluster. Workload Management does not mind your admin privileges, it’ll deny your request. Even though creating a namespace in Workload Management will create a namespace in the supervisor cluster, too.
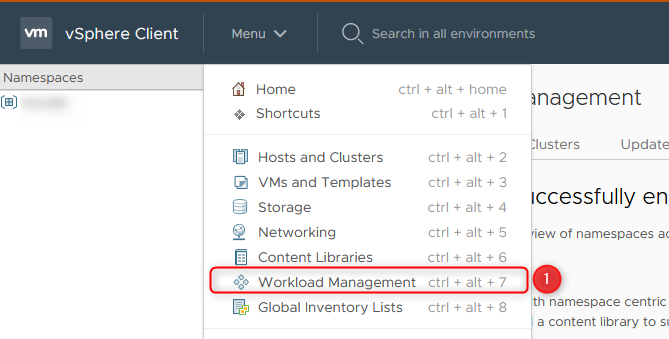
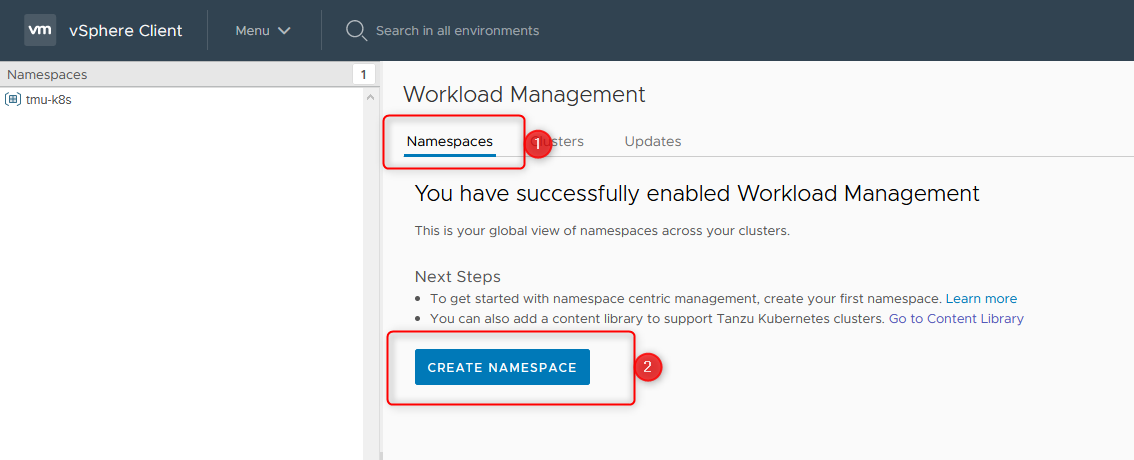
- Select Workload Management in the vSphere Client via the Menu
- Select Namespaces followed by Create Namespace
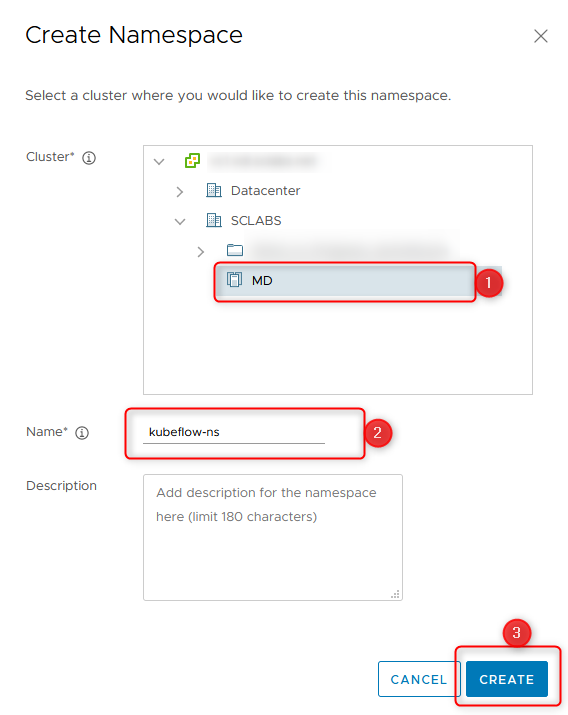
- Choose your ESXi Cluster, in which you deployed your Workload Management, put a namespace-name and remember it
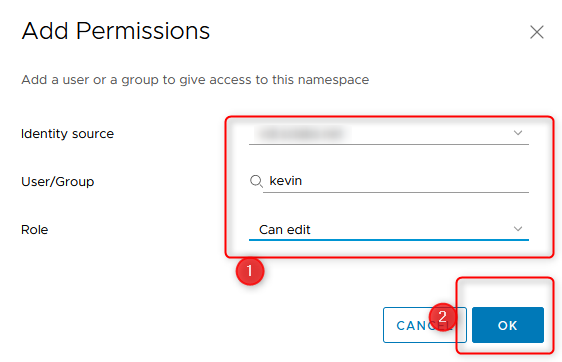
- Add a Permission, so someone can deploy into this cluster. This step can be skipped, when you connect as a vsphere.local Administrator to the cluster

- Select an identity source, e.g. your domain. The identity source and the username are required later, when connecting against the cluster!
- Finally configure the Storage
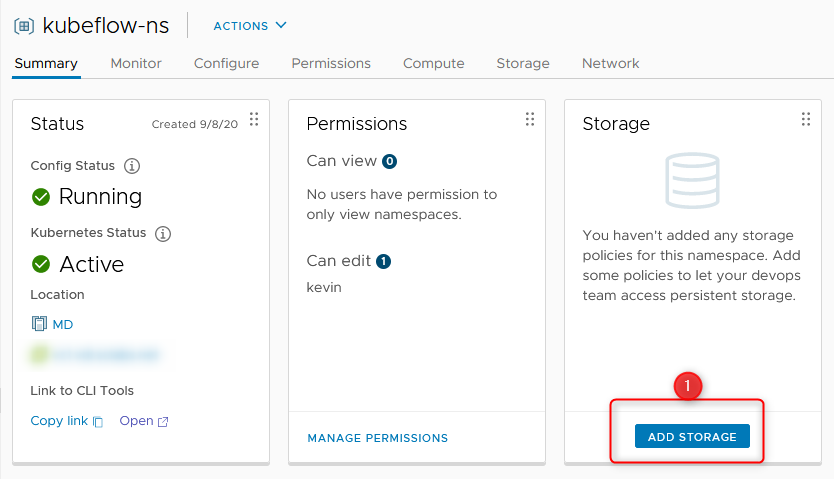
- Provide any VM Storage Policy, you’ve maybe already configured. I’ve chosen the Storage Policy which is used for Workload Management.
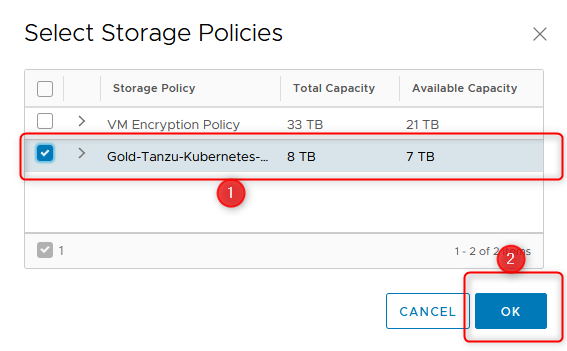
Congratulations, the namespace is created and configured.
3. Create the TKG Cluster
Now we need the TKG cli, download it to your work machine, make sure it’s executable.
kubectl and the corresponding kubectl-vsphere plugin will be downloaded in the next few steps, as they’re given to us conveniently by Workload Management.
kubectl communicates with any cluster – based on information stored in the following file:
~/.kube/config
VMware provides a cli binary: kubectl-vsphere. This binary checks authentication and, based on authorization, configures your ~/.kube/config file.
After that it’s mostly regular kubectl. Only for the connection to the TKG cluster we’ll need to kubectl-vsphere binary again.
Screenshots now are sparse, as the console commands must be pasted anyways.
- We left on namespaces (if you somehow manage to not find it again, don’t worry: Menu > Workload Management > Namespace > <your namespace>)
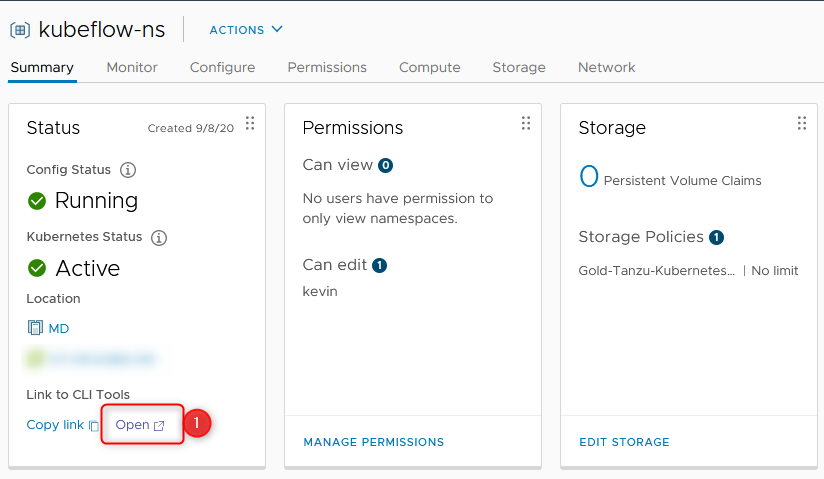
- Make sure to remember the IP of the website that you’re currently accessing (it’s the IP of the supervisor cluster)
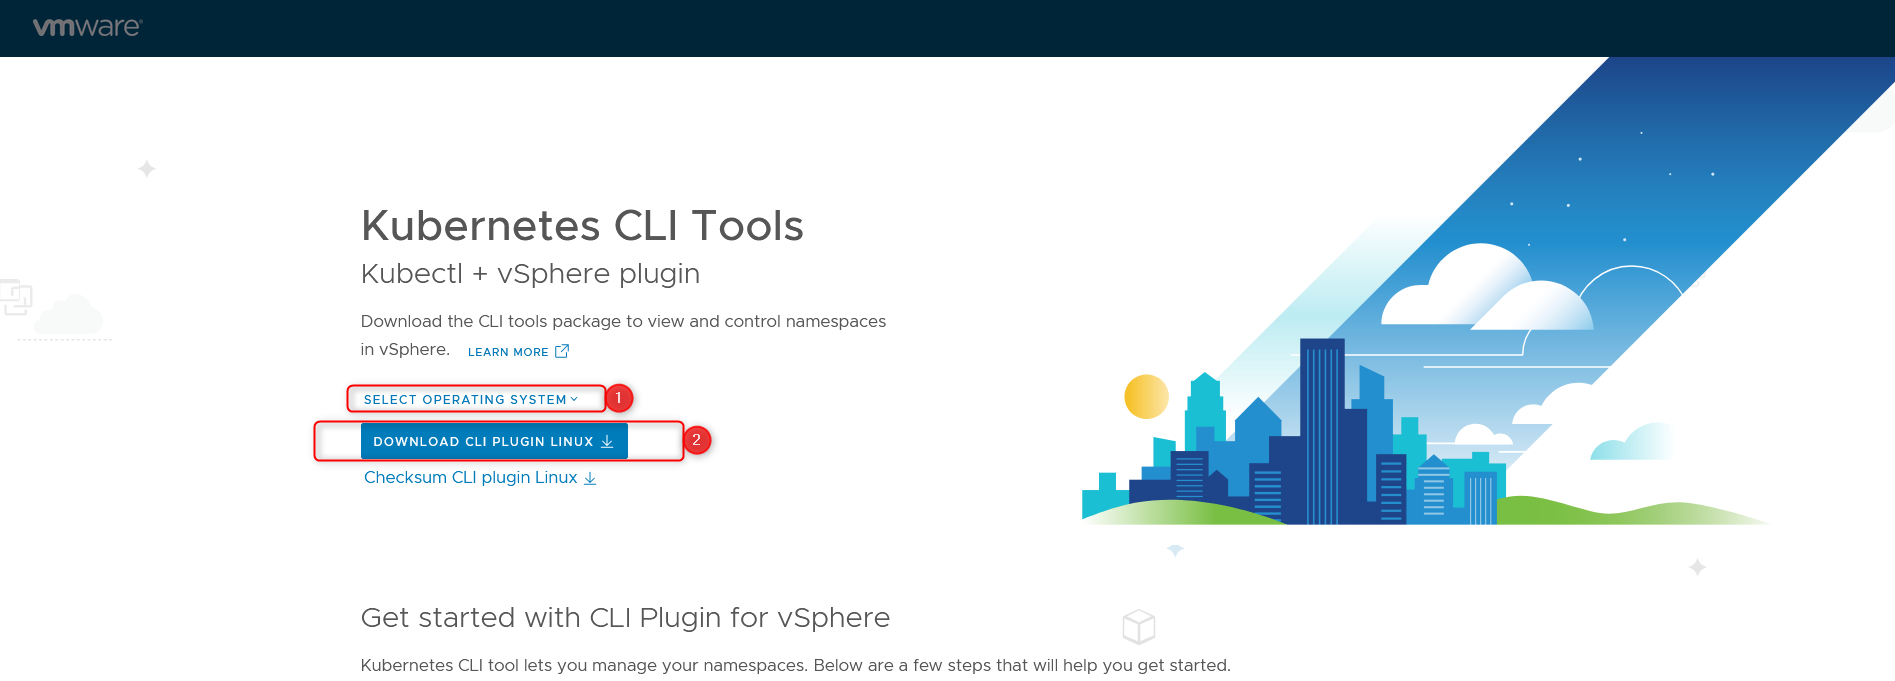
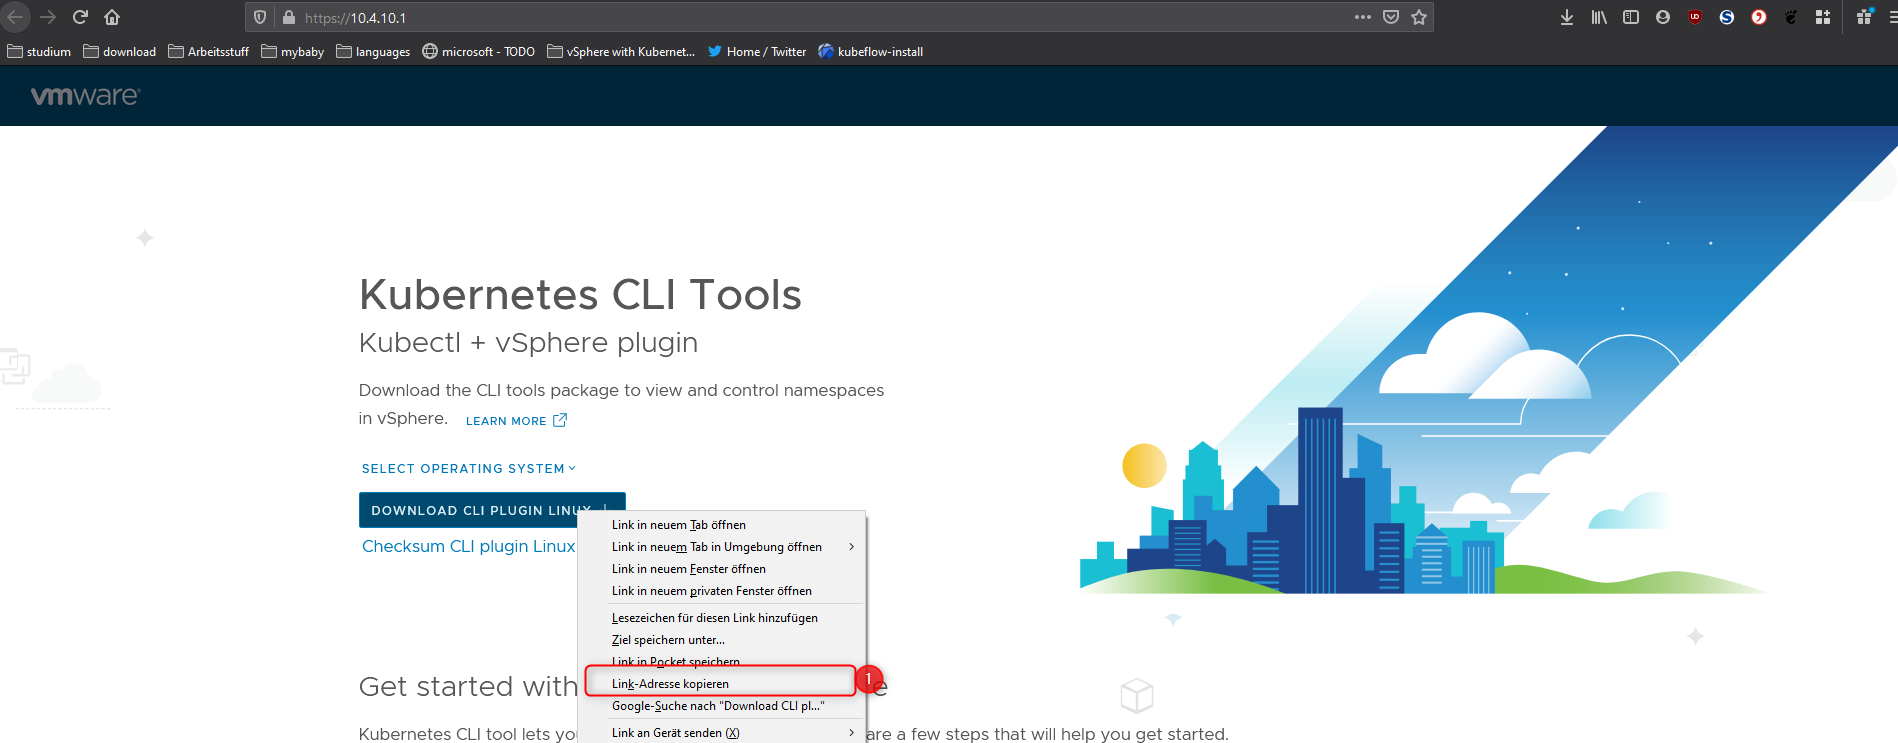
- You could manually download the binaries, I’ll prefer using wget and creating my own scripts, so I copy the download link.
- Unpack, move binaries to binary location and remove the remainder
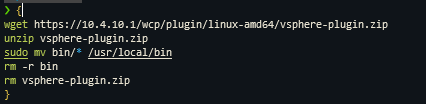
Remember to change the IP to your supervisor cluster
{
  wget https://<IP-of-supervisor-cluster>/wcp/plugin/linux-amd64/vsphere-plugin.zip
  unzip vsphere-plugin.zip
  sudo mv bin/* /usr/local/bin
  rm -r bin
  rm vsphere-plugin.zip
}
- Now utilize the vsphere plugin and connect as the vSphere administrator.

- The next commands are all done on the supervisor cluster.
kubectl config use-context <supervisor-ip> #10.4.10.1
- Now configure the TKG binary
tkg add mc <supervisor-ip> #10.4.10.1
tkg set mc <supervisor-ip> #10.4.10.1
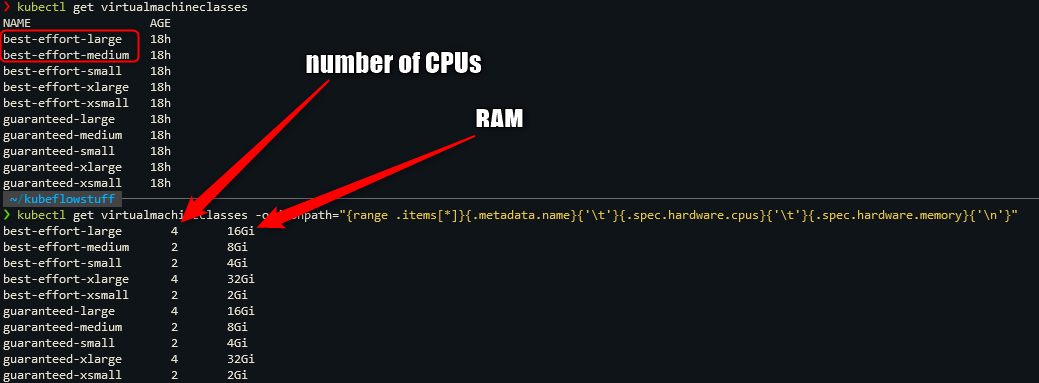
- Obtain configuration parameters,
we need the
- storageclass (where can we save what)
- virtualmachineclasses (how much ressources to allocate for the worker and master nodes of the tkg cluster)
- virtualmachineimage (which image to use to deploy the worker and master nodes).
Save the circled information!


kubectl get storageclass
kubectl get virtualmachineimages
kubectl get virtualmachineclasses
kubectl get virtualmachineclasses -o jsonpath="{range .items[*]}{.metadata.name}{'\t'}{.spec.hardware.cpus}{'\t'}{.spec.hardware.memory}{'\n'}"
- Now create some environment variables. the SERVICE_DOMAIN must match cluster.local or kubeflow will later on have troubles! Exchange found storage classes. The service/cluster CIDR are TKG Cluster internal, choose whatever you want to.
export CONTROL_PLANE_STORAGE_CLASS=gold-tanzu-kubernetes-storage-policy
export WORKER_STORAGE_CLASS=gold-tanzu-kubernetes-storage-policy
export DEFAULT_STORAGE_CLASS=gold-tanzu-kubernetes-storage-policy
export STORAGE_CLASSES=
export SERVICE_DOMAIN=cluster.local #don't change this! kubeflow needs it.
export CONTROL_PLANE_VM_CLASS=guaranteed-medium
export WORKER_VM_CLASS=guaranteed-xlarge
export SERVICE_CIDR=100.64.0.0/13
export CLUSTER_CIDR=100.96.0.0/11
- Create the TKG cluster, after you’ve exported all these variables.
This command creates a .yaml file and saves it in tkg-cluster-creation-small. Exchange your cluster name (kubeflow-tkg), the namespace (kubeflow-ns), the kubernetes-version (v1.17.8+vmware.1-tkg.1.5417466). You do find the kubernetes version with the command from step 8 (kubectl get virtualmachineimages).
tkg config cluster kubeflow-tkg --plan=dev \
--namespace=kubeflow-ns \
--kubernetes-version=v1.17.8+vmware.1-tkg.1.5417466 \
--controlplane-machine-count=1 \
--worker-machine-count=3 > tkg-cluster-creation-small.yaml
- Apply the yaml
kubectl apply -f tkg-cluster-creation.yaml

Monitor Cluster creation
Now that the cluster is created, we’ll check vSphere… Once again we’ll open the namespace via Menu > Workload Management > Namespace > <your-namespace>.
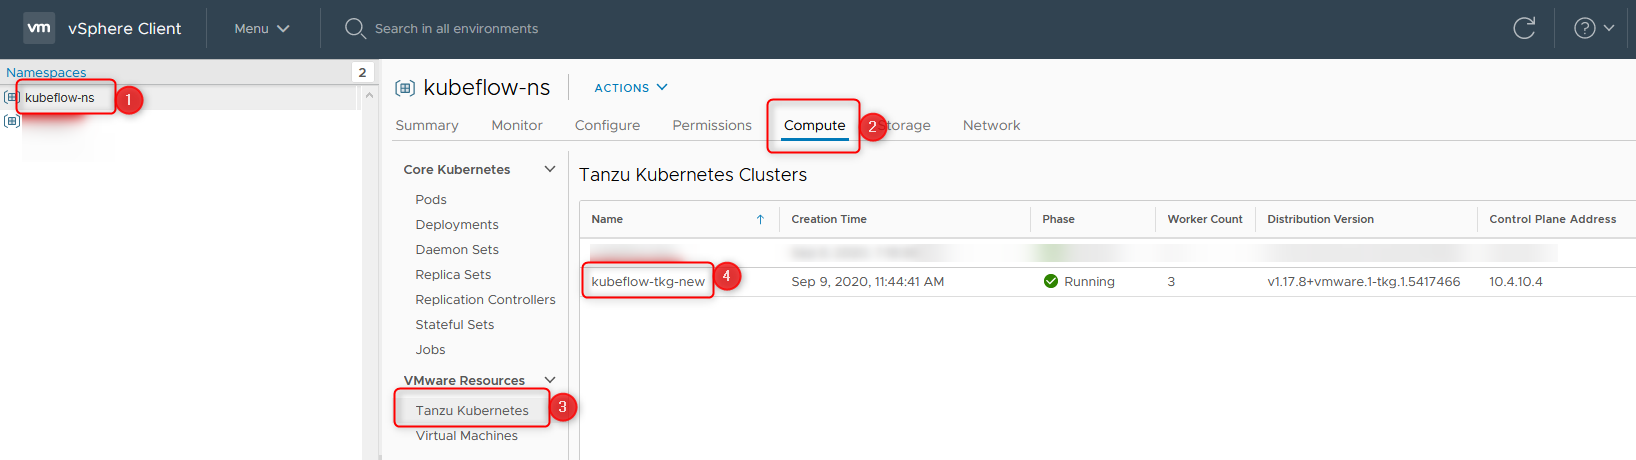
Note down the name (1) of the namespace and the TKG Cluster name (4) to proceed.
When the cluster is green, meaning everything is up and running, you should proceed.
4. Create an NGINX Deployment
Creating a Pod in a TKG Cluster isn’t hard, it’ll work out of the box. But when creating a Deployment, for example, it’ll not work. We’ll hit the configured Pod Security Policy of VMware, because Service Accounts are utilized by Deployments. The Deployment will be created, but it won’t finish. When deploying Kubeflow we’ll fix this issue, too, so don’t stop reading now.
Let us connect to the freshly created TKG Cluster with the kubectl-vsphere plugin and the following command.
- Let us connect to the freshly created TKG Cluster with the kubectl-vsphere plugin and the following command.
kubectl vsphere login --server=<supervisor-ip> \
--vsphere-username <your-configured-user@<your-domain> \
--tanzu-kubernetes-cluster-namespace=<your-namespace> \
--tanzu-kubernetes-cluster-name=<your-TKG-Cluster-name>
The supervisor-ip is the same as the last one! It’ll handle authentication and authorization for you!

When you see this output message, you can proceed, kubectl is already configured to use the correct context. It’s still possible to switch out of the TKG Cluster back into the Supervisor Cluster, but that’s not necessary for us. Checking cluster health is free and fast, therefore type the following command for one last check.
kubectl get nodes

Create a Role Binding between Service Accounts and a new namespace
Full blown explanation for Pod Security Policies (PSP) is surely not my goal here. We’ll take the already specified PSP, attach them to all created Service Accounts (SA) from a new namespace (ns).
- Obtain all available PSP
kubectl get psp

- Create a new namespace, save this name for later
kubectl create namespace test
- Create a Role Binding between SA and PSP in the freshly created test namespace. Focus on the highlighted lines!
cat << EOF > test-rb.yaml
kind: RoleBinding
apiVersion: rbac.authorization.k8s.io/v1
metadata:
  name: rb-all-sa_ns-test
  namespace: test
roleRef:
  kind: ClusterRole
  name: psp:vmware-system-privileged
  apiGroup: rbac.authorization.k8s.io
subjects:
- kind: Group
  apiGroup: rbac.authorization.k8s.io
  name: system:serviceaccounts:test
EOF

kubectl apply -f test-rb.yaml

rm test-rb.yaml
- With that RoleBinding each SA of the NS test will have a privileged PSP attached. Proceed with your deployment.
kubectl run nginx --image=nginx
Final thoughts
This was a rather long post with many potential problems. They may or may not occur. I’m going to create a special post with some erros I’ve hit. Let’s be honest, it’s not a script, you may forget something, overread a sentence or whatever!
Additionally I’m not advising for any set up security in this post, especially regarding Pod Security Policy, please check this topic out for yourself!
Recent Comments