
Welcome back to the third of four planned blogposts. This one is quite a bit longer, because we need to understand many technical issues. This is rather a deep dive into understanding Kubernetes and/or Kubeflow internals than a vSphere deep dive. Nevertheless, it’s necessary for a working Kubeflow installation whether or not you’re running it in the cloud or on-premise.
What to expect
You’ll get an understanding of the Kubeflow process. Some expertise is gained regarding Kale. We’ll need to extend Kubeflow functionality with custom images. All the Code is accessible here, licensed under Apache 2.0. The last step is tying everything together in as few steps as possible.
If you want to solely install the extension, I’ll refer you to the end of the Blogpost.
Table of contents
- “Installing” Kale in Kubeflow
- Process deep dive of Kale with Kubeflow
- Fixing access to KFP from Notebooks
- Enabling istio sidecar injection into, by Trial generated, Pods
- Enabling access from by Trial generated Pods
- “Graceful” shutdown of the istio sidecar, after completion
- Improving robustness of the Kale library
- Wrapping Everything up
- Running the first simple pipeline as a Katib experiment
1 Installing Kale in Kubeflow
This step is rather easy, as arrikto provides an image, which we can utilize:
gcr.io/arrikto/jupyter-kale:v0.5.0-47-g2427cc9
This is put as the image within the Kubeflow Notebooks UI, when creating a new Notebook. There may exist newer images!
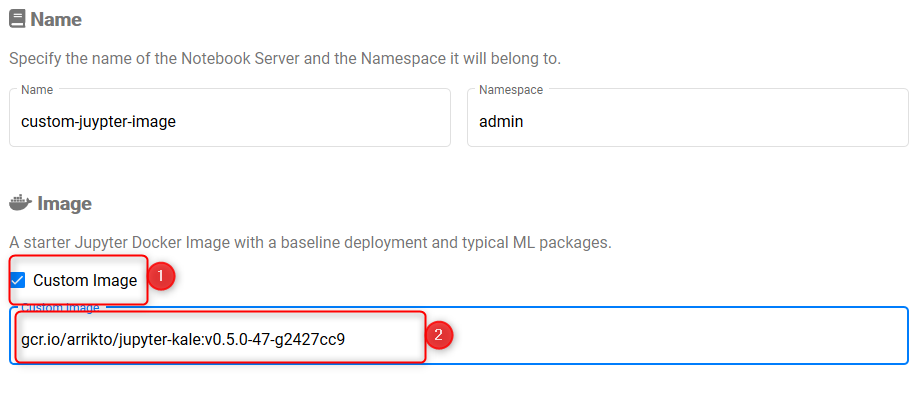
Utilize a custom image in Kubeflow Notebooks
2 Process deep dive of Kale with Kubeflow
In our first post, I’ve highlighted, how Kale interacts with Kubeflow:
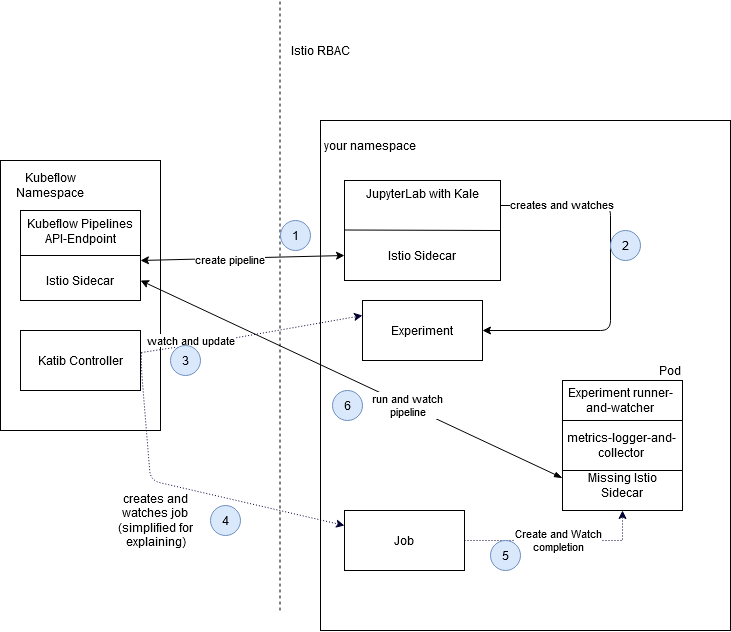
simplified Kale-Katib process
The whole process is now described in a greater detail:
2.1 Create the POD for execution of an Experiment!
We’re in our Jupyerlab working with Kale, pressing the button for creation of a Katib Experiment. We get back an identifier for example PIPELINE-XYZ.
Now the second phase begins, “access” to Katib. Kale will create an Experiment-Katib-Resource. The default-editor service-account is authorized for creation of the aforementioned resource.
An Experiment contains a Trial specification, telling how a Trial should be built, and where later parameter suggestions should be inserted.
Katib spawns a Suggestion Pod; Suggestions are necessary, because you’ll run multiple Trials, where you want to explore the best possible parameter for your model.
Suggestions were found, Katib is ready to create the first Trials. When a Trial is created, the Trial spec from the experiment is utilized, and Suggestion output is put into the Trial.
The Trial contains a run specification, defining how the Job should look, that is spawned and watched. The Job creates a Pod, which finally executes the machine learning code, producing results. These Results are taken by the Suggestion-pod to create educated guesses on the next Trial.
Now it’s possible, that we could run our own ML-code within that Pod. That’s not necessary, as we’ve already created a Pipeline. Our code of the pod solely consists of executing the KFP, and watching it. When the pipeline finishes, the metrics are collected and send to the katib database, this all is done automatically.
The final Pod consists of three containers. Container one is our python code, writing logs and data into a special place. Container two of the pod is the metrics collector, waiting for the first container to finish, when finished, data is collected out of the file, in which logs were written into.
2.2 Trial to Pod
Let’s dive a bit deeper from Trial to Pod. The Trial solely contains the python call necessary to execute the Kubeflow Pipeline. Where does the metrics collector come from?
Katib has it’s own Admission Webhook. Is a Pod created because of a Trial, it’ll be intercepted.
- The python code of the Pod is wrapped and appended with a stdout redirection into a specific file
- The pod gets the metrics collector container injected
When both containers finished execution, the Pod will shut down. Kubernetes’ Job Controller watches the Pod and registers the completion. The Job is now updated, too. After that, Katib registers the completion of the Job, and updates the Trial. As the Trial has finished, a new Trial may be run, or, if everything has finished, the experiment is completed.
3) Fixing access to KFP from Notebooks
Executing a Kubeflow Pipeline with the DSL is really easy, we’ve got a static access to a default client. “kfp.Client().doWhatever()” is the the call structure. For example, we can pass a Pipeline ID and create a run. Or obtain all experiments.
Unfortunately, this does not work with Kubeflow 1.1 anymore, because
- Access without istio-sidecar to the ml-pipeline service is not allowed
- If the istio-sidecar enabled, then access must be allowed by istio-rbac
- Additionally, if istio-rbac succeeded, ml-pipeline validates for a request header
When we press the button for the creation of a Katib experiment, we’ll encounter our first problem.
The Jupyter Notebook, where the kale extension runs in, has an istio-sidecar injected. But it’s neither istio-rbac authorized, nor it contains the necessary request-headers to pass the ml-pipeline validation step.
The exception looks like this:
ApiException: (403)Reason: ForbiddenHTTP response headers: (<omitted>'server': 'envoy'<omitted>)HTTP response body: RBAC: access denied
Fixit
This problem can be fixed one time, if we execute the temporary solution, which is found here. In short, we need to create two resources.
- In the Kubeflow Namespace an Istio Service Role Binding, allowing access to the ml-pipeline resource for the Service-Account “default-editor” from the namespace, which the pod is running.
- An Envoy Filter, adding an identification header into the request, which is fired against the ml-pipleine service
But we’re not doing this to provide access for a sole user, we want to create these resources dynamically. Fortunately, it’s possible. As explained in an earlier post, we’ll utilize a Watch and a Mutating Webhook. You can find all the necessary code here in this open source repository.
Breaking down the solution into three discrete steps:
- The Watch: when a new Namespace is created, check whether or not a corresponding Profile exists.
- If true; create a Service Role Binding, allowing access to the Service-Account “default-editor” from the new namespace and
- If true; create a new EnvoyFilter, stating that each Pod, which has a specific “kubeflow-extension: true” label, to inject the required authentication header.
- The Watch: when a Namespace is deleted, delete an existing Service Role Binding based on naming convention.
- The Admission Controller: When a new Pod is created, check whether or not it contains the “notebook-name” label. If that’s true, add the “kubeflow-extension“-label.
The application starts, each namespace is listed, all the necessary custom resources (CRs) are created. A new namespace is created, new CRs are put into place. When a new Pod is created, the label is injected, and therefore allowing the access to ml-pipelines.
4) Enabling Istio-Sidecar injection into, by Trial generated, Pods
As described earlier in this Post, access to ml-pipelines-API from another Namespace is not allowed, when no Istio-Sidecar is utilized. The Job starts a Pod, and the Pod has disabled this option. Therefore, the call immediately fails. The container fails, the Pod fails, the Job fails, the Trial fails. All that in a rapid cycle, where debugging is really not that pleasant.
If you’re not that accustomed to yaml, like me, then you won’t immediately guess, that it’s possible to put yaml into yaml. It’s just a little pipe “| indicating that the following, possibly multiline string is a single value for the aforementioned key. Well, this shouldn’t be a problem, but when the surrounding yaml is packed into json (by the kube-apiserver), then the inner yaml IS NOT PARSED, it’s still yaml. yaml in json.
The Experiment, or the TrialSpec both contain this “sidecar.istio.io/inject: false” label-information; we could possibly write an Admission Webhook, parsing json, parsing yaml, fixing the label, putting it back to place, create the jsonpatch etc. etc…
Unfortunately, we can’t just intercept the Pod creation with a Mutating Webhook. There’s no way to set up priority in Mutating Webhooks (except based on the name… but that feels like more hacking, we’ve got enough), and Istio Webhook is run before our Pod Admission Webhook. Mutating the Pod Label was without effect.
Therefore, we’ll write an Admission Webhook for the Job. When the Job has a given label (which we inject on our own, based on trial and experiments) then we’re going to set the istio-inject label to true.
Breaking this section down: We need to change the istio-inject label to true from Pods, which are generated because of a Trial/Experiment.
Caution
A JSONPatch identifies the structure by the “/”-slash separator. You may notice, that the Istio-Sidecar label contains a slash on it’s own. Yes, this a problem, which is fixed easily, if you know the problem. Yaml allows escaping the slash with ~1 (tilde one). This will break down further compatibility of the JSONPatch generator utilized by this project, but it works, for now…
5) Enabling access from by Trial generated Pods
It’s still not working yet, because we only fixed access steps 1 of 3 with enabling Istio-Sidecar injection. The utilized Service-Account is NOT the default-editor, therefore we’re going to change the pod Service-Account. Additionally, the Pod is also missing the necessary label, by which the Envoy Filter will decide, whether or not an identification header should be injected. We’ll reuse our already existing Job Mutating Webhook. It’s only two additional lines of code, cool – look at the function mutateJob!
6) “Graceful” shutdown of the istio sidecar, after completion
As always, fixing one problem creates another problem. In our case, injecting the Istio-Sidecar, which is absolutely necessary, creates a multitude of other problems. The first one is the graceful shutdown of the sidecar. This was really nasty trial and error.
Some Kubernetes and Docker characteristics
- A started container is just a process. When this process is stopped, the container stops. If all container stopped, the pod stops. It’s not possible, to detach a second process, based on the first process of a container, and let that run in the background. The container engines DO NOT CARE. AT ALL.
- If your started process returns anything except 0, your container has “failed”. When you have a call which fails, and it’s not relevant, you’ll ignore this error, like everyone else would. But surprise, it’s possible to set up a Kubernetes Pods in such a way, that it shadow logs every return code. Even though you ignored it, it may be logged in the background, telling Kubernetes the container failed. Workarounds like this one are in itself quite hacky, but doesn’t even work in this combination, because the exit code of the pilot-agent is still written into another file, which is scanned – the exact cause is not yet known to me, maybe because of the termination-log file behavior.
- Docker provides two ways for executing commands, one is the entrypoint, which, when not explicitly set, is used from the Dockerfile. And the cmd Kubernetes does not map these 1-to-1. An entrypoint is the command in Kubernetes and the cmd is args in Kubernetes. Unfortunately, if you do not provide any command and only the args, Kubernetes will hide the command, which is set up in the Dockerfile as an entrypoint.
The actual problem
Istio-Sidecar is not yet working with jobs, because the sidecar won’t shut down. Utilizing the /quitquitquit endpoint of istio will stop the istio process, but not the envoy process… We can and will use pkill.
But when? The first container is useless, because the second does its work, when the first container stopped fully. You can’t just create another process detach it, wait 5 seconds and kill the Istio-Sidecar. Because if the main process finished, the container shuts down, no matter which processes still run. If we kill the istio sidecar, right after the finish of our first container, the following container has not yet done its deed. It’ll hit a connection error.
Although there may be other solutions, we’ve run with the following for the PoC: The Katib Pod contains the second container “metrics-logger-and-collector”. We need to wait till the collector send its data to the corresponding database.
How does the created YAML by Katib look like? Simplified it’s like this:
args:
  - "arg a"
  - "arg b"
The command is missing, there is no program which is called. We can’t just add:
args:
  - arg a
  - arg b
  - ;pkill -f ...
This will result in the following shell command:
./metricscollector "arg a" "arg b" ";pkill -f"
And, rightfully so, the metricscollector can’t parse the argument “;pkill -f”. Where is the “./metricscollector” part defined ? As an ENTRYPOINT within the Dockerfile of the image. We can override the entrypoint with the cmd part of the specification, but we need to rewrite everything into the following structure for it to work:
cmd:
  - sh -c
args:
  - ./metricscollector argA argB; pkill -f ...
The pseudocode
This is done in five steps:
- Collect all arguments from the spec into a single string
- Prepend first argument with “./metricscollector”
- Append first argument with “pkill -f …”
- Append first argument with termination logfile override logic for dismissing the error code
- Add a new command with “sh -c”
Yes. It’s that complicated. It may be easier to watch the process from another, fourth container, but we’ve chosen this way for now.
7) Improving robustness of the Kale library
Actually, we can utilize Kale at this moment. It’s fully functional, up and running, with some… minor annoyances. Not exactly because of Kale, but rather because of Istio. Istio promises to be the solution for network-related problems, i.e. retrying failed connections, without the client knowing about this. Sounds really great, until it doesn’t work. What does happen? It seems, that configurations are periodically updated, and the next call will fail. Kale, isn’t programmed with robustness in mind. Retrying is done immediately, connection still not up and running. The utilized urllib library retries three times without any back off time. The call fails, the container fails, the trial failed. But the pipeline is still up and running. This bug seems to be fixed in newer Istio versions.
Let’s check the Kale source code for a better knowledge. The started Pod does work in the following way: Create a Pipeline run with the defined parameters; check every 30 seconds whether or not the run is finished; when finished collect the metrics. Now imagine, you’ve got a 30-hour single iteration machine learning project. In there a single call every 30 seconds may fail, without even contributing to the project. That’s not acceptable, not at all. The offending root cause is the following method:
def get_run(run_id: str, host: str = None, namespace: str = "kubeflow"):
    client = _get_kfp_client(host, namespace)
    return client.get_run(run_id)
Although, wrapping this call did not yield the expected result. Therefore, we took the second-best method:
def _wait_kfp_run(run_id: str):
    while True:
        time.sleep(30)
        run = get_run(run_id)
        status = run.run.status

        if status not in KFP_RUN_FINAL_STATES:
            continue

        return status
This is stripped down method for the essential content. We call the get_run method; this call fails. We need to wrap it with try: except, resulting in the linked code here.
The dirty little utilized python hack
You should know about the Python concept, that nearly everything is an object. When you import a module, you’ll have an object. The object has members, such as functions. But these are hidden behind the function name, which is solely a reference to the actual function. Even a function is an object. Its possible to replace a function from a module with your own code by assigning a new function to the function name. After that, each call to the original function will call your replaced function. Quite cool, quite hacky. You really shouldn’t utilize that functionality, rather fix the underlying issue, i.e. istio dropping connections. We did it for the PoC. Remember, all this may be obsolete with the next Kubeflow iteration.
Kale container workflow
The main container of the Katib Pod has the following spec, simplified for explanation:
cmd:
  -sh
  - -c
args:
  - "python3 -c 'import kfputils; kfputils.create_and_wait_kfp_run(…)'"
now it’s necessary to inject our fixed code right before this import statement.
Actual implementation
We’ve written a Pod Admission Webhook hooking into the creation of Pods. These Pods are already labeled by our Job Admission Webhook. This is the reason why identification is simple. When a Pod is created, we’ll check out the labels, if a label is found, obtain the container running the python code. Search and replace for the import statement and place the code-fix right before. Create a JSONPatch and send it back to the kube-apiserver.
8) Wrapping everything up
Now we’ve written our cool Application, but how… do we deploy it? Rather than an in-depth tutorial I’ll provide a short explanation, and refer to the README on how to do it in the project. If you need some additional guidance, read the corresponding part of this post – Installation, as they’re nearly identical.
The short text-summarization for installation:
First of all, we build the project and provide and create a Dockerimage. This is pushed to docker.io (or the registry you’d like to utilize). We have an Admission Webhook, therefore we need mutual TLS. We need to create some RBAC rules for Kubernetes to obtain access to e.g. the Namespaces or the EnvoyFilter. After that, we create a Deployment which will load the earlier created Dockerimage. The resources are all applied. Now we’ll ready to obtain the root ca of the deployed container, and exchange these within the Mutating Webhook Resource. This file is pushed too, and the program is finally installed.
9) Running a simple Katib experiment
For tests sake, we’ll run a simple experiment:
By now your JupyterLab Pod should be created and you should be allowed to connect, create a new Python file and follow each step:
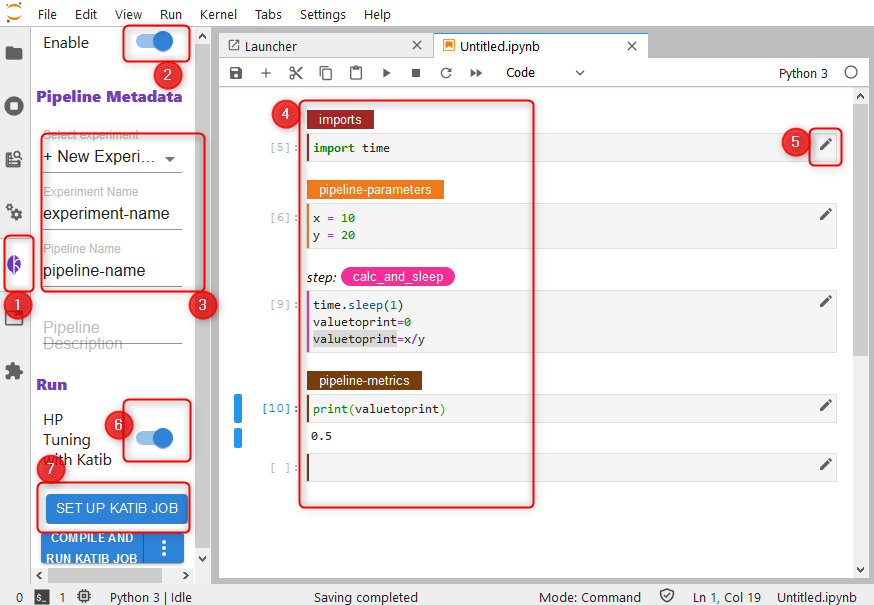
step by step utilization of Kale with a Katib Experiment
- click the Kale extension panel.
- Enable the Kale extension
- Name your experiment and pipeline
- Create all Cells, they must be divided like displayed
- Edit each cell. You must tell Kale, which cell does what
- Enable HP Tuning with Katib in the Kale panel
- Set up HP Tuning with Katib
This will lead to the following window:
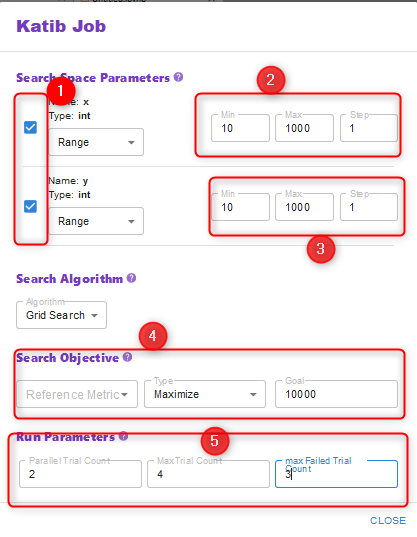
Setting up the Katib configuration
- Set up both search space parameters, which you desire to modify
- Tell Katib the search space of these parameters
- Same as in 2
- Set up the search objective, i.e. maximize the final reference metric “valuetoprint”
- Instruct Katib to utilize 2 experiments in parallel with a maximum of 4 Trials. Stop when 3 trials failed.
And now we’re ready for execution.
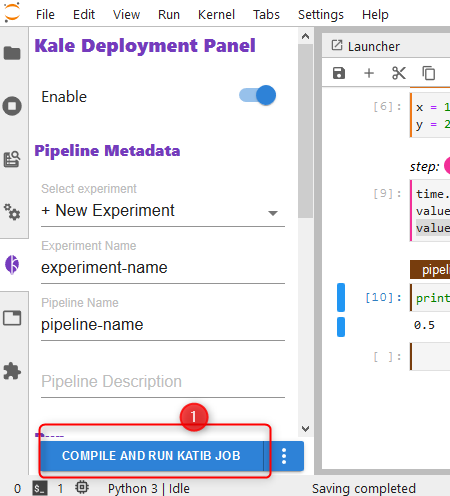
Run the Katib Experiment
Finally
This was a REALLY long blogpost, kinda technical. I’m glad you read everything. If you found that interesting and you have some idea for improvement, I’d like to hear about optimization possibilities ?.
I hope you enjoyed this post. Feedback is welcomed and with that said, have a great day!
Recent Comments