
Deploying default Kubeflow into a TKG Cluster within vSphere
I’m glad that you’re here (or back)! This is the fourth blogpost of the Kubeflow series. Last week we’ve deployed NGINX in a TKG Cluster! Today we will access the Kubeflow Dashboard and check out the functionality of Kubeflow Notebooks and Pipelines. Spoiler: It works!
What are you going to learn?
First and foremost, you’ll deploy Kubeflow and can access the most important functionality for testing purposes, giving your teammates access to bleeding edge technology. Actually, you CAN already instrumentalize your hardware for Machine Learning. Additionally, you’ll get to know different techniques on how to tweak your Kubeflow installation. Furthermore, you’ll learn to read some errors your Kubeflow installation may throw!
Content of this Blogpost
This post contains much more code than the last chapters. I’ll try to find a good balance with my explanations. The code must be fleshed out on your behalf. For instance, I’m utilizing a bash terminal (rather zsh, but that should be mostly compliant code). The code is rather fragile, because it depends on many variables (e.g. your chosen virtualmachineimage).
The following list displays all necessary steps for completion:
- What’s necessary for following this tutorial
- Starting the TKG Cluster
- Patching the API-Server
- Preparing/configuring Kubeflow
- Installation of Kubeflow
- Post installation configuration
- Initial Kubeflow connection
- Checking Pipelines
- Checking Jupyter Notebooks
At some points I’ve redeclared already used variables. Just for the sake of clarity in the code block!
1. What’s necessary for following this tutorial
All code snippets assume, that you have access to some crucial infrastructure. If you are not exactly sure what I’m talking about, I propose to you reading the other parts of this series (They’re not that long!).
- your work machine (e.g. an Ubuntu VM) can ping your Workload Management Supervisor Cluster
- you can log yourself into the Workload Management Supervisor Cluster as a vSphere Admin (if you want to create a new TKG Cluster).
- your work machine has the kubectl and kubectl-vsphere binaries
- you’ve got a namespace in the supervisor cluster where you are going to deploy this TKG Cluster
2. Starting the TKG Cluster
The last post explained in depth how we created a TKG Cluster. Please refer to this post for further information! I’m utilizing the already created namespace from there, so I’ve got a place for deployment.
#obtain storage class via "kubectl get sc"
storageclass=gold-tanzu-kubernetes-storage-policy
#obtain virtualmachineclass via "kubectl get virtualmachineclasses"
vmclass_cp=guaranteed-medium
vmclass_worker=guaranteed-xlarge
#obtain virtualmachineimage via "kubectl get virtualmachineimages"
vm_image=v1.17.8+vmware.1-tkg.1.5417466
#your namespace
namespace=kubeflow-ns
#your cluster name
clustername=kubeflow-tkg
#ip of workload management cluster ip
supervisor_ip=10.4.10.1
#utilized username for logging into the cluster
username_and_domain=administrator@vsphere.local

#export some tkg relevant variables
export CONTROL_PLANE_STORAGE_CLASS=$storageclass
export WORKER_STORAGE_CLASS=$storageclass
export DEFAULT_STORAGE_CLASS=$storageclass
export STORAGE_CLASSES=
export SERVICE_DOMAIN=cluster.local #this is necessary, do not change!
export CONTROL_PLANE_VM_CLASS=$vmclass_cp
export WORKER_VM_CLASS=$vmclass_worker
export SERVICE_CIDR=100.64.0.0/13 #use whatever you want to
export CLUSTER_CIDR=100.96.0.0/11 #use whatever you want to

#clean up old tkg settings
rm -f ~/.tkg/config.yaml

#setup tkg again (done in earlier posts)
kubectl vsphere login --server=$supervisor_ip \
--vsphere-username $username_and_domain
#proceed, when logged in
kubectl config use-context $supervisor_ip
tkg add mc $supervisor_ip
tkg set mc $supervisor_ip

#create TKG Cluster
tkg create cluster $clustername --plan=dev --namespace=$namespace \
--kubernetes-version=$vm_image --controlplane-machine-count=1 \
--worker-machine-count=7
Unfortunately, TKG has some actual obstacles, which forces us to utilize more workers than we intend to. Why do we need 7 worker machines? We technically don’t. However, at this point in time (2020-09-17 – yyyy-mm-dd) vSphere does not allow us to create custom virtualmachineclasses. I’ve tried, and I’ve failed. Therefore, I assume we can’t manipulate the available resources for the created TKG control and worker nodes. We’ve got a fixed limit, we can’t change it.
With 3/5 worker nodes I’ve hit storage errors on my Kubeflow installation. (Eviction of Pods, no more images could be downloaded etc.).
It’s still possible to utilize only three, but this requires manual configuration and a reboot of each worker node on each of the ESXi Hosts, directly. (Search WorkerNodeVM > Edit settings > Change storage size > reboot).
For simplicity of this tutorial, we’ll proceed the easy way: just scaling the worker nodes.
Wait for the deployment of the TKG Cluster.
3. Patching the API-Server
Why do we need to patch the API-Server?
Kubeflow provides multiple installation methods. Istio is part of the chosen way. Istio with Kubeflow requires the configuration of Trustworthy JWTs. This configuration is done via command line flags while starting the API-Server. TKG utilizes kubeadm, which configures this server. We can’t access the creation process; therefore, we need to change the configuration of the API-Server by hand. Kubeadm puts ConfigMaps within Kubernetes, however, changing them is without effect. Kubeflow proposes changing a file within the node, where the api-server is installed. In other words, we need to manipulate each controlplanenode).
How do we do this?
Earlier versions of TKG clusters allowed accessing them via SSH, this is not working anymore (the architecture did not change on our side; this is the reason why I assume it was disabled on the direct way. The reason is unknown to me).
We can reach our goal on different ways. One would be doing everything by hand, via browser and the other one is a nested ssh script solution. We focus on the second way.
Programatically patching the API-Server via nested Pod
Each node of the TKG cluster has two IPs for access. One is the „API-Server“ IP, which we talk to with our kubectl commands, and the other IP is a Kubernetes internal IP, which the created Pods talk to. In other words, we’ve got the public and the private IP.
Directly SSH’ing into the nodes via the public IP is not working. But it’s possible via a Pod from the internal network.
In conclusion of the upcoming code: We create a Pod with an ubuntu VM, this one can ssh into the control plane nodes and manipulate the kube-apiserver.yaml files.
supervisor_ip=10.4.10.1
namespace=kubeflow-ns
clustername=kubeflow-tkg
username_and_domain=administrator@vsphere.local

#log into tkg-cluster
kubectl-vsphere login \
--vsphere-username=$username_and_domain  \
--server=$supervisor_ip \
--tanzu-kubernetes-cluster-namespace=$namespace \
--tanzu-kubernetes-cluster-name=$clustername
#step 1 obtain pw of node on supervisor cluster
kubectl config use-context $supervisor_ip
pw=$(kubectl get secret ${clustername}-ssh-password -o jsonpath='{.data.ssh-passwordkey}' -n $namespace| base64 -d)

#step 2 obtain ips from control plane nodes within the private kubernetes network
kubectl config use-context $clustername
node_ips=$(kubectl get nodes -o jsonpath=\
"{range .items[*]}{.metadata.name}{'\t'}{.metadata.annotations.projectcalico\.org/IPv4IPIPTunnelAddr}{'\n'}" \
| grep control-plane | awk '{print $2}')

#step 4 create POD with ubuntu container in TKG Cluster
cat << EOF | kubectl apply -f -
apiVersion: v1
kind: Pod
metadata:
  name: ubuntu
spec:
  containers:
  - name: ubuntu
    image: ubuntu:focal
    command:
    -  sh
    -  '-c'
    -  "while true; do echo working; sleep 100; done;"
EOF
kubectl wait --for=condition=Ready --timeout=300s pod/ubuntu

#this last step is rather ugly. because we ssh multiple levels and use
#variable substitution in different hosts, so we sometimes break up double quotes and use single quotes.
kubectl exec ubuntu -- bash -c "\
{
#install necessary tools
apt update
apt upgrade -y
apt install -y sshpass openssh-client
pw=$pw

for node in ${node_ips[@]}; do
  "'#use inner variable substitution
    sshpass -p $pw  ssh -o "StrictHostKeyChecking=no" vmware-system-user@$node \
    '\''apiServerFile=/etc/kubernetes/manifests/kube-apiserver.yaml; \
    sudo sed -i "s,- --tls-private-key-file=/etc/kubernetes/pki/apiserver.key,- --tls-private-key-file=/etc/kubernetes/pki/apiserver.key\n\    - --service-account-issuer=kubernetes.default.svc\n\    - --service-account-signing-key-file=/etc/kubernetes/pki/sa.key," $apiServerFile '\''
  '"
done;
}"
kubectl delete po ubuntu
4. Preparing Kubeflow
This section contains information on HOW Kubeflow can be configured. Each step is necessary or your Kubeflow installation will later not work as expected. The WHY is given on each step.
Download kfctl and prepare for customization
Most information is taken from the official installation guide.
function download_and_unpack_kubeflow() {
  echo "downloading kfctl and exporting path"
  # Add kfctl to PATH, to make the kfctl binary easier to use.
  # Use only alphanumeric characters or - in the directory name.
  rm -rf /tmp/kube/kfctl_tmp
  rm -rf /tmp/kubeflowtmp/
  mkdir -p /tmp/kube/kfctl_tmp
  cd /tmp/kube/kfctl_tmp
  wget https://github.com/kubeflow/kfctl/releases/download/v1.1.0/kfctl_v1.1.0-0-g9a3621e_linux.tar.gz
  tar -xvf kfctl_*.tar.gz
  rm kfctl_v1.1.0-0-g9a3621e_linux.tar.gz
  export PATH=$PATH:"/tmp/kube/kfctl_tmp"
}

function create_local_kubeflow_kustomize_build() {
  echo "creating initial install suite for kubeflow"
  # Set the following kfctl configuration file:
  export CONFIG_URI="https://raw.githubusercontent.com/kubeflow/manifests/v1.1-branch/kfdef/kfctl_istio_dex.v1.1.0.yaml"
  # Set KF_NAME to the name of your Kubeflow deployment. You also use this
  # value as directory name when creating your configuration directory.
  # For example, your deployment name can be 'my-kubeflow' or 'kf-test'.
  export KF_NAME=kf-devenv

  # Set the path to the base directory where you want to store one or more
  # Kubeflow deployments. For example, /opt.
  # Then set the Kubeflow application directory for this deployment.
  export BASE_DIR="/tmp/kubeflowtmp"
  export KF_DIR=${BASE_DIR}/${KF_NAME}

  mkdir -p ${KF_DIR}
  cd ${KF_DIR}

  # Download the config file and change default settings.
  kfctl build -V -f ${CONFIG_URI}
  export CONFIG_FILE="${KF_DIR}/kfctl_istio_dex.v1.1.0.yaml"
}

download_and_unpack_kubeflow
create_local_kubeflow_kustomize_build
Customize Kubeflow installation
Here are all necessary steps for customization of the Kubeflow installation. Some of these I’ll do upfront, some are done post installation. This decision is based on when what is easier. Additionally, you’ll get to know different tools in your belt for fixing problems of Kubeflow.
- Patch knative deployment errors
knative will not be deployed, because the application checks against the Kubernetes version. This check is not working with the „v1.XX+vmware.1“ style of vSphere. knative proposes setting an environment variable, which we will do upfront, before installation. - Setup namespaces and PodSecurityPolicies
Multiple namespaces are created, and each Deployment in these isn’t going to start up without proper PodSecurityPolicies. - Patching argo.
When utilizing kubeflow pipelines, argo is used. Argo will fire up containers. Argo will search for docker, vSphere does not utilize docker in the worker nodes, it’s containerd. Skipping this step won’t allow any pipeline job to be run. It’s done post installation - patching istio
this step could be done theoretically upfront with kustomize, but I prefer doing it when I’m creating certificates etc. for https access later on, everything at the same time. - Creation for production namespaces with PodSecurityPolicies
When working with Kubeflow, we can create our own namespaces. This will be highlighted in upcoming posts. First and foremost, I’m going to show you what happens, when you DON’T follow the official guide.
How does kfctl work?
Kfctl utilizes kustomize.
It is like building with lego. You’ve got many building blocks, but don’t utilize everything. e.g. in AWS you’ll need different building blocks / configuration.
kfctl downloads every building block, and prepares a „recipe“. This recipe tells kfctl which blocks you want to utilize, and where you are going to configure these blocks, i.e. should this block be red, or green. Should I use static authentication or do I want to use my active directory.
the building blocks are found here:
$kfdir/.cache/...
Kubeflows recipe is this file:
$kfdir/kfctl_istio_dex.*.yaml
Further customization of chosen building blocks is done in this directory
$kfdir/kustomize/**
Let’s take a look at a part of the recipe file.
#---skipped---#
spec:
  applications:
  - kustomizeConfig:
      repoRef:
        name: manifests #where are my building blocks
        path: namespaces/base #which of the building blocks
    name: namespaces #where can I further customize the building block
#---skipped---#
  - kustomizeConfig:
      repoRef:
        name: manifests
        path: stacks/kubernetes
    name: kubeflow-apps
#---skipped---#
The other parts are rather irrelevant. Each building block is created with one - kustomizeConfig
-repoRef nameis always the same, don’t worry about that. It contains the base building blocks in.cache-repoRef -pathtells which building block from.cacheyou want to use and further customize. It’s base path is in.cache/manifests/manifest*/. In other words, namespaces kustomizeConfig would refer to the path.cache/manifests/manifest*/namespaces/base/kustomization.yaml-kustomizeConfig -nametells Kubeflow, where you want to place your additional configuration in$kfdir/kustomize/name/kustomization.yamland places all the relevant code in there
With that understanding, you can slowly crawl through every component of the recipe file and check out, what kustomizations are applied. For example Kubeflow-apps part of kfctl_istio*.yaml refers to multiple components, e.g. argo. When we would like to further manipulate argo, we’d configure $kfdir/kustomize/kubeflow-apps/kustomization.yaml
Now the last step for understanding is, how kustomize does work exactly. This is out of my scope, but I’ll briefly explain it, so the presented code does make sense. We need to tell the kustomization.yaml WHICH patch we want to apply, where it refers to a patch-file. And the patch file either contains a normal Kubernetes .yaml declaration of any kind. This is merged with the already existing one. Another way is utilizing json patches. This is for deeply nested structures. The code contains both ways.
Create namespaces (NS) and PodSecurityPolicies (PSP)
The predecessor of this post contains all information on why PSPs are needed. The following script creates one for each NS and the corresponding namespace, when not yet created. Kubeflow is a bit special, because it has added labels.
Some patches could be put at different places. But this may not work because of time dependencies. kfctl wont proceed, when e.g. a namespace is not yet created. On the other hand, when the rolebindings are created too late, kfctl won’t proceed, too. This is because some pods must to be up and running, e.g. cert-manager, before kfctl will proceed.
When you’re really unlucky, you’ll hit hard to debug errors, e.g. knative wont run, because PSPs were created too late, but no PSP errors show up.
function create_psp_yaml_file() {
  patch_path=$1
  which_namespace=$2
  echo "creating pod security policy for $which_namespace in $patch_path "

if [ "$which_namespace" = "kubeflow" ]; then
    cat << EOF >"${patch_path}/${which_namespace}-rb.yaml"
apiVersion: v1
kind: Namespace
metadata:
  name: $namespace
  labels:
    control-plane: kubeflow
    istio-injection: enabled
---
EOF
else
  cat << EOF >"${patch_path}/${which_namespace}-rb.yaml"
apiVersion: v1
kind: Namespace
metadata:
  name: $namespace
---
EOF

fi
  #create rb yaml file for each namespace
  cat << EOF >>"${patch_path}/${which_namespace}-rb.yaml"
kind: RoleBinding
apiVersion: rbac.authorization.k8s.io/v1
metadata:
  name: rb-all-sa_ns-$which_namespace
  namespace: $which_namespace
roleRef:
  kind: ClusterRole
  name: psp:vmware-system-privileged
  apiGroup: rbac.authorization.k8s.io
subjects:
- kind: Group
  apiGroup: rbac.authorization.k8s.io
  name: system:serviceaccounts:$which_namespace
EOF
  return $?
}

function update_kustomization_file() {
  kustomization_file_path=$1
  cat << EOF >> "${kustomization_file_path}"/kustomization.yaml
- ${namespace}-rb.yaml
EOF
}

function create_patches() {
  certmanager_patch_patch="kustomize/application"
  #identified namespaces
  namespaces=(auth knative-serving istio-system kubeflow cert-manager)

  for namespace in "${namespaces[@]}"; do
    create_psp_yaml_file ${certmanager_patch_patch} "${namespace}"
    update_kustomization_file $certmanager_patch_patch
  done
}

create_patches
Patch knative deployment errors
knative contains 6 deployments, each one containing a container where we need to add the environment variable with the fixed MINIMUM KUBERNETES version into the yaml.
Therefore, we create 1 patch operation (it’s identical for all), followed by telling kustomize to patch 6 targets, with the given patch operation.
#KUBERNETES_MIN_VERSION
#is based on the utilized virtualmachineimage we've declared earlier for the tkg cluster
#but it differs significantly from the provided string, obtain
#the necessary version value via kubectl get nodes -o wide
#in the corresponding tkg cluster

function create_knative_patch_file() {
  kub_version=$(kubectl get nodes | awk '{print $5}' | tail -n 1)
  echo 'creating patchfile'
  cat << EOF > kustomize/knative/knative-deploy-patch.yaml
- op: add
  path: /spec/template/spec/containers/0/env/-
  value:
    name: KUBERNETES_MIN_VERSION
    value: $kub_version
EOF
  return $?
}

function add_patch_segment() {
  echo "adding $comp patch"
  comp=$1
  cat << EOF >>kustomize/knative/kustomization.yaml
- path: knative-deploy-patch.yaml
  target:
    group: apps
    version: v1
    kind: Deployment
    name: $comp
    namespace: knative-serving
EOF
  return $?
}

function patch_knative_deployment_errors() {
  if create_knative_patch_file ; then
    echo "created knative patch file "
  else
    echo "could not create knative patch file "
    return 1
  fi

  echo "creating patch header "
  cat << EOF >>kustomize/knative/kustomization.yaml
patchesJson6902:
EOF

  # shellcheck disable=SC2181
  if [ $? -eq 0 ] ; then

    echo "creating kustomize file with patches "
    #kubeflow has 6 components, which we need to patch
    list=(activator autoscaler autoscaler-hpa controller networking-istio webhook)
    for comp in "${list[@]}"; do
      if ! add_patch_segment "$comp"; then
        echo "Could not create patch component for $comp "
        return 1
      fi
    done
  else
    echo "Could not write to file kustomize/knative/kustomization.yaml should clean up created knative-patch-file "
    return 1
  fi
  return 0
}

patch_knative_deployment_errors
5. Installation/Deployment of kubeflow
Preinstallation customization for Kubeflow is finished, only some steps are remaining! Deploy our configuration to Kubernetes and wait for installation success!
function apply_kubeflow_kustomize() {
  #we exported it already, but to make sure it's working..
  export KF_DIR=${BASE_DIR}/${KF_NAME}
  #config file is from earlier..
  export CONFIG_FILE="${KF_DIR}/kfctl_istio_dex.v1.1.0.yaml"
  echo "installing kubeflow"
  kfctl apply -V -f "${CONFIG_FILE}"
}

function wait_for_kubeflowinstall() {
  counter=0
  while true; do

    num_of_pods_not_running=$(kubectl get po -A -o wide | grep -v "Running" | grep -v -c "Evicted")
    if [ "$num_of_pods_not_running" -lt 3 ]; then
      echo "everything seems to be up and running, next steps can be started! "
      break
    fi

    if [ $counter -gt 100 ]; then
      echo "we waited $((10 * 100 / 60)) minutes, still not every pod is up and running.. please have a look "
        return 1;
      break
    fi

    echo "$((num_of_pods_not_running - 2)) pods are still not ready! "
    counter=$((counter + 1))
    sleep 10
  done
}

apply_kubeflow_kustomize
wait_for_kubeflowinstall
6. Postinstall configuration: Patching Istio
Everything should be up and running, we’re patching istio, so we can access Kubeflow via https and from the outside of Kubernetes.
First, istio will redirect http to https. Secondly, Kubeflow is made accessible from the outside world (set Service to type of LoadBalancer). Thirdly, wait for the IP, when an IP is given by the LoadBalancer, create an SSL certificate with the new IP. Finally, curl the service, waiting for changes to take effect.
function patch_http_redirect_and_enable_https(){
  cat << EOF | kubectl apply -f -
apiVersion: networking.istio.io/v1alpha3
kind: Gateway
metadata:
  name: kubeflow-gateway
  namespace: kubeflow
spec:
  selector:
    istio: ingressgateway
  servers:
  - hosts:
    - '*'
    port:
      name: http
      number: 80
      protocol: HTTP
    # Upgrade HTTP to HTTPS
    tls:
      httpsRedirect: true
  - hosts:
    - '*'
    port:
      name: https
      number: 443
      protocol: HTTPS
    tls:
      mode: SIMPLE
      privateKey: /etc/istio/ingressgateway-certs/tls.key
      serverCertificate: /etc/istio/ingressgateway-certs/tls.crt
EOF
  return $?
}

function expose_with_loadbalancer() {
  kubectl patch service -n istio-system istio-ingressgateway -p '{"spec": {"type": "LoadBalancer"}}'
}

function obtain_kubeflow_lb_ip() {
  kubectl get svc -n istio-system istio-ingressgateway -o jsonpath='{.status.loadBalancer.ingress[0].ip}'
}

function create_kubeflow_certificates() {
  if [ $# -ne 1 ]; then
    echo "ip should be provided.. canceling creating of certificate"
    return 1
  fi

  kubeflowIp=$1
  cat << EOF | kubectl apply -f -
apiVersion: cert-manager.io/v1alpha2
kind: Certificate
metadata:
  name: istio-ingressgateway-certs
  namespace: istio-system
spec:
  commonName: istio-ingressgateway.istio-system.svc
  ipAddresses:
  - $kubeflowIp
  isCA: true
  issuerRef:
    kind: ClusterIssuer
    name: kubeflow-self-signing-issuer
  secretName: istio-ingressgateway-certs
EOF

  return 0
}

function wait_for_kubeflow_to_be_ready() {
  lb_ip=$1
  for i in $(seq 50); do
    if curl -k "https://${lb_ip}/" -v; then
      echo "service is up and running "
      return 0
    else
      echo "service not yet ready waiting some seconds. "
      echo "This was try: $i of 50"
      sleep 10
    fi
  done
  echo "kubeflow is not yet ready.. please retry"
  return 1
}

function wait_for_kubeflow_lb_ip() {
  maxTries=50
  for i in $(seq $maxTries); do
    echo "waiting for ip of loadbalancer; try #${i} from $maxTries "
    ipOfKubeflowService=$(obtain_kubeflow_lb_ip)
    if echo "$ipOfKubeflowService" | grep '^[0-9]\{1,3\}\.[0-9]\{1,3\}\.[0-9]\{1,3\}\.[0-9]\{1,3\}$'; then
      echo "found ip of loadbalancer! "
      echo "using $ipOfKubeflowService "
      break
    else
      if [ "$i" -ge $maxTries ]; then
        echo "Max tries exceeded.. Cancelling operation, check whether or not the IP is given to the service"
        return 1
      fi

      echo "no ip adress yet.. retrying in some seconds "
      sleep 5
    fi
  done
}

function postinstall() {
  patch_http_redirect_and_enable_https
  expose_with_loadbalancer
  if wait_for_kubeflow_lb_ip; then
    ipOfKubeflowService=$(obtain_kubeflow_lb_ip)
    create_kubeflow_certificates "$ipOfKubeflowService"
    wait_for_kubeflow_to_be_ready "$ipOfKubeflowService"
  fi
}

postinstall
Post install: patch argo
For now we need to follow these steps right here. Followed by a restart, everything should be fine! Tell argo to utilize containerd, and restart each Pod.
#patch argo to use pns
kubectl get -n kubeflow configmaps workflow-controller-configmap -o yaml | sed "s/containerRuntimeExecutor: docker/containerRuntimeExecutor: pns/" | kubectl apply -f -

#and restart the deployment
kubectl rollout restart deployment/ml-pipeline -n kubeflow
7. Initial Kubeflow Connection
Everything is up and running! Let’s connect! Obtain the IP first with this code:
kubectl get svc -n istio-system istio-ingressgateway -o jsonpath='{.status.loadBalancer.ingress[0].ip}'
My Kubeflow IP is 10.4.10.3. Open another tab in your browser and call https://10.4.10.3/. Ignore the upcoming warning and proceed.
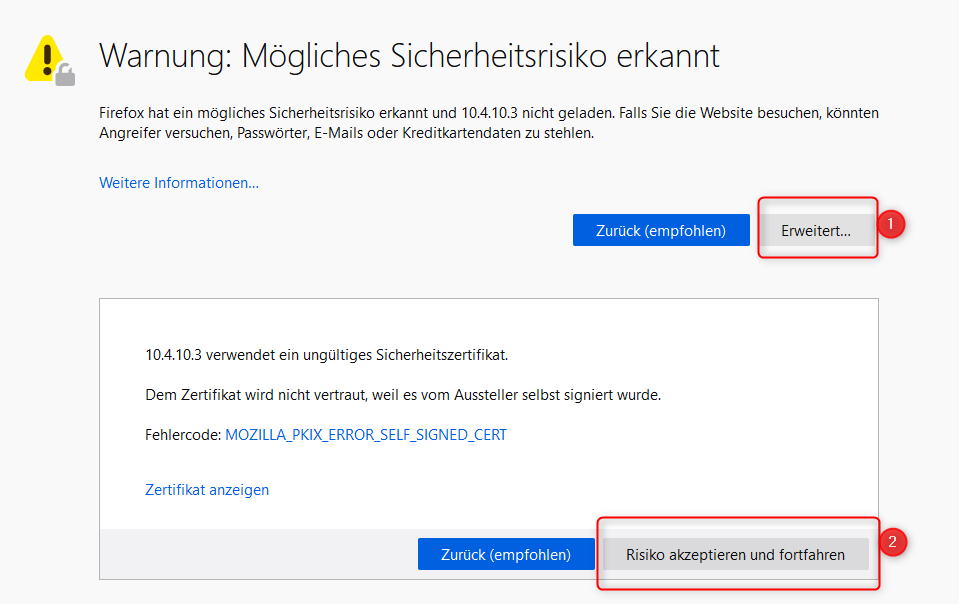
a self-signed certificate warning in German
When connecting the first time to Kubeflow, without further customization of the installation, you’ll see this webpage:
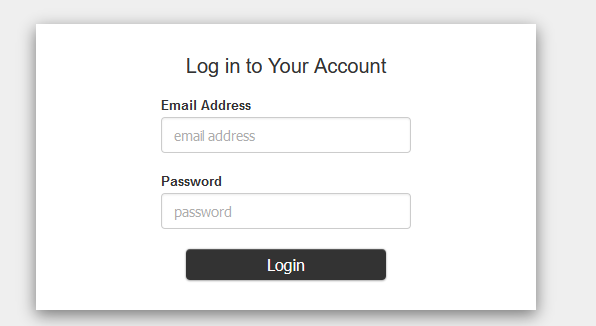
login form of kubeflow
Utilize the default username and passwort: admin@kubeflow.org and the default password 12341234. One of the major goals is to integrate kubeflow into our existing Active Directory. We’ll learn about that within the next posts!
When you’ve logged in, you’ll get an initial setup (which is configurable, too. see here, if you want to work it out for yourself.)
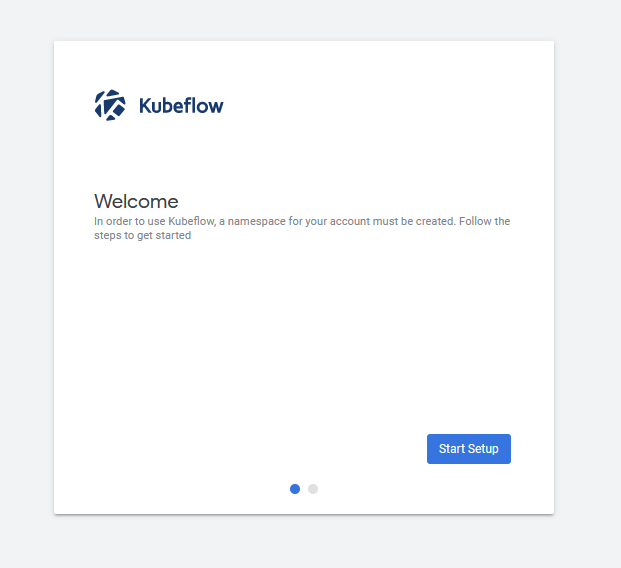
initial Kubeflow setup from kubeflow
Just press Start Setup
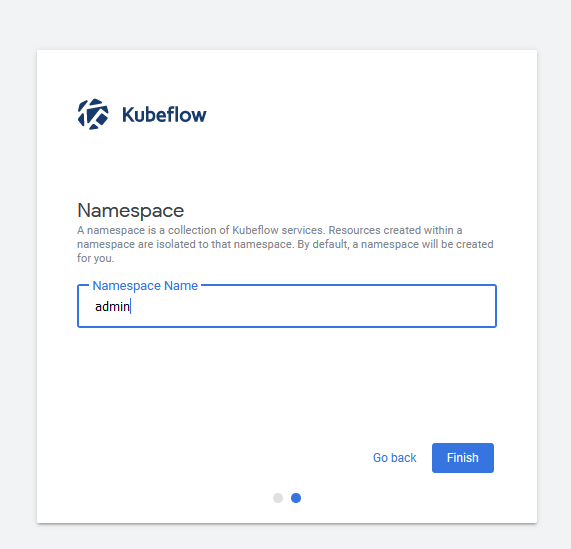
initial Kubeflow setup part 2 with required namespace
I’ve utilized the namespace „admin“ as it’s the default. You may change this, but later scripts require minor tweaks, be cautious, if you copy paste only!
Maybe you’re asking yourself: No PodSecurityPolicy? New namespace? Yes. You’re absolutely right. We need one. Check out the produced errors in the activity tab:
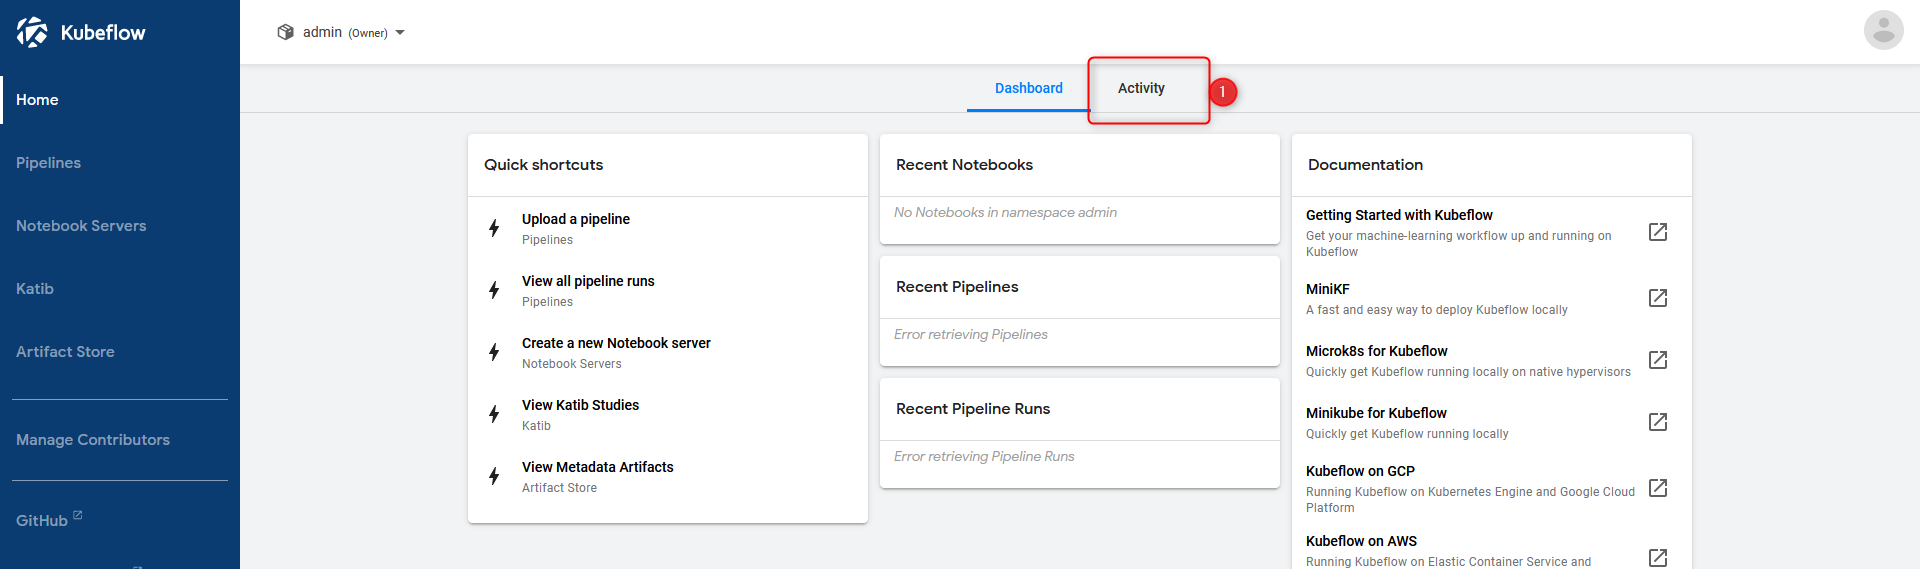
Kubeflow dashboard

activity tab of kubeflow dashboard showing pod security policies errors
Let’s fix this problem with another RoleBinding.yaml:
#fix PSP errors for namespace admin
namespace=admin

  cat <<EOF | kubectl apply -f -
kind: RoleBinding
apiVersion: rbac.authorization.k8s.io/v1
metadata:
  name: rb-all-sa_ns-$namespace
  namespace: $namespace
roleRef:
  kind: ClusterRole
  name: psp:vmware-system-privileged
  apiGroup: rbac.authorization.k8s.io
subjects:
- kind: Group
  apiGroup: rbac.authorization.k8s.io
  name: system:serviceaccounts:$namespace
EOF
Create an example Python Notebook
Let’s check out the functionality of Kubeflow Notebooks!
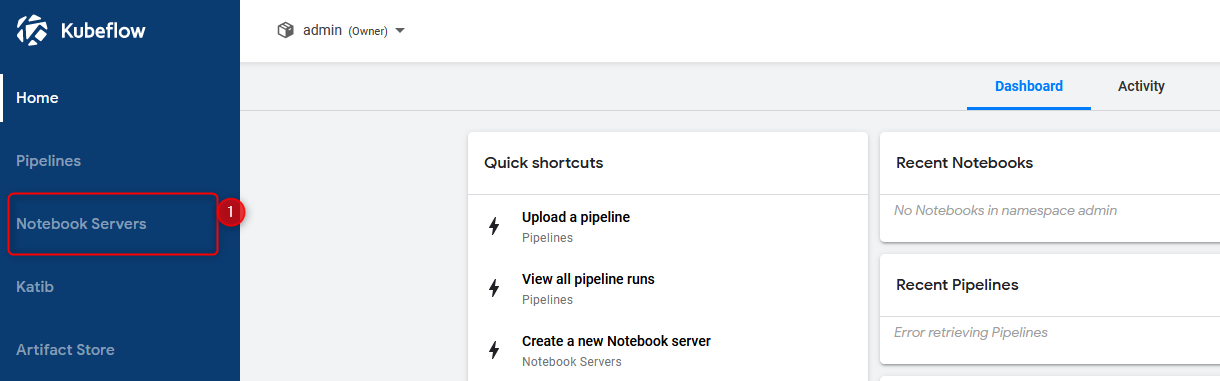
on dashboard click notebooks
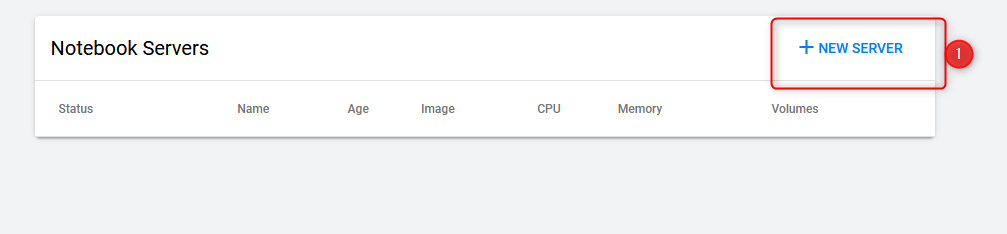
on notebooks click new server
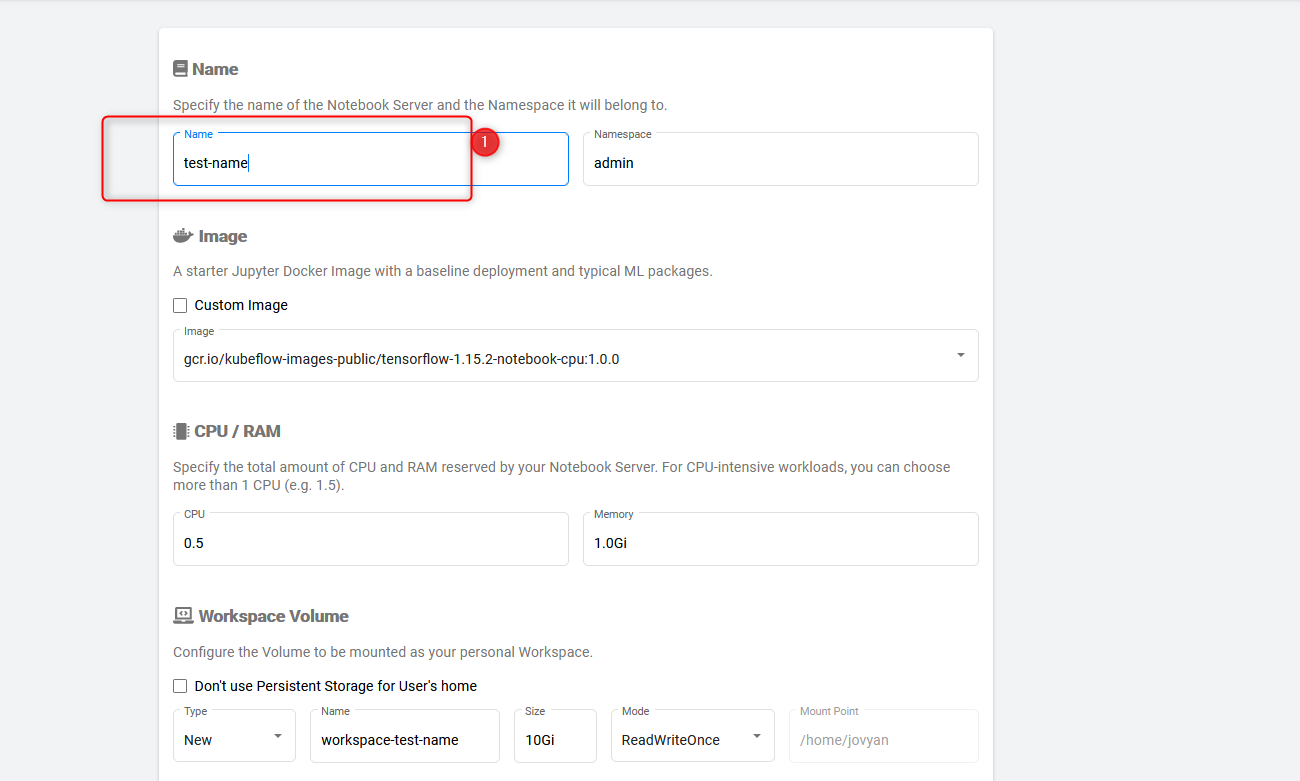
set up a name, e.g. test-name for the notebook
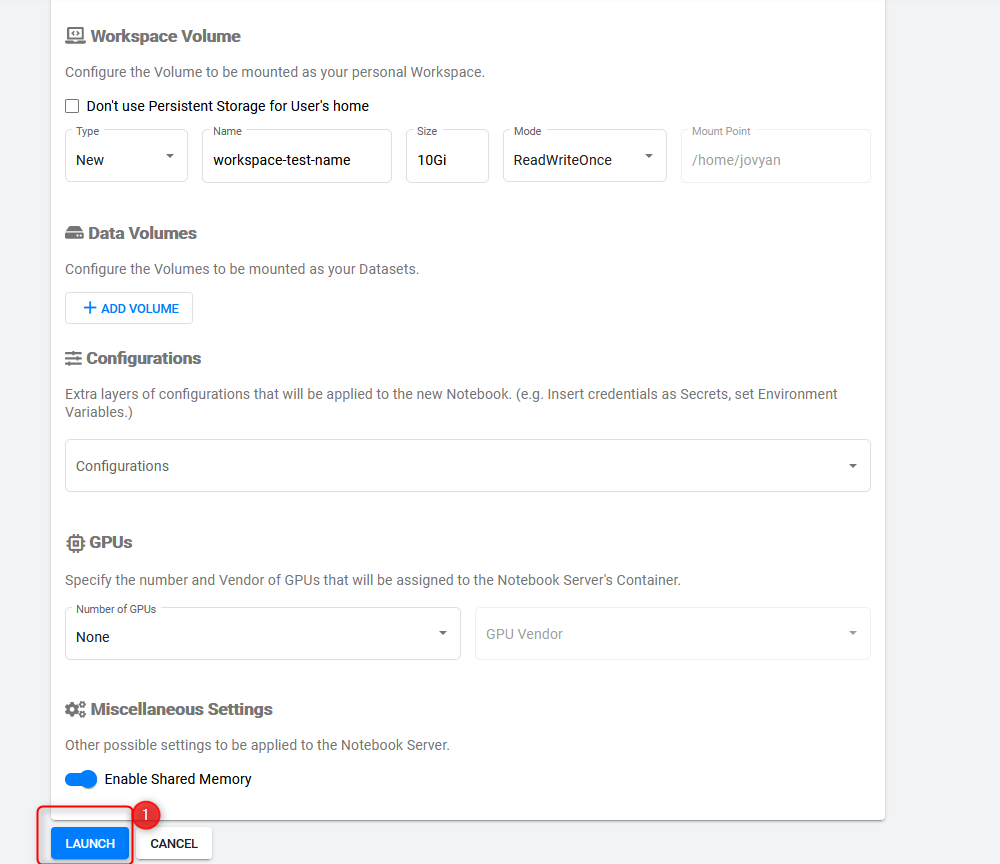
scroll down to launch and fire up the notebook
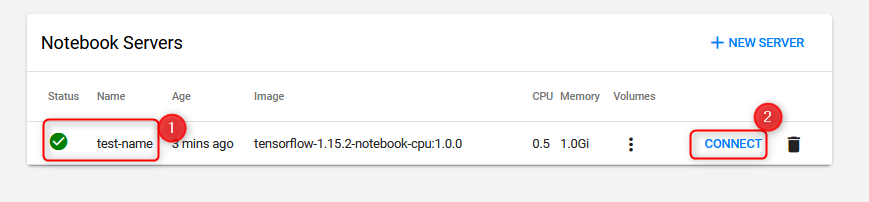
when the notebook status is green, press connect
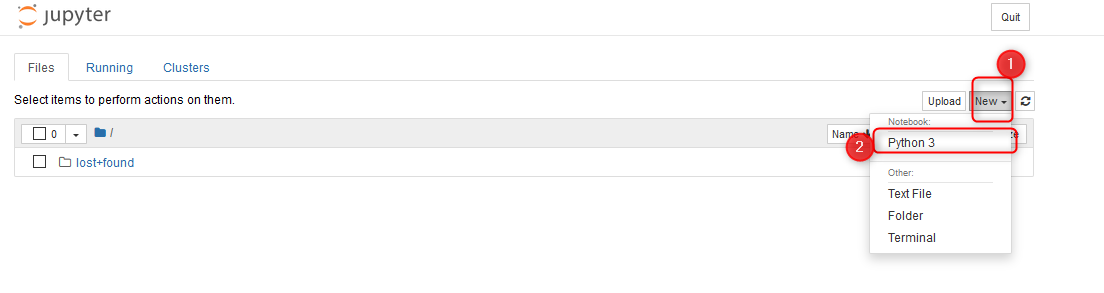
python 3″ width=“1104″ height=“293″> In Jupyter press new > Python 3
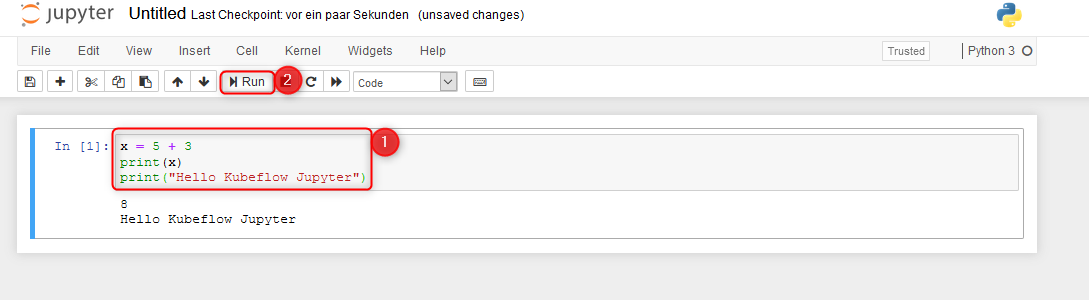
Paste some Hello World code and run the Cell, checking the functionality of Python in your Kubernetes / Kubeflow cluster!
Create an example Kubeflow Pipeline
All these pictures should be enough to follow and validate your pipeline functionality!
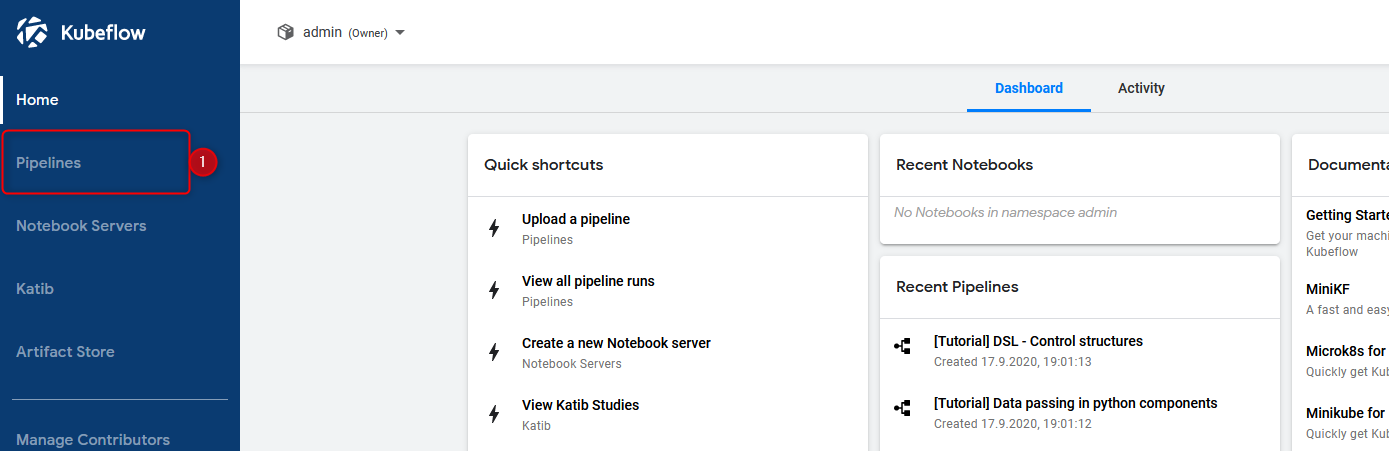
Pipeline verification step 1 – klick pipelines

Pipeline verification step 2 klick the link-text of „[Tutorial] data passing in python components„
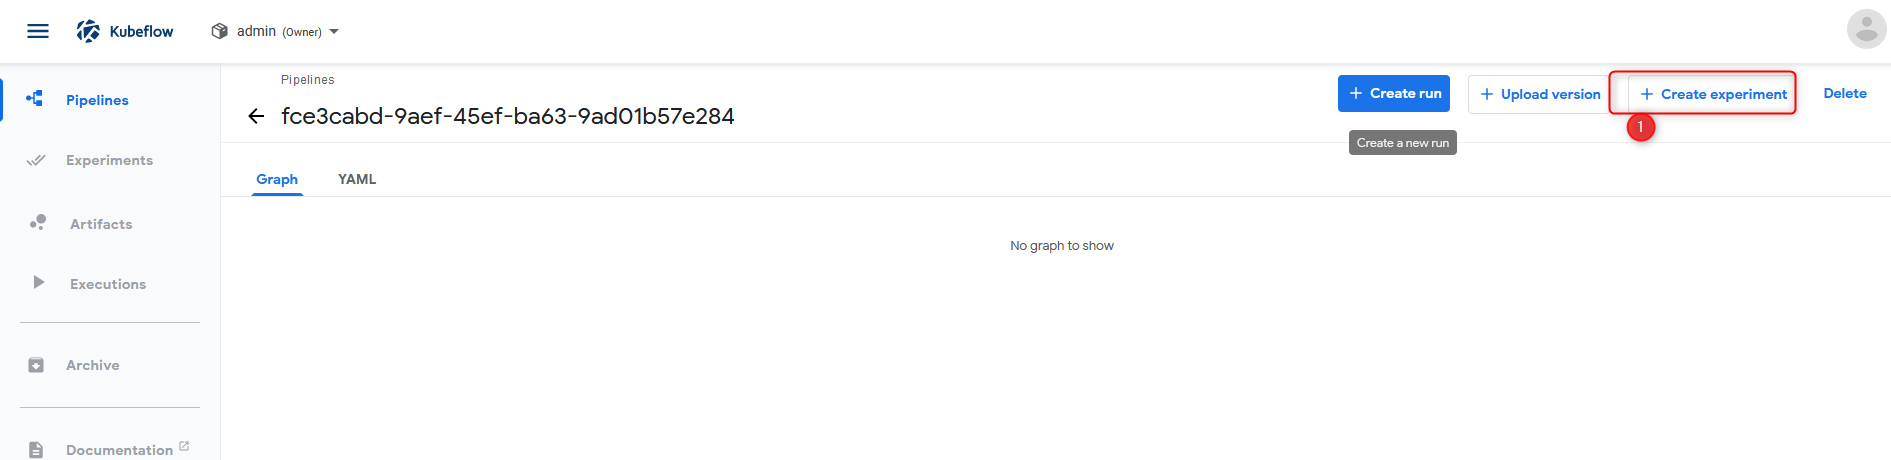
Pipeline verification step 3 click create experiment
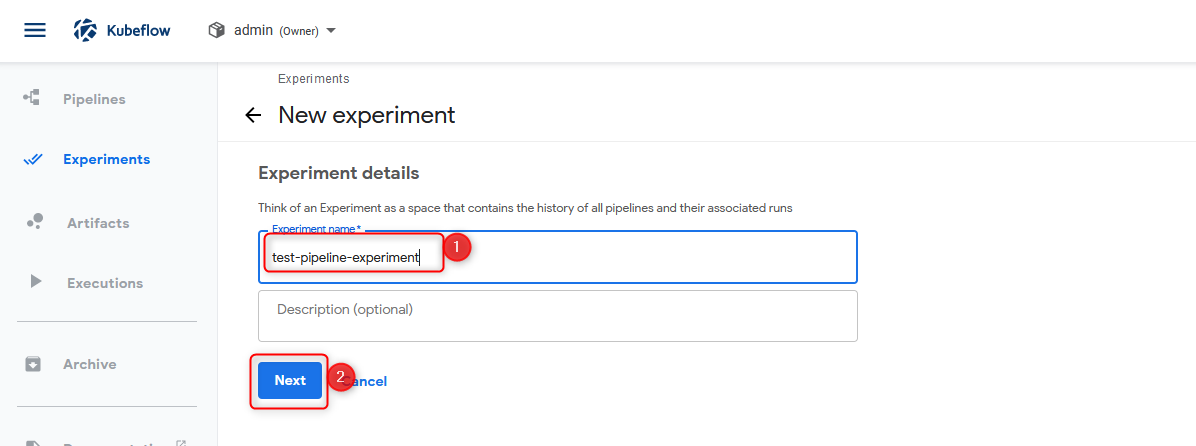
Pipeline verification step 4 put a name into the necessary field. After that, press Next
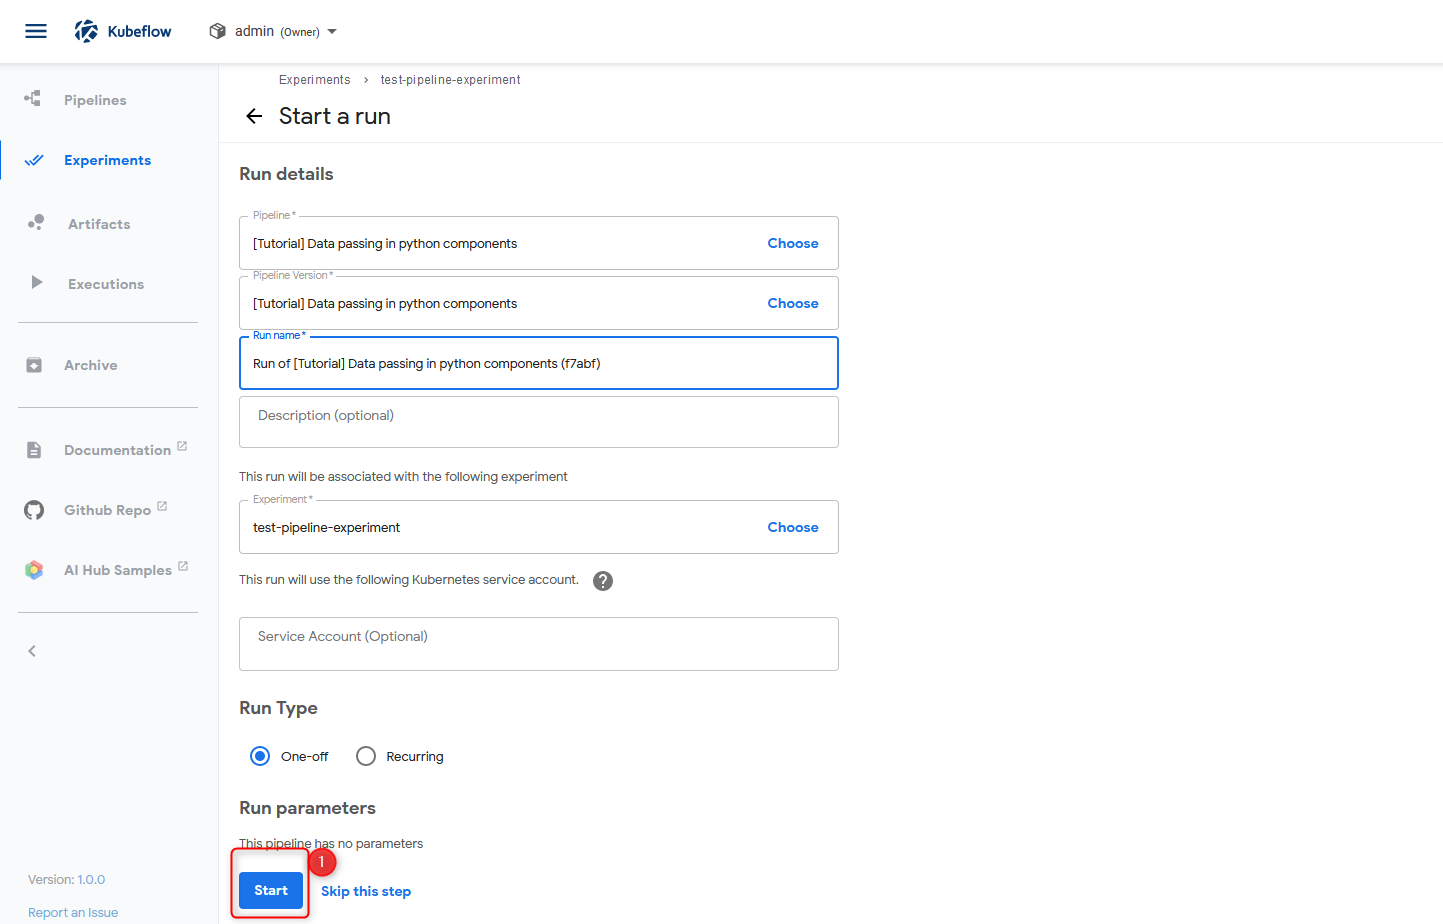
Pipeline verification step 5 Click Start
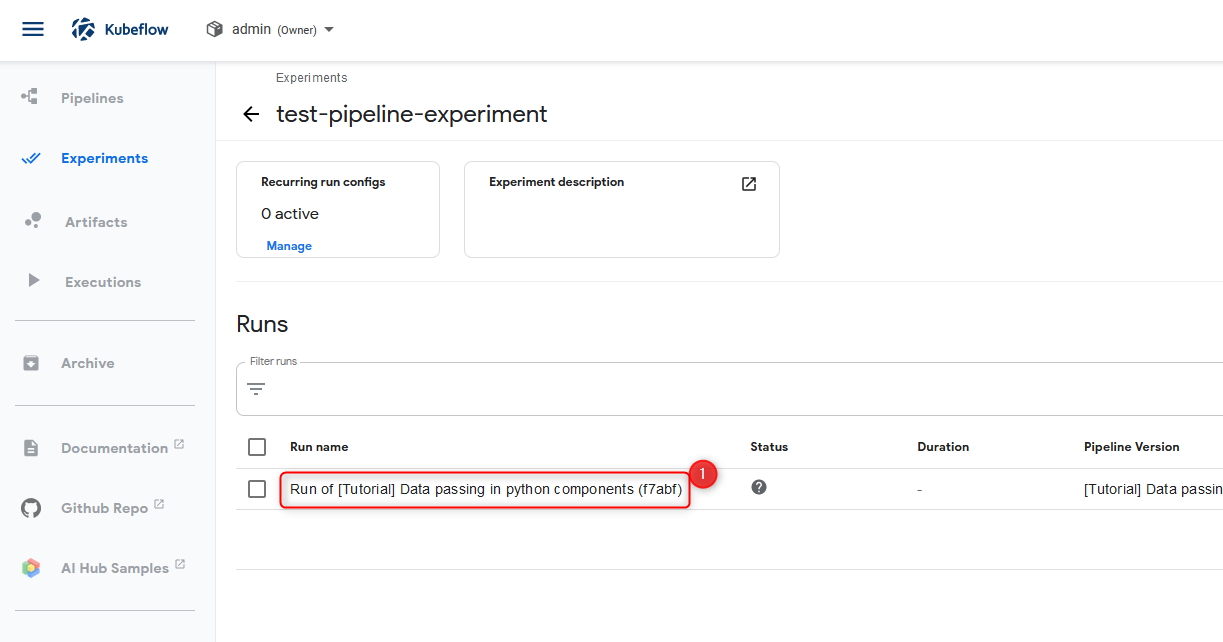
Pipeline verification step 6 open the pipeline view via the circled link
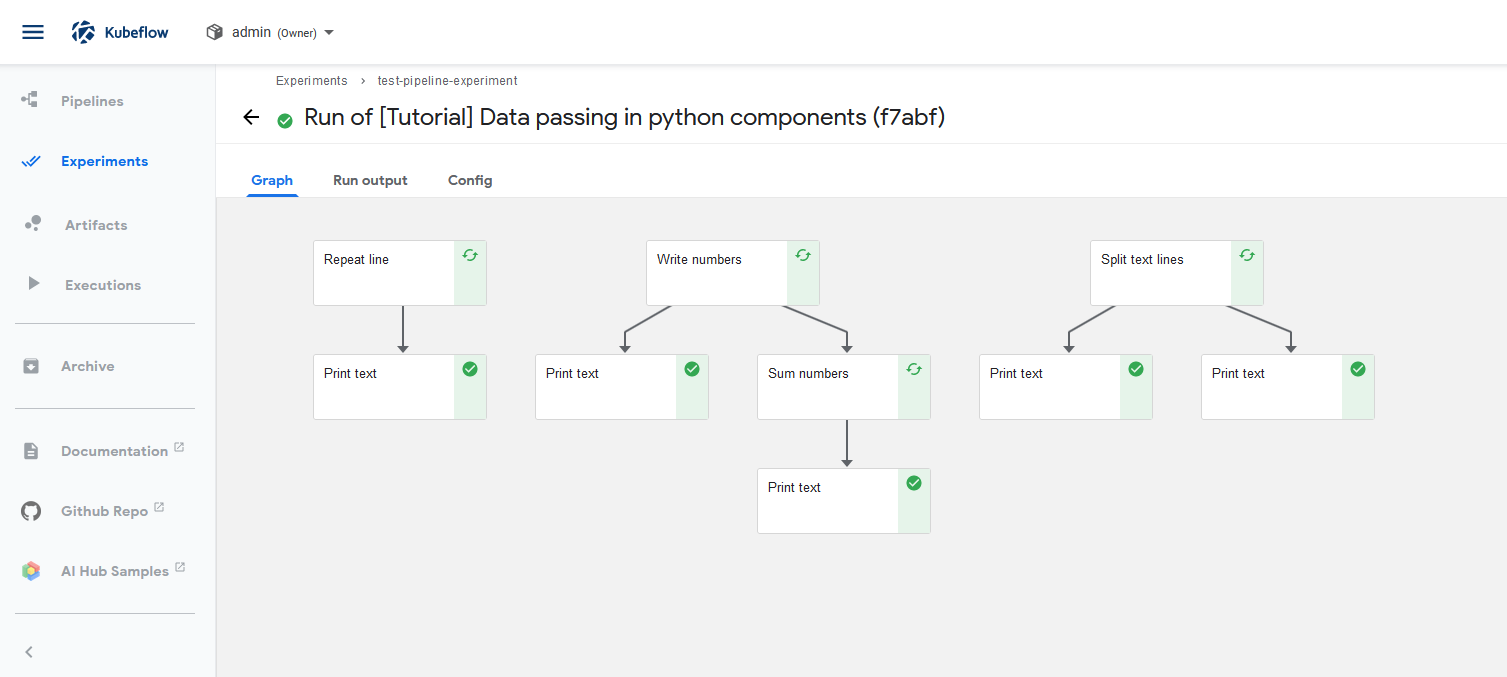
Pipeline verification step 7 everything’s green? Good!
Final words
Kubeflow is rather complex, thanks for this @Everyone! I’m glad I’ve got it to work in vSphere. In each of my following blogposts I’ll explore different configurations of Kubeflow, e.g. integration into Active Directory, scaling down PSP privileges, creating a full blown TKG Kubeflow script for installation. Additionally, at some point I’ll try out Harbor!
Recent Comments