
In this blog post, I will describe the deployment of a production ready AVI Controller Cluster.
In Part 2, I will describe how to replace the GUI certificate and integrate with Active Directory.
You can find it here:
Deployment
Step 1: Deploy OVA
This step is a standard OVA Deployment and will not be shown in here. When you reach 7 Customize template, the only required fields are:
- Management Interface IP Address
- Management Interface Subnet Mask
- Default Gateway
You need to deploy 3 controller nodes in order to create a cluster, they need to be in the same network.
Scripted Deployment
In case you prefer to do a scripted deployment, you can use ovftool for this. The following script was used on Ubuntu 20.04. You need to have jq installed.
#!/usr/bin/zsh

usage() {
        echo "usage: ${0##*/} [options]"
        echo ""
        echo "Options:"
        echo "  -h                  : Display help"
        echo "  -f <filename>       : name of config file"
        echo ""
}

########################
# Chage these settings #
########################
VC_USER=torsten@vdi.sclabs.net  # vCenter user name
VC_PASS=READ                    # vCenter password. If set to READ you need to type it in.
VC_NAME=vc-1.vdi.sclabs.net     # vCenter name or IP
DATACENTER=Noris                # Datacenter
########################

# Parse arguments

while getopts "hf:" opt; do
	case $opt in
		h)
			usage
			exit 0
			;;

		f)
			CONFIG=$OPTARG
			if [ ! -f $CONFIG ]
			then
				echo "$CONFIG does not exist"
				exit 1
			fi
			;;
		\?)
			echo "Invalid option: $OPTARG"
			usage
			exit 2
			;;
		:)
			echo "Option -$OPTARG requires an argument."
	esac
done

shift $(( OPTIND -1 ))

if [ -z "$CONFIG" ]
then
	echo "-f <filename> is required"
	usage
	exit 3
fi

if [ $VC_PASS = READ ]
then
	echo -n "Enter password for $VC_USER@VC_NAME: "
	read -s VC_PASS
fi

if ! cat $CONFIG | jq >/dev/null
then
	echo "JSON format error"
	exit 1
fi

typeset -i instance=0

while true
do

	#read in common options
	COMMON_CFG=$(cat $CONFIG|jq -r ".common")
	echo "--- common ---"
	echo $COMMON_CFG

	echo $COMMON_CFG | jq -r "keys[]" | while read key
	do
		eval $key=$(echo $COMMON_CFG | jq ".$key")
	done

	#read in instance options
	INSTANCE_CFG=$(cat $CONFIG|jq ".instances[$instance]")
	if [ $INSTANCE_CFG = null ]
	then
		break
	fi
	echo "--- instance=$instance ---"
	echo $INSTANCE_CFG
	echo $INSTANCE_CFG | jq -r "keys[]" | while read key
	do
		eval $key=$(echo $INSTANCE_CFG | jq ".$key")
	done
	ovftool \
	  --datastore=$datastore \
	  --vmFolder=$vmFolder \
	  --acceptAllEulas \
	  --name=$vmName \
	  --diskMode=thin \
	  --powerOn \
	  --net:Management=$portGroup \
	  --prop:avi.mgmt-ip.CONTROLLER=$ipAddress \
	  --prop:avi.mgmt-mask.CONTROLLER=$netmask \
	  --prop:avi.default-gw.CONTROLLER=$gateway \
	  $AVI_OVA vi://$VC_USER:$VC_PASS@$VC_NAME/$DATACENTER/host/$cluster

	instance=$((instance + 1))
done

echo "DONE WITH ALL"
The script requires a configuration file in JSON format. Common settings like datastore name or network portgroup can be specified in the common section and can be overwritten in the definition of the individual instances. The following example JSON file creates three avi controller VMs:
{
  "title": "AVI Controller deployments",
  "common": {
    "comment": "anything in here will be inherited by the instances but can individually be overwritten",
    "AVI_OVA": "/home/torsten/controller-21.1.2-9124.ova",
    "netmask": "255.255.255.0",
    "gateway": "10.12.1.254",
    "portGroup": "AVI-Mgmt",
    "cluster": "Workload",
    "vmFolder": "Users/TorstenM/AVI",
    "datastore": "NetApp1"
  },
  "instances": [
    {
      "ipAddress": "10.12.1.11",
      "vmName": "avi01"
    },
    {
      "ipAddress": "10.12.1.12",
      "vmName": "avi02"
    },
    {
      "ipAddress": "10.12.1.13",
      "vmName": "avi03"
    }
  ]
}
Step 2: Access Controller GUI
This step only needs to be performed on one of your controllers!
When you access the AVI Controller GUI for the first time, you need to specify the admin password and click CREATE ACCOUNT:

Then configure a passphrase for configuration export and periodic backup, dns servers and search domains:
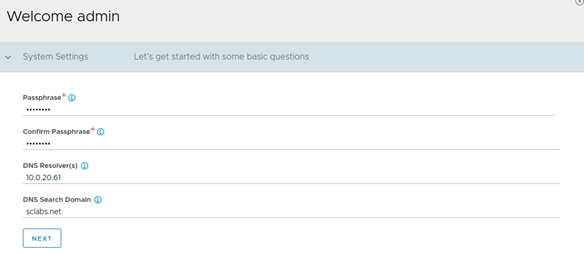
Click Next. You can leave Email/SMTP settings and Multi-Tenant settings with the defaults for now. Click SAVE.
Step 3: Create a controller cluster
After going through step 2, you can now access the controller GUI.
Go to Administration -> Controller -> Nodes, click Edit and add the 2nd and 3rd node. Also specify a cluster name and the Controller Cluster IP. No need to specify any passwords:

Then click Save.
Don’t worry if it looks like nothing happened! All three controllers will re-initialize and this will take about 10 Minutes. Then you will be able to access the Cluster IP with your browser.
You might want to change the NTP configuration, by default the controllers use [0-3].us.pool.ntp.org – which might not be reachable from your corporate network. In order to do this, go to Administration -> Settings -> DNS/NTP and change the defaults to your internal NTP server(s).
Congratulations, you successfully created an AVI Controller Cluster.
Recent Comments