This blog post will explain how to set up your private registry using AWS ECR. In the first step we are going to create a private repository. In the second step, we will connect via the command line to that repository and upload a Docker image.
Creating a repository
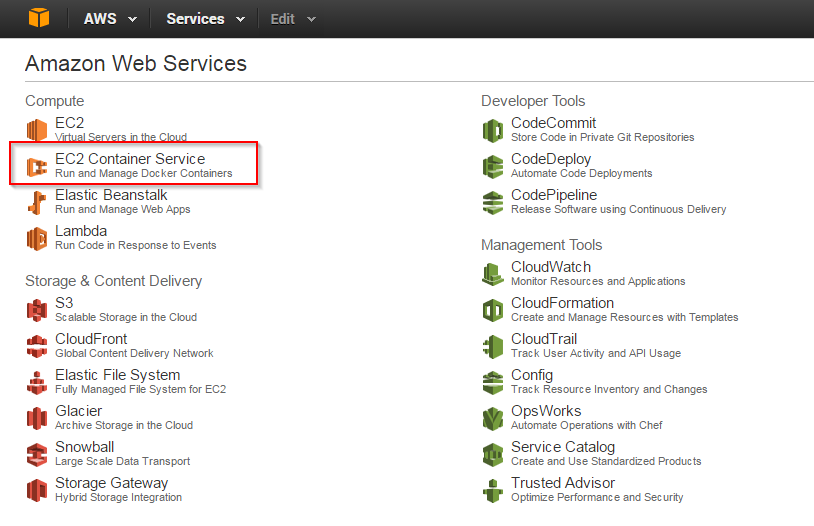
If you take a look at the AWS user interface, you will notice, that ECR is not shown as a separate service on the main site, but is part of the EC2 Container Service (ECS) section. This makes sense insofar, as ECR is usually used in combination with ECS. So let’s just go there.
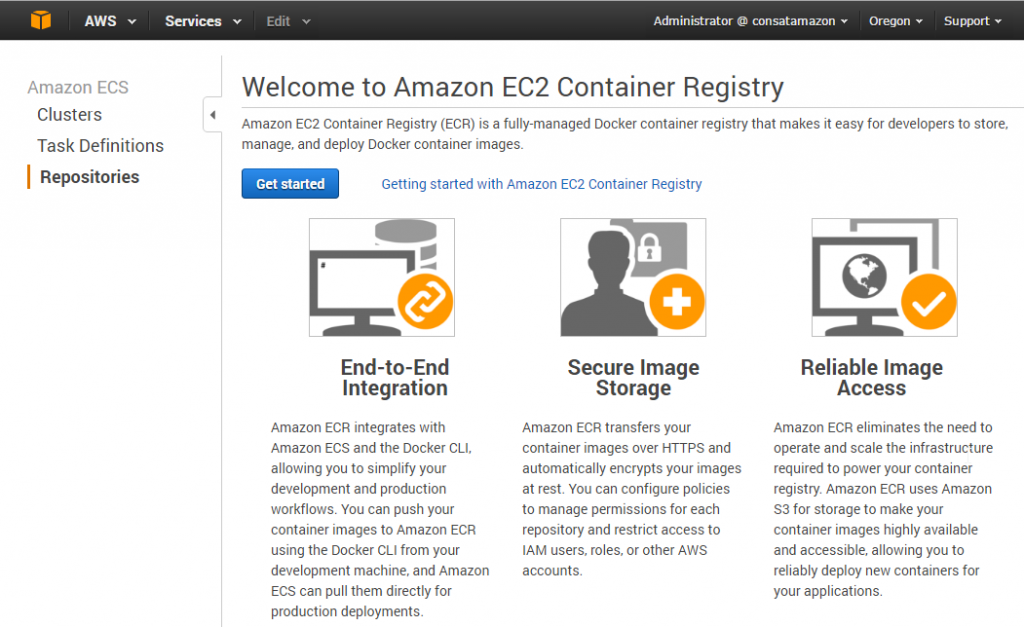
In the ECS menu, on the left side you can click on Repositories
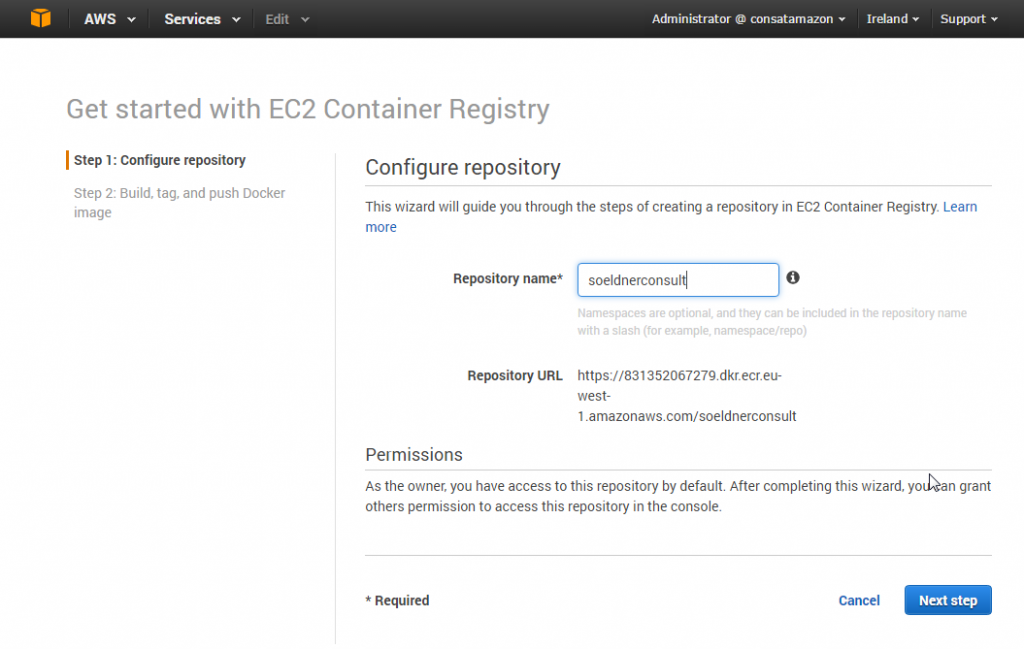
Clicking on “Get started” leads you to the repository wizard, where you can create a new repository. Give your repository a name (here: soeldnerconsult) and click on “Next step”.
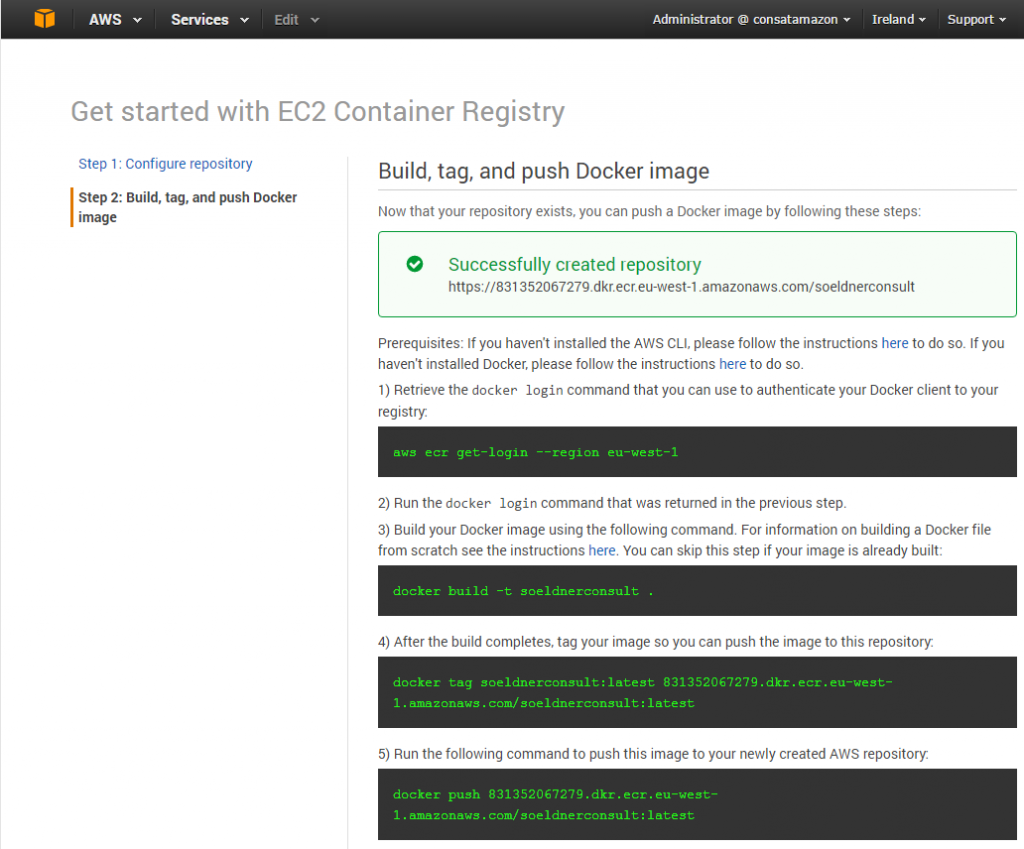
This will lead you to step 2, which shows you that your repository has already been created.
You might have expected more configuration work here, as the step is called “Build, tag and push Docker image”, but the UI merely shows you how to achieve the next steps via the command line. From now on, we’ll have to switch to the CLI to go on with the configuration. Fortunately, the screen already gives us some hints what we need to do in the next step.
Configuration with the CLI
Before we continue, we need to fulfill two requirements:
- Install the AWS CLI. For this demo, I am using CentOS. Installing the AWS CLI on CentOS requires the following steps to be carried out:
- CentOS requires the package manager pip, which is used to manage Python packages, such as the AWS CLI on CentOs. For detailed instructions, have a look here: http://docs.aws.amazon.com/cli/latest/userguide/installing.html#install-with-pip
- Install docker in order to get access to the docker command, e.g. for CentOS, follow the instructions shown here: https://docs.docker.com/engine/installation/linux/centos/
After setting up the AWS CLI and docker on your local linux machine (of course, you could also use an EC2 instance), we can now get a login for our ECR registry.
Enter the first command shown in the screenshot above: aws ecr get-login <<region>>
This will generate a prebuilt command for you, which you can copy and paste. It will look similar like the following output:
docker login -u AWS -p CiB+dS+BlNu0NxnXwowbILs115yjd+LNAZhBLZsunOxk3BKOBgEBAgB4fnUvgZTbtDcZ18KMGyC7Ndeco3fizQGYQS2bLpzsZNwAAALlMIIC4QYJKoZIhvcNAQcGoIIC0jCCAs4CAQAwggLHBgkqhkiG9w0BBwEwHgYJYIZIAWUDBAEuMBEEDGjN4YUDYA59y+d3ugIBEICCApgTqcdNXuPfcaI12EkuBksdN0TPPEO75BL1zdrhD4IcBy3l8KTGkThR3W2RNlehjy69d7rsmQ+CwuZznquoLCZEcFIT9yrf/G0UXcwTXZoT5HtR++wqle4/BAeWxKjl16RmLxmW3+a/ynq9gByBIvOiNokgk3Ap6KEqm73Z1DgJWdHavvMQXOVHdiiovhbqnC7GObDuhSUmJn/RQWlDJH6W5qxVDMiWLES8uhQR4cQ5oZ4QoaFG6jVBHKG6BLlC8Q24Eptqpgmqn4AzdUcgujXwln1hRTqs6yyEi8mgb0LhYh/H8oTpEru3E01j47gYmyAjlSFWumnmE0yXO9Eake7yN/AHlHJAneWKN/6X58+2Y8ZwBWrRS04XBei2gXRkRKZtnoiaJX+LtvinSgAVEP6zUfQhSHGj/qNccTi8KaMOg1OjssyPzSH5bqvnXw4rRaIG3z3k38AhTLsMSbJxnA6w0Oh0X6ZTAwIbC6MoN93KD5KAUer+obJNWiFa4neIPhDjbnfbO7tCfTkjNArOd7gM8VDU1NiEd0BmLmUFikNZRzVftQbGUbIJy9dLock3qt2I2yvieI1Vxsi7Rowq5mLotAdSkGW7IUdTloGKcZfTETNl71EIvte+BTrk0WrbGK5TpYtV5kA2thgHDZy5Vn3QDtI7qgnqKMMG+gRWzE2e3EAbAfCKTmhRNHlUFYC4T0/SPVKYprS8MGfC/q+y9TDk2ogmNtvMEUUzXmvLu+4tfm/2T3UxDRaobEqhXGdQ7FQgkKALTQsNQQDzqZzIHkLaqMcqYkZfiFteQ2gzoHwjOpZNGKB9/CZL2VpH7MAhvo165udJvBF+zG/u+vMuTxmPYa+XnG8qfJ1NIhxymnpc5ykD0ALj+QmG -e none https://<<account id>>.dkr.ecr.eu-west-1.amazonaws.com
Just copy & paste this command in the command line and you should receive a message that the login succeeded.
Uploading a docker image to the ECR repository
In this example, we will use the nginx Docker image. You could also use any other Docker image (or build your own one), however, this article puts the focus on how to deploy Docker images to your own repository (for more information how to build Docker images, check out the documentation on the Docker website). In your command line session, first of all pull the nginx Docker image from Docker Hub by issuing the following command:
docker pull nginx
This will pull the latest version of the image. To make sure, the image was successfully pulled, you can enter:
docker images
You would now be able to make your own customized image based on the nginx – image, however, we will just work with the standard image. In the next step, we need to tag the image with the URL of the repository. This can be achieved by the following command:
docker tag nginx https://<<account id>>.dkr.ecr.eu-west-1.amazonaws.com/<<name of repository>>
After tagging the image, you push it to your private ECR repository with the following command:
docker push <<account id>.dkr.ecr.eu-west-1.amazonaws.com/<<name of repository>>
As soon as you have uploaded the image to the repository, we can test if it already works in ECS. If you followed the preceding blog article (link), you should already have implemented the needed prerequisites. If not, just go back to have a look how to set up ECS.
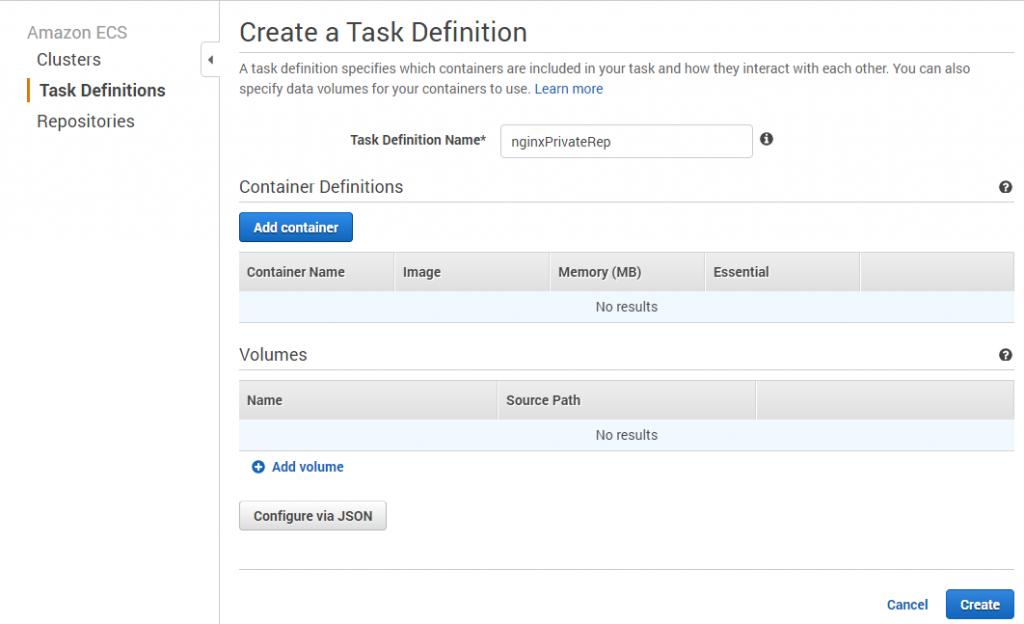
Let’s now switch to ECS to create a new task definition. Give the new task definition a name, e.g. nginxPrivateRep:
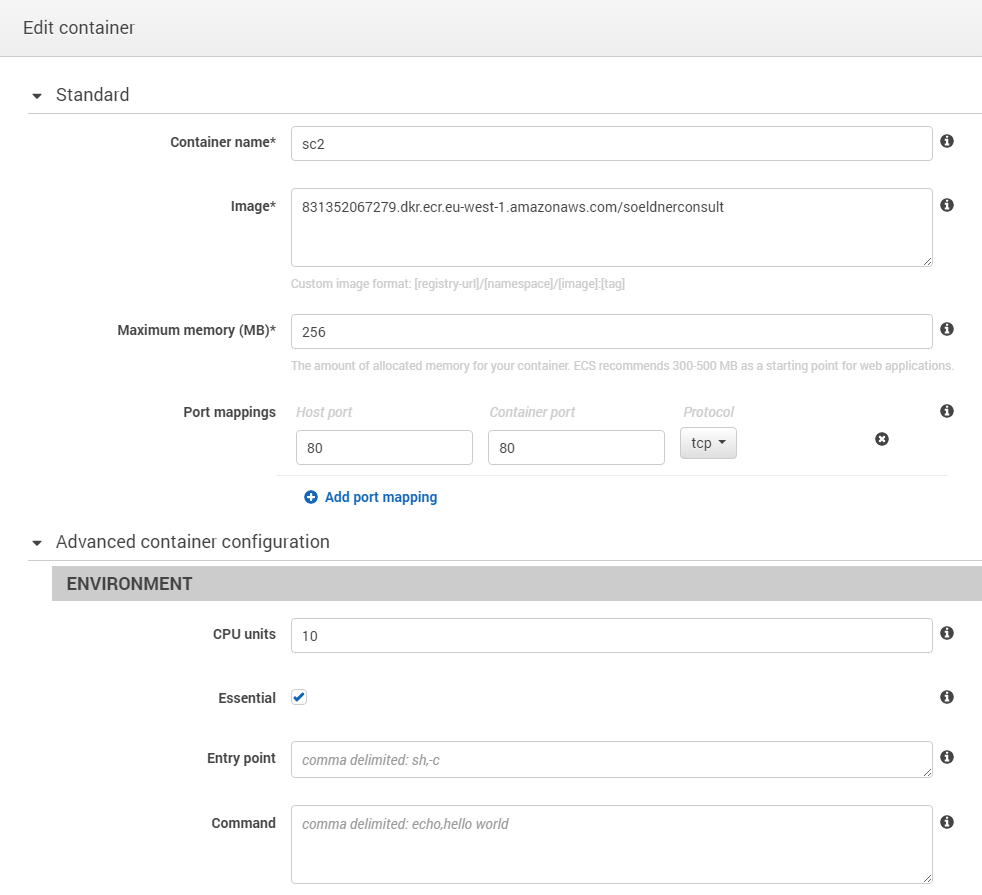
Click on “Add container” and fill it out similarly to the next screenhot:
- Name: e.g. nginx
- Image: <<account-id>>.dkr.ecr.<<region>>.amazonaws.com/<<repository name>>
- Maximum memory: e.g. 256
- CPU Units: e.g. 10
Configure your service accordingly to use the task definition (in order to see how to do that, check out the second part of this article series).
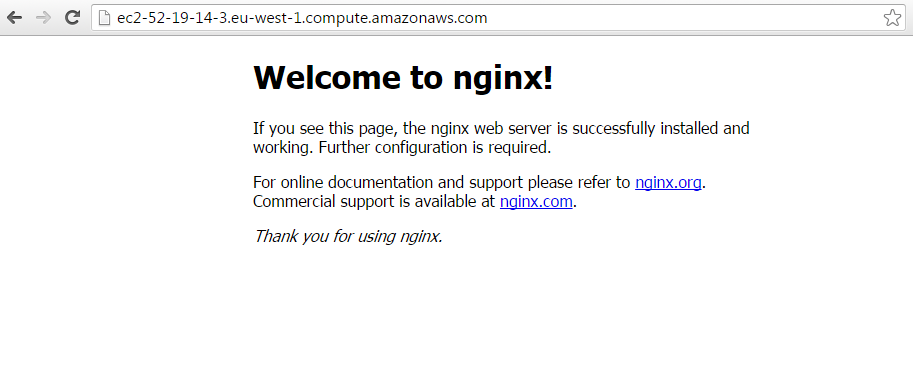
In case you configured everything correctly, you should get a similar output in the browser:

Recent Comments