
After having discussed the basic building blocks that form a vRealize Automation environment, we now want to shift the focus towards the implementation. The basic steps to be taken for the implementation are outlined in the following picture.
Most of these steps are mandatory, only the last two of them are optional. In addition, we discussed that one of the goals of the vRealize Automation version 7 is to ease the installation and configuration of the product. For this reason, there is an Orchestrator workflow shipped with the product that will create the required building blocks as depicted in Fig. 1. This workflow is especially useful in smaller environments or POCs. In the remainder of this chapter, we will show how to run that workflow and describe all the configuration steps in detail.
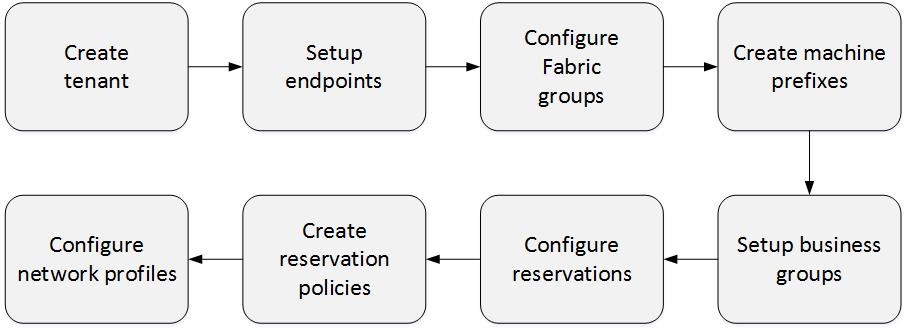
Fig. 1: Tenant configuration steps
7.1 Using the vSphere initial setup workflow
Running the vSphere initial setup workflow is quite easy and can be done by performing the following instructions:
- Log in into the vRealize Automation portal having tenant administrator and IaaS administrator permissions (if you have created the configurationadmin user during the installation, you can use this user).
- Navigate to the Catalog
- On the Catalog page, you will find that there is already a catalog item called vSphere Initial Setup. Click on Request.
- The first page of the wizard asks if you want to use the current tenant. If you don’t want to use the current tenant, you can either customize an existing tenant or create a new tenant.
- For using the current tenant select Yes in the Do you want to use the current tenant and click Next.
- For running the workflow in another existing tenant, select No in the Do you want to use the current tenant and No for Do you want to create a new tenant, provide the Tenant name, the Username and Password of the corresponding tenant administrator. Click Next to continue.
- For creating a new tenant, select No in the Do you want to use the current tenant and Yes for Do you want to create a new tenant, provide the System tenant administrator password and the new Tenant name. Optionally, you can create a new tenant administrator as a local user. Click Next to continue.
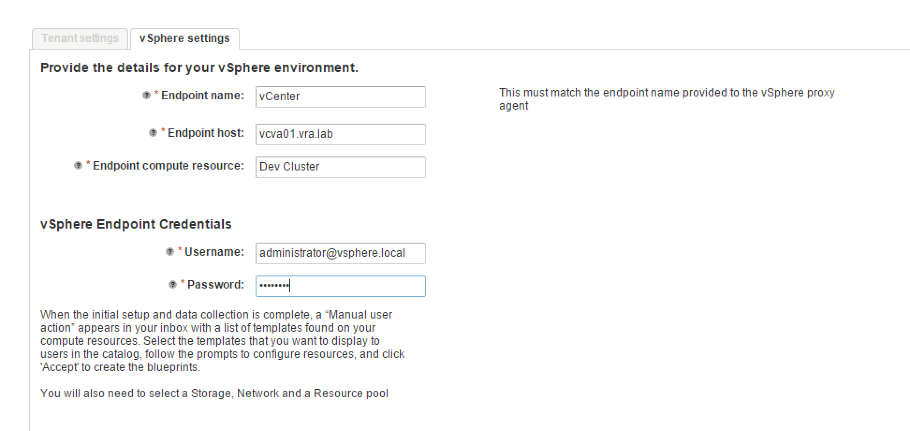
Fig. 2: vSphere inital workflow
- On the next screen, we have to provide the details for the vSphere environment (see 2):
- Endpoint name: This must match the endpoint name provided to the vSphere proxy agent as specified during the installation.
- Endpoint host: The hostname of your vCenter Server.
- Endpoint compute resource: The name of your resource cluster in vSphere you want to connect to.
- Username for connecting to the vCenter Server.
- Password for the vCenter Server.
- Click Submit to trigger the workflow.
The workflow itself will take a couple of minutes to run. You can check the current status by navigating to the Requests page. By clicking on the workflow token, you can view the workflow details.
If your workflow remains for a long time in the “In Progress” state – most probably – a workflow interaction has occurred that asks for additional information (this happens if the initial workflow discovers virtual machine templates on your vCenter cluster and wants user feedback to determine whether these virtual machines should be published into the service catalog).
In this case perform the following steps (some steps may differ – based on the version and input):
- Open your Orchestrator client (check the Orchestrator chapter if you are unsure how to do that).
- Navigate to the Library > vRealize Automation > Init Content
- Expand the vSphere Initial Setup workflow and select your current workflow token. The workflow should be in progress.
- Click on the Answer icon in the upper left of the main pane.
- On the first page, select the virtual machine templates to publish as a catalog item and click on Next (see 3).
- On the second page, provide the following input and click Submit:
- The reservation storage to be used.
- The reservation resource pool.
- The reservation network.
Once you have provided all the input, the workflow should run through and your vRealize Automation environment is ready to use.
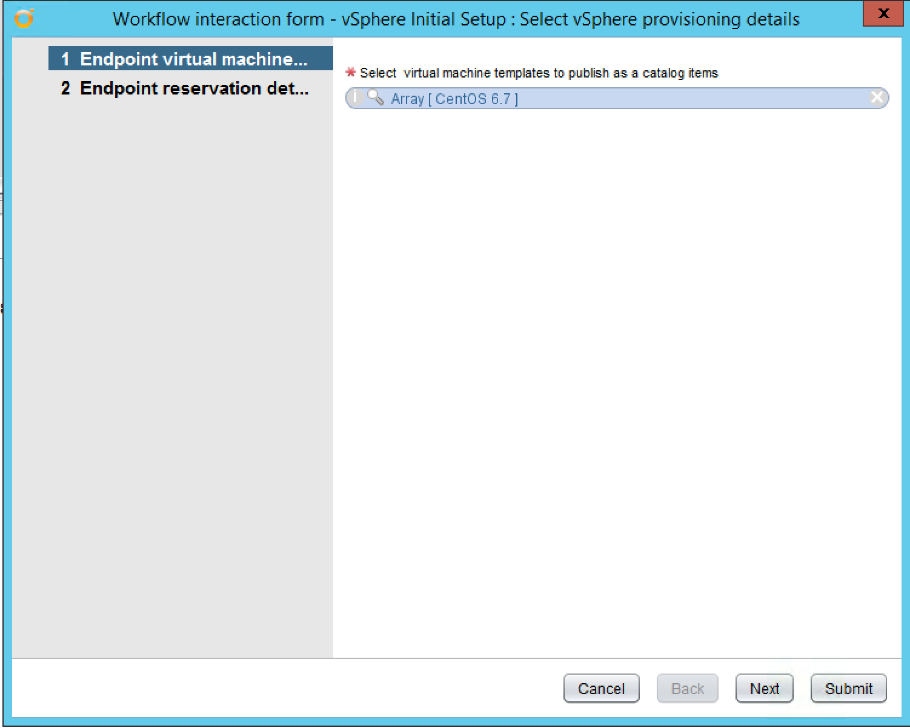
Fig. 3: Orchestrator answer dialogue
7.2 vRealize Automation Configuration
After having described how to invoke the vSphere initial workflow, we want to show how the different building blocks can be manually configured in vRealize Automation. At the beginning of this chapter, we have already shown the basic steps for the configuration. As we have already shown how to create and configure a tenant, we can immediately start with the second step, the configuration of endpoints.
7.2.1 Setup endpoints
Endpoints can be created and configured by navigating to the Infrastructure > Endpoints > Endpoints page. In the main pane, you can create a new endpoint by clicking on the New button and choosing the kind of endpoint you want to create. In addition, you can hover over existing endpoints and edit the endpoint.
7.2.1.1 Creating a vSphere endpoint
As most machines provisioned with vRealize Automation will likely be created in a vSphere environment, you certainly want to add a vSphere endpoint right at the beginning. Configuring a vSphere endpoint involves the following steps:
- Check the vSphere Agent status.
- Create the credentials for connecting to vSphere.
- Create the endpoint.
Checking the vSphere agent status
The vSphere agent is installed by default when installing vRealize Automation with the installation wizard. This means there is usually nothing to do but to check if the vSphere Agent is running as a Windows service.
Creating the credentials for connecting to vSphere
The next prerequisite for creating an endpoint is to define the credentials to be used. Credentials can be reused, which makes perfect sense if you have a user account with privileges on more than one vCenter server.
Configuring credentials in vRealize Automation is pretty easy (they only consist of a username/password combination and some description), so just navigate to the Infrastructure > Endpoints > Credentials page and click on the New button (Fig. 4 depicts the credentials page).

Fig. 4: Manage Credentials
In the modal dialog box which is then opened, type in your credentials. Please consider the format of the username: For vSphere, a username will use the User Principal Name (UPN) format, so your username will be like administrator@vsphere.local. Once you have entered all information, save the data by clicking on the Save icon.
Creating the endpoint
The last step is to create the endpoint. Navigate to Infrastructure > Endpoints > Endpoints. On the right-hand side, in the endpoint table header, click on New > Virtual > vSphere (vCenter). A configuration dialog opens. Perform the following steps for the endpoint configuration (see Fig. 5):
- Type the name of the endpoint into the Name textbox as it was specified during the installation.
- Give a Description of the endpoint (optional).
- vRealize Automation uses the vSphere web service API for communication. Therefore, you have to specify the URL of the vCenter server in the Address field accordingly (the format is https://<vCenter-server.domain.name>/sdk).
- If you are using NSX in your environment, you can check the Specify manager for network and security platform checkbox and enter the URL of the server (format https://<nsx-server.domain.name>).
- Click OK to finish.

Fig. 5: Endpoint Configuration
| Hint: Check if the endpoints are working
It usually takes some time for the configuration to take effect (up to five minutes). After that period, vRealize Automation should have found the compute resources behind the endpoint. If you need to see if something is going wrong, check the log entries. These can be found under Infrastructure > Monitoring > Log. |
If you are adding resources (or changing the resource configuration) and want vRealize Automation to be aware of these changes, you must synchronize vRealize Automation with the underlying compute resources. This process is also referred to as data collection. While synchronization automatically happens once a day you can also trigger it manually by performing the following steps:
- Navigate to Infrastructure > Compute Resources > Compute Resources.
- Hover over the compute resource you want to synchronize and click on the Data Collection menu item.
Once the first data collection has been completed successfully, the compute resources will have been added to the fabric (as we have explained in the previous design chapter).
| Background: Data collection
Data collection is the process of synchronizing the environment with the vRealize Automation database. Data collections take place at fixed intervals and there are different kinds of data collections: The Infrastructure Source Endpoint Data Collection regularly (once a day) loads information regarding hosts, ISO images and virtual machine templates into vRealize Automation. In vCloud Director, information regarding virtual datacenter and templates is considered. When using AWS, additional information regarding regions and available virtual machines is retrieved. With physical machines, the available memory and the CPU will be loaded into the database. The Inventory Data Collection analyzes the machines. This involves checking the networking properties as well as memory. Information relating to machines not provisioned and managed by vRealize Automation is also retrieved. By default, the Inventory Data Collection occurs daily. The State Data Collection checks the state of single machines and verifies if the machines are still available. This workflow runs every 15 minutes. The Performance Data Collection (only available for vSphere resources) loads performance data into the vRealize Automation database (this happens once every day). The vCloud Networking and Security (vCNS) Inventory Data Collection detects new objects in NSX (please note that while the process uses the name of the old vCNS product, it nevertheless applies to NSX). The WMI data collection can retrieve information referring to Windows machines in the environment. |
Of course, you can trigger a data collection manually as well (this is especially important if you changed any template or resource in the underlying cloud environment of the hypervisor):
- Navigate to Infrastructure > Endpoints > Endpoints.
- Select the compute resource for which you want to run a data collection and click Data Collection.
- Click on the right Data Collection workflow and click on Request Now.
7.2.1.2 Creating an AWS endpoint
Setting up an AWS connection differs a little bit from the creation of the other endpoints. In the following, we will show how to set up an AWS endpoint. However, before being able to start the configuration in vRealize Automation, you must first obtain both an AWS access key and secret key.
Retrieving your Amazon access key and secret key
If you do not have your access key and secret key available, you must log in into the AWS management console and perform the following steps:
- Open the Identity and Access Management
- Click Users from the navigation menu.
- Select your IAM user name.
- Click User Actions and then on Manage Access Keys.
- Click Create Access Key.
- Expand Show User Security Credentials and copy both keys.
- Optionally, download the keys (see 6).
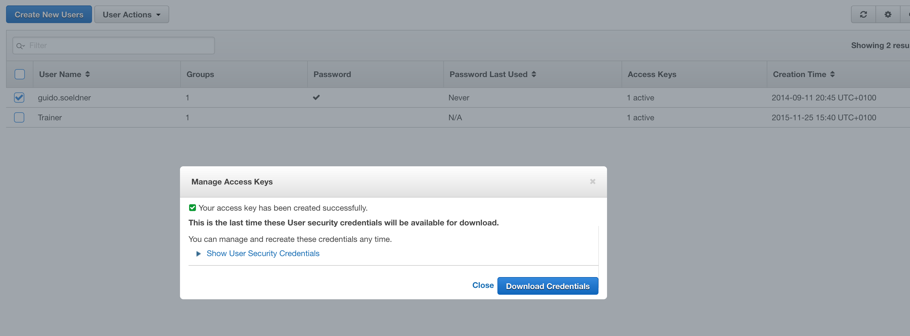
Fig. 6: Download AWS access key and secret key
Once, you have obtained the AWS access key and secret key, you can create the appropriate AWS credentials in vRealize Automation (see Fig. 7). This can be done by following the steps outlined here:
- Switch to the page Infrastructure > Endpoints > Credentials.
- Click on the New
- Type in a Name and a Description for the credentials.
- Paste the access key to the User Name field and the secret key in the Password
- Save your credentials.

Fig. 7: Manage AWS Credentials
Now we can create the AWS endpoint:
- Navigate to the Infrastructure > Endpoints > Endpoints
- Click on New and choose Cloud > Amazon EC2.
- Specify a Name and a Description (optional).
- Select the Credentials to be used for the endpoint.
- If your vRealize Automation server does not have direct internet access, you can specify to Use a proxy server.
- Click OK to save the endpoint.
After a short while, data collection will take place and you will have your Amazon regions available for selection when you create a fabric group. We will cover fabric groups in the next section.
7.2.2 Creating and configuring fabric groups
As we have discussed in the design chapter, fabric groups are used to group your compute resources into different manageable entities in order to be able to configure these groups separately.
To create a fabric group, navigate to the Infrastructure > Endpoints > Fabric Group page as an infrastructure administrator and click on the New button. Provide the following information:
- Name of the fabric group
- Description
- Fabric administrator(s)
- Compute resources

Fig. 8: Endpoint Configuration
Once you have filled in the relevant fields, click OK to save your fabric group.
7.2.3 Creating a machine prefix
In order to provision machines from vRealize Automation, you have to configure a machine prefix in advance. Every business group needs to reference a machine prefix. Perform the following steps to create a machine prefix:
- Navigate to Infrastructure > Administration > Machine Prefixes
- Click on the [+ New ]
- Provide the input for the Name, Number of Digits and Next Number
- Click OK to save the machine prefix.
7.2.4 Defining business groups
As we have discussed, business groups help to group users of the self-service portal for ease of management. With that background knowledge in mind, it is easy to create a business group:
- Navigate to the Administration > Users & Groups > Business Groups
- If you already have an existing business group, you can click on the Copy button and modify the newly created business group.
- If you want to create a business group from scratch, click on the [+ New ]
- On the General tab (see 8), specify the Name, optionally the Description and type in one or more email addresses of the manager of the business group (please note that you have to configure an outbound email server first in order to send notifications).
- For most cases, you can keep the custom properties empty. We will talk about custom properties later.
- Click Next.
- On the Members tab, please specify the members of the Group manager role, the Support role and the User role as explained in the previous design chapter and click Next.
- On the Infrastructure tab, choose the Default machine prefix for the business group.
- Provisioned Windows machines can be placed in an Active Directory container. You have to specify the distinguished name (DN) of the container to use this feature.
- Click OK to save your changes.
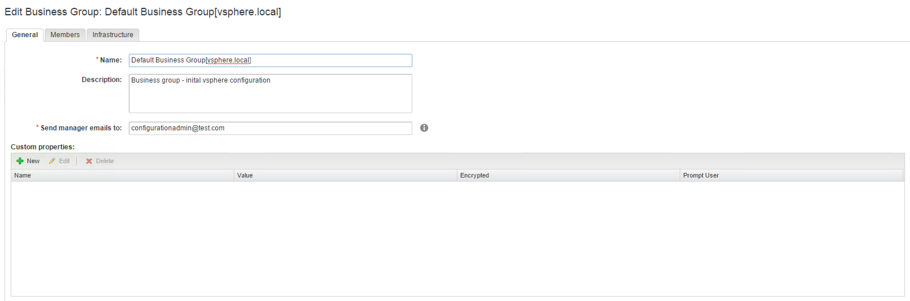
Fig. 9: Creation of business groups
Once you have created the first business group, the business group manager can see the resource consumption on the business group main page. The page displays the following information (the values of the quotas are dependent on the underlying reservations):
- Total number of virtual machines in the business group.
- The allocated quota of machines.
- The allocated memory and storage (in % and in total GB).
In addition, by selecting a business group and clicking on the Group Info button, vRealize Automation now supports to easily display a business group’s underlying reservations (a very useful feature) and information about the deployed machines (this includes the status, the platform type as well as metadata about expired and destroyed machines).
| Troubleshooting missing business groups
One of the changes of vRealize Automation 7 was that business group information is primarily stored within the vRealize Automation appliance (as opposed to prior versions, which store them in the IaaS database). However, as reservations and business groups are closely interacting with each other, the business groups information are synced to the IaaS database. But there is a problem: If the synchronization fails, you might not see the business groups from the automation console anymore. In that case, synchronization must be triggered manually from the Windows IaaS server’s command line. To synchronize the CAFÉ database with the IaaS values, enter the following command: vcac-config.exe SynchronizeDatabases –dss IaaS –v To synchronize the IaaS database with the CAFÉ values, enter the following command: vcac-config.exe SynchronizeDatabases –dss Café –v |
| Troubleshooting Slow Performance when displaying group members
Business groups or custom group members might take long to be displayed when viewing a group’s details. This is due to the time required to load the names in a large Active Directory environment. In that case, try to use Active Directory groups or custom groups whenever possible rather than adding hundreds of individual members by name. |
7.2.5 Creating reservations
Now that we have created our fabric groups (groups defining which resources can be used for provisioning) and business groups (groups defining who is able to request any new resource), it is time to establish a link between these two building blocks – hence, we need a reservation. Reservations for vSphere can be configured in the following way:
- Navigate to the Infrastructure > Reservations > Reservations
- Click on the [+ New ] button and then on vSphere.
- If you already have an existing reservation, you can copy the settings from that existing one.
- The first tab shows the General settings (see 10). First, provide a Name for the reservation.
- Specify the Tenant of the reservation.
- Choose the Business Group.
- Select a Reservation policy (if you haven’t created one before, this drop-down list will be empty – we will talk about reservations later on, so for now you can leave it blank).
- Set the Priority of the reservation (remember we discussed that topic in the design section).
- Click on the Enable this reservation checkbox (once you have saved your reservation and everything is properly configured, deployments can use this reservation).
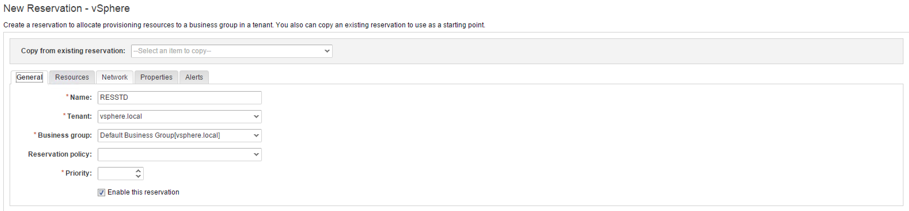
Fig. 10: General reservation settings
- Next, click on the Resources tab (see Fig. 11).
- First, select the Compute Resource that you want to associate with the reservation. Once there is a compute resource selected, the memory and storage controls are updated to show the available resources of the compute resource.
- Define the Memory allocated by this reservation. Please note that you can configure a reservation to use more memory than is availabe in the compute resource, so that over-allocation and over-commitment is supported (if you over allocate memory you should keep an eye on the underyling resources using a capacity management system like vRealize Operations, otherwise you’ll risk a degredation of service).
- The Storage table helps you to reserve storage. You can select multiple storage paths. There is a priority column that defines which storage path is chosen during provisioning. The priority works exactly like the priority on reservations: vRealize Automation chooses the storage path with the lowest priority number. If no storage is free on a storage path, the storage path with the next higher priority value is chosen. If there are different storage paths having the same priority, a round robin algorithm is used to distribute the workload. Once again, you can also configure over-allocations on a storage path. However, the same considerations regarding capacity management as for memory apply.
- If you want to assign a guaranteed level of service in terms of vSphere resource pools, you can choose a Resource pool on a reservation. However, note that when you activate this feature, deployment of virtual machines can fail either because of your reservation settings or vSphere resource pool settings, so consequently you need to manage and monitor both items using a capacity management tool.
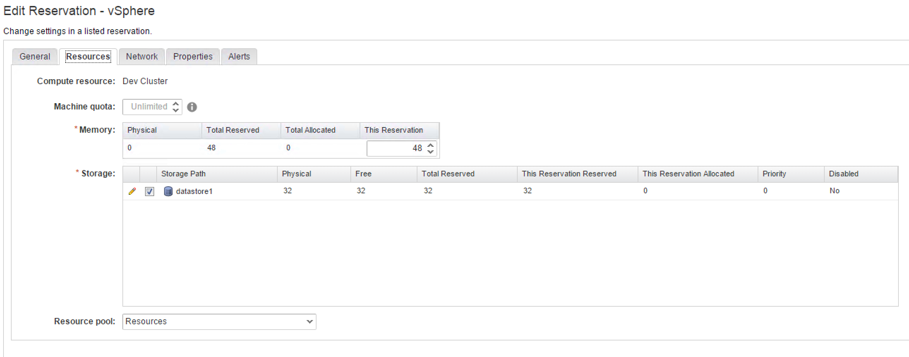
Fig. 11: Reservation resource allocation
- The third register tab is for configuring networks (see Fig. 12). Please check all the network paths which should be availble for provisioning. There is a drop-down list for the network profiles as well – however, we will talk about them later.
| Hint: Network paths
If you select different network paths on your reservation and a blueprint provisions to this reservation, the default behavior is to round robin between these network paths. If you want to override this feature, you can configure a network profile (or use custom properties) to let users decide which network should be used for the provisioning of machines. |
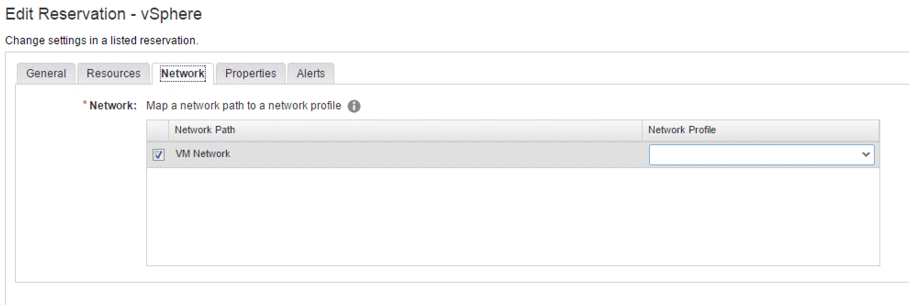
Fig. 12: Edit reservation vSphere
- The next screen is about custom properties (Properties tab). As discussed, this topic will be explained later in detail, so we don’t need to specify any settings here right at the moment.
- The last screen refers to Alerts. By default, capacity alerts are turned off. If you turn them on, you can specify the threshold at which alerts should be fired (there are alerts for storage, memory, CPU and machine quote).
- Furthermore, don’t forget to add some Recipients.
- Optionally, select if the group manager should be notified by activating the Send alerts to the business group manager
- The last item to be configured is the Reminder frequency (days), if you want to send multiple notifications.
- Click OK to save the reservation.
7.2.5.1 Create an AWS reservation
Creating an AWS reservation is basically quite similar to setting up a standard reservation, however, as a prerequisite, you need to determine which key pair should be used for the provisioning.
Amazon key pairs
In Amazon, key pairs are used to provide remote access to virtual machines. They are based on public-key cryptography to encrypt and decrypt login information. To log in into your instance, you must create a key pair and specify the name of the key pair when launching the EC2 instance. For Linux machines, Amazon places the public key into the virtual machine and you can use your private key to connect via SSH to the EC2 machine. For Windows, you can use RDP to log in into instances using an encrypted random password that can only be encrypted using the private secret access key.
Key pairs are usually created using the Amazon Management Console or the Amazon API. Existing key pairs are getting imported to vRealize Automation as part of the compute resource data collection. Besides that, you can also manage key pairs from within vRealize Automation.
Key pairs can be managed on the Infrastructure > Reservations > Key pairs page (see Fig. 13).

Fig. 13: Manage key pairs
You can also create a new key pair by clicking on the [+ New ] button and providing a name as well as a compute resource. Once vRealize Automation has created the key pair, you can download the secret key by clicking on the Export link in the Secret Key column.
In addition, you can also upload an existing private key. However, an existing key pair must already be in place before being able to start the upload process. You can upload a private key by clicking Edit on an existing key and then providing the appropriate information.
When configuring key pairs and associating them with reservations, there are a couple of issues to be considered:
- Key pairs can be managed on a reservation level as well as on a blueprint level. You must be fabric administrator in order to create an AWS reservation and assign a key pair to the reservation.
- If key pairs are controlled per business group, the fabric administrator is setting the Not Specified value on the reservation.
- If both the reservation and the blueprints are configured for key pairs, the reservation settings override the blueprint settings.
Configuring the AWS reservation
Once we have a valid key pair strategy, we can continue with setting up an AWS reservation. This can be done as follows:
- Navigate to the Infrastructure > Reservations > Reservations
- Click on the [+ New ] button and then on Amazon.
- If you already have an existing reservation, you can copy the settings from that existing one.
- The General, Properties and Alerts section of the reservation is identical to a vSphere reservation, so provide the required input.
- On the Resources tab, choose the AWS region where your workload should be deployed (don’t forget to add the AWS region to the fabric group before).
- From the Machine quota drop-down link, select how many machines can be deployed using this reservation (optional).
- From the key pair user controls select one of the four settings:
- Not specified
- Auto-Generated per business group
- Auto-Generated per machine
- Specific key pair
- If you have selected Specific key pair, choose your key pair from the Specific key pair drop-down list.
- If you have an AWS account created before 03-18-2013, you can provision EC2 classic as well as VPC EC2 machines. If your account was created after that date, check the Assign to a subnet in a VPC checkbox (see Fig. 14).
- If you are using VPCs, from the VPC table, configure the VPC to be used for the resevation. Select the Subnets, the Security Groups and the Load balancer of the VPC.
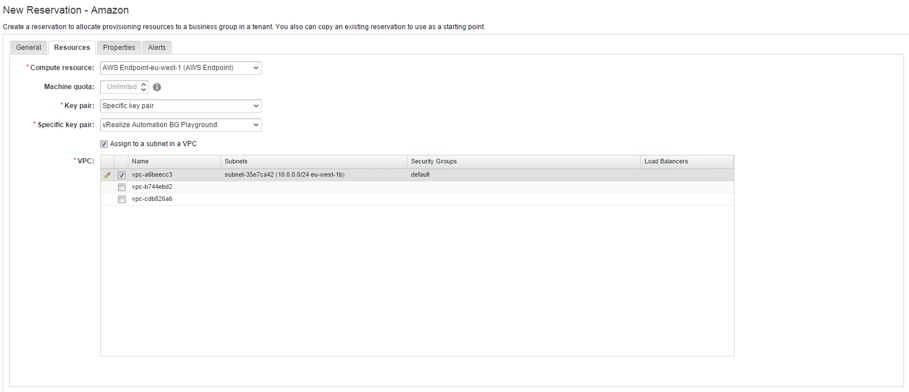
Fig. 14: Configuring an AWS reservation
| Amazon VPCs
An Amazon VPC can be described as a virtual network that acts as an isolated portion within the AWS cloud for EC2 instances. They are virtual networks, and as such, they support multiple subnets, routing and fine-grained security mechanisms. VPC usually span across multiple Availability Zones (datacenters) within a region (for example eu-central-1). Subnets segment VPC even further, and can only exist within one and only one Availability Zone. Security groups are essentially stateful firewalls that surround individual Amazon EC2 instances and allow to control the traffic passed to the instance. Elastic load balancers are provided by Amazon to distribute traffic across multiple instances. |
7.2.6 onfigure reservation policies
The next step in the configuration process is to create reservation policies. We have learnt that reservation policies can be used to configure an association between machines and reservations. Hence, we can configure tiering based on reservation polices.
There is a 1:n relationship between reservations and reservation policies. Therefore, each reservation can have exactly one reservation policy, but the very same reservation policy can be mapped to different reservations. Three steps are necessary to configure reservation policies:
- Create the reservation policy.
- Assign a reservation policy to a machine.
- Assign a reservation policy to a reservation.
Create a reservation policy
The reservation policy itself is easy to be created:
- Navigate to the Infrastructure > Reservations > Reservation Policies
- Click on the [+ New ] The configuration dialog opens.
- Provide the Name of the reservation policy.
- Within the Type drop-down field, choose if you want to create a standard reservation policy or a storage reservation policy.
- Optionally, specify a Description.
- Click OK to save the policy.

Fig. 15: Creating an reservation policy
Assign a reservation policy to a machine
Perform the following steps to assign a reservation policy to a machine within a blueprint:
- Navigate to the Design > Blueprints page and open the blueprint that contains the machine you want to attach the reservation policy to.
- In the main pane, select the machine for the association.
- In the properties pane, at the bottom of the screen, on the General tab, select your policy from the Reservation policy drop-down list.
- Click Save to close the blueprint.

Fig. 16: Assign a reservation policy to a machine
Assign a reservation policy to a reservation
The last step is to assign a reservation policy to a reservation. Once again, this is quite easy to do:
- Navigate to the Infrastructure > Reservations > Reservations
- Select the appropriate reservation.
- On the General tab, select the reservation policy from the Reservation policy drop-down list.
- Click Ok to save the reservation.
7.2.7 Storage policies
As mentioned, in addition to the normal reservation policies, there is also a second kind of reservation policies – storage reservation policies. Storage reservation policies are created in the same way as reservation policies – however, the way they are applied differs slightly (they will be assigned to a compute resource instead of a reservation). Work through the following steps:
- Navigate to the Infrastructure > Compute Resources > Compute Resources
- Hover over a compute resource and click Edit.
- Switch to the Configuration
- Locate the datastore to which you want to add your storage reservation policy within the Storage
- Click the Edit

Fig. 17: Assign a storage reservation policy to a compute resource
- Choose your storage reservation policy from the Storage Reservation Policy drop-down menu.
- Click on the Save
- Click OK.
Last but not least, add the storage reservation policy to a machine on a blueprint:
- Navigate to the Design > Blueprints page and open the blueprint that contains the machine you want to attach the reservation policy to.
- In the main pane, select the machine for the association.
- Within the list of datastores, on the Storage tab, select your reservation policy from the Reservation policy drop-down list.
- Click Save to close the blueprint.
7.2.8 Configuring network profiles
As discussed in the design section, network profiles help you to configure the network settings of a deployed virtual machine. Hence, vRealize Automation can act as a simple IP address management tool using network profiles. In the following section, we will show how to create and map an external network to a reservation. The other two network profiles will be discussed later.
If you want to create a network profile, be sure to log in as a fabric administrator. Then you can perform the steps as described:
- Navigate to the Infrastructure > Reservations > Network Profile
- Click on the [+ New] button and then on External (see Fig 18).
- Specify a Name.
- Optionally, you can assign a Description.
- Provide a Subnet Mask.
- Configure the IP address in the Gateway text box.
- Optionally, provide input for the Primary DNS, Secondary DNS, DNS suffix, DNS search suffix, Preferred WINS and Alternate WINS text boxes.
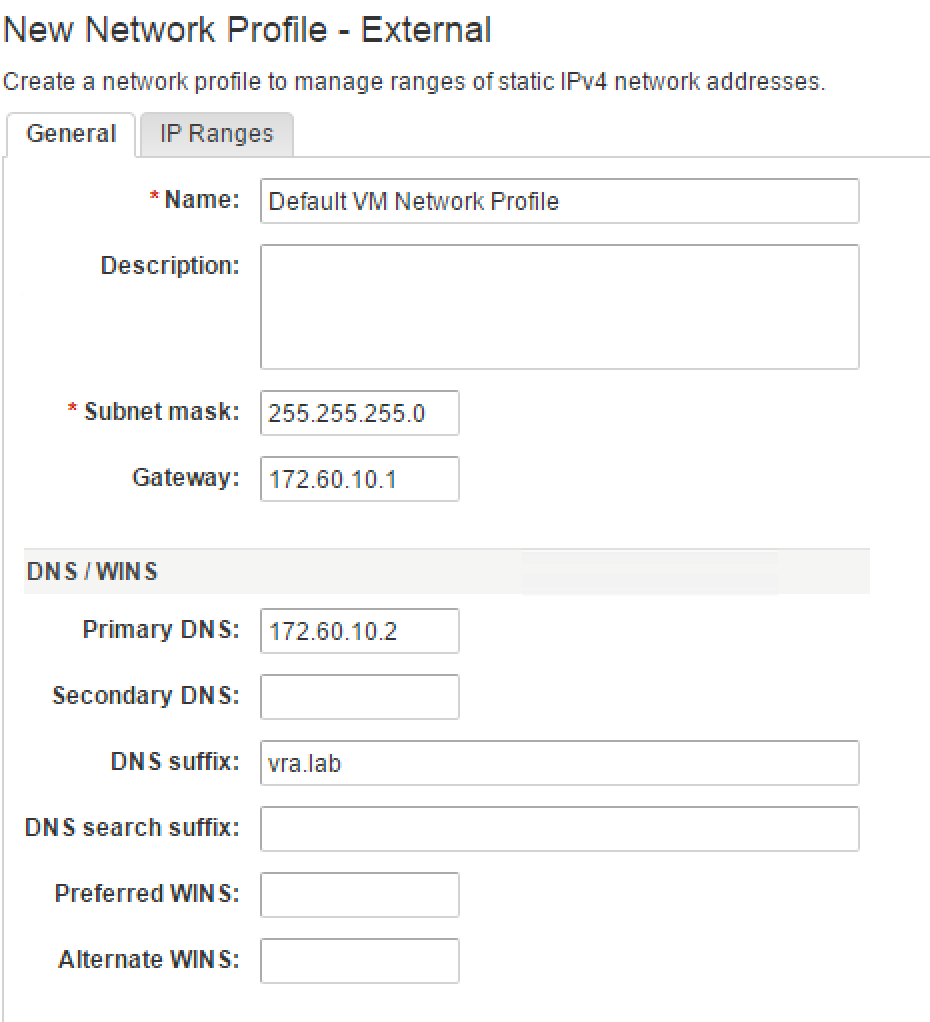
Fig. 18: Create an external network profile
If you want vRealize Automation to assign IP addresses, you can move along to the IP Ranges tab and create a pool of IP addresses:
- Click on the [+ New] button in the IPv4 ranges table.
- Assign a Name for the range and optionally a Description.
- Type in the Starting IP address.
- Type in the Ending IP address.
- Save your changes with OK.
- Save your network profile with OK.
Once you have saved your IP range, vRealize Automation will populate the Defined IP Addresses table. Here you will see an overview of all IP addresses and if they are currently allocated or not.
7.3 Configuring groups and user roles
As discussed in the previous chapter, vRealize Automation provides a set of roles that can be assigned to users and groups. We have already shown how to create and manage business groups, so we can now focus on assigning roles and creating custom groups.
7.3.1 Assigning roles to directory users or groups
Perform the following steps as a tenant administrator to assign roles to directory users and groups:
- Navigate to the Administration > Users & Groups > Directory Users & Groups
- Within the Search text box, enter a username or group and press Enter.
- Click the name of the user or group to which you want to assign roles.
- Select one or more roles from the Add Roles to this User list (see Fig. 19).
- Optionally, you can view more information about the user or group by clicking Next.
- Click Update.
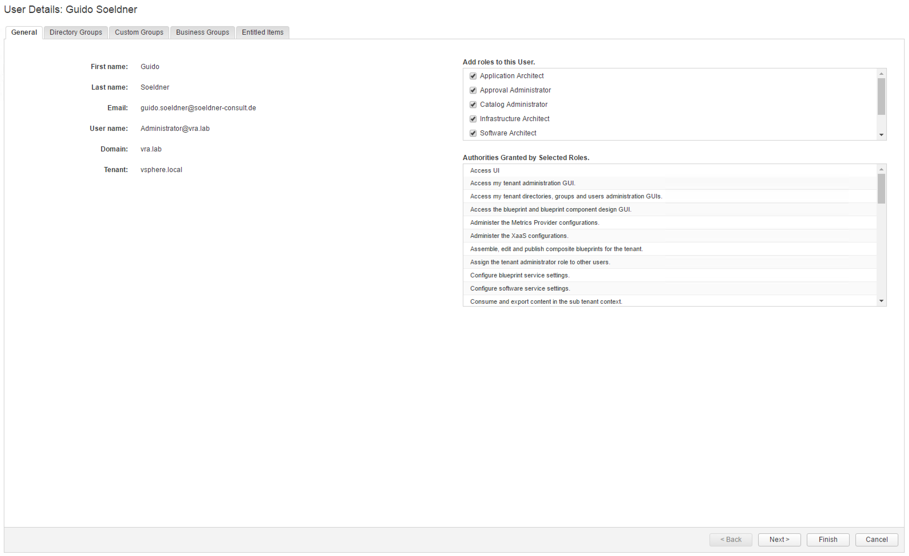
Fig. 19: Assigning roles
| Showing group memberships
A quite noteworthy feature that has been implemented in vRealize Automation 7, is the ability to see all group memberships in the Directory Users & Groups page. The following memberships can be seen from the menu: – Directory groups – Custom groups – Business groups – Entitled items |
7.3.2 Create a custom group
Tenant administrators can create a custom group by performing the following steps:
- Navigate to the Administration > Users & Groups > Custom Groups
- Click the [+]
- Within the New Group Name text box, enter a group name (see Fig. 20).
- Optionally, you can enter a description.
- Select one or more roles from the Add Roles to this Group
- Click Next.
- Add users and groups to create your custom group.
- Click Add.
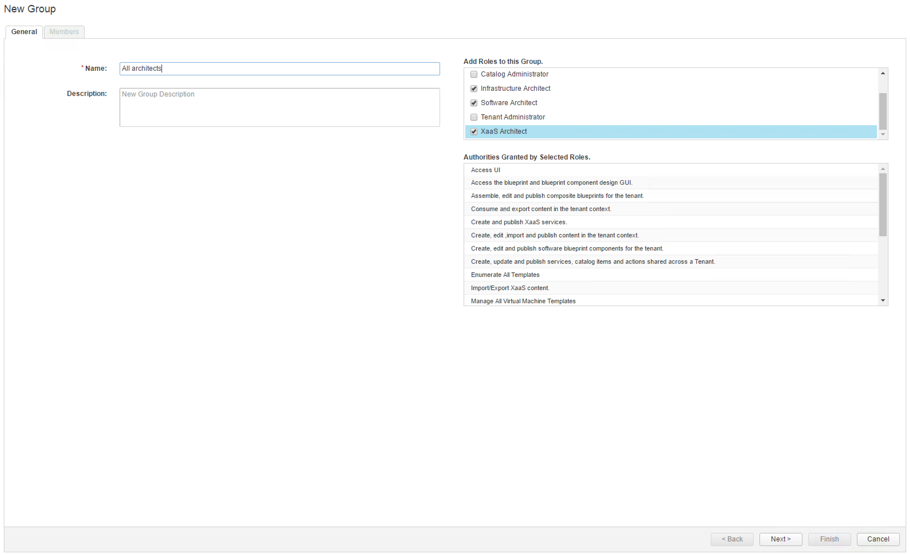
Fig. 20: Creating custom groups
Fig. 20: Creating custom groups
Once a user has logged out and logged in again, he can navigate to the pages to which he has been granted access.
7.4 Summary
This chapter showed how to configure a vRealize Automation with most of its building blocks. This included setting up credentials, endpoints, fabric groups, machine prefixes, business groups, reservations, reservation policies and network profiles. In this chapter we specially focused on the implementation, as all design issues have been covered in the previous chapter. At this point, as we have completed the configuration, it is now time to continue with setting up blueprints and putting them into the service catalog, so that we are able to automatically deploy machines. These topics will be covered in the next chapter.
Recent Comments