
After having finished the vRealize Automation installation, we can now begin with the configuration of the cloud environment. Regarding the basic configuration, there is some work to do. This includes uploading a licence to the IaaS portal, configuring the email settings, doing some branding and setting up authentication. At the end of the deployment wizard you were able to trigger a worklflow that creates a local user named configurationadmin, which eases the further configuration.
| Configurationadmin privileges
The configurationadmin user, that can be optionally created during the execution of the deployment wizard, has the following roles (we will discuss the roles in more detail in a later chapter):
|
5.1 Basic vRealize Automation Configuration
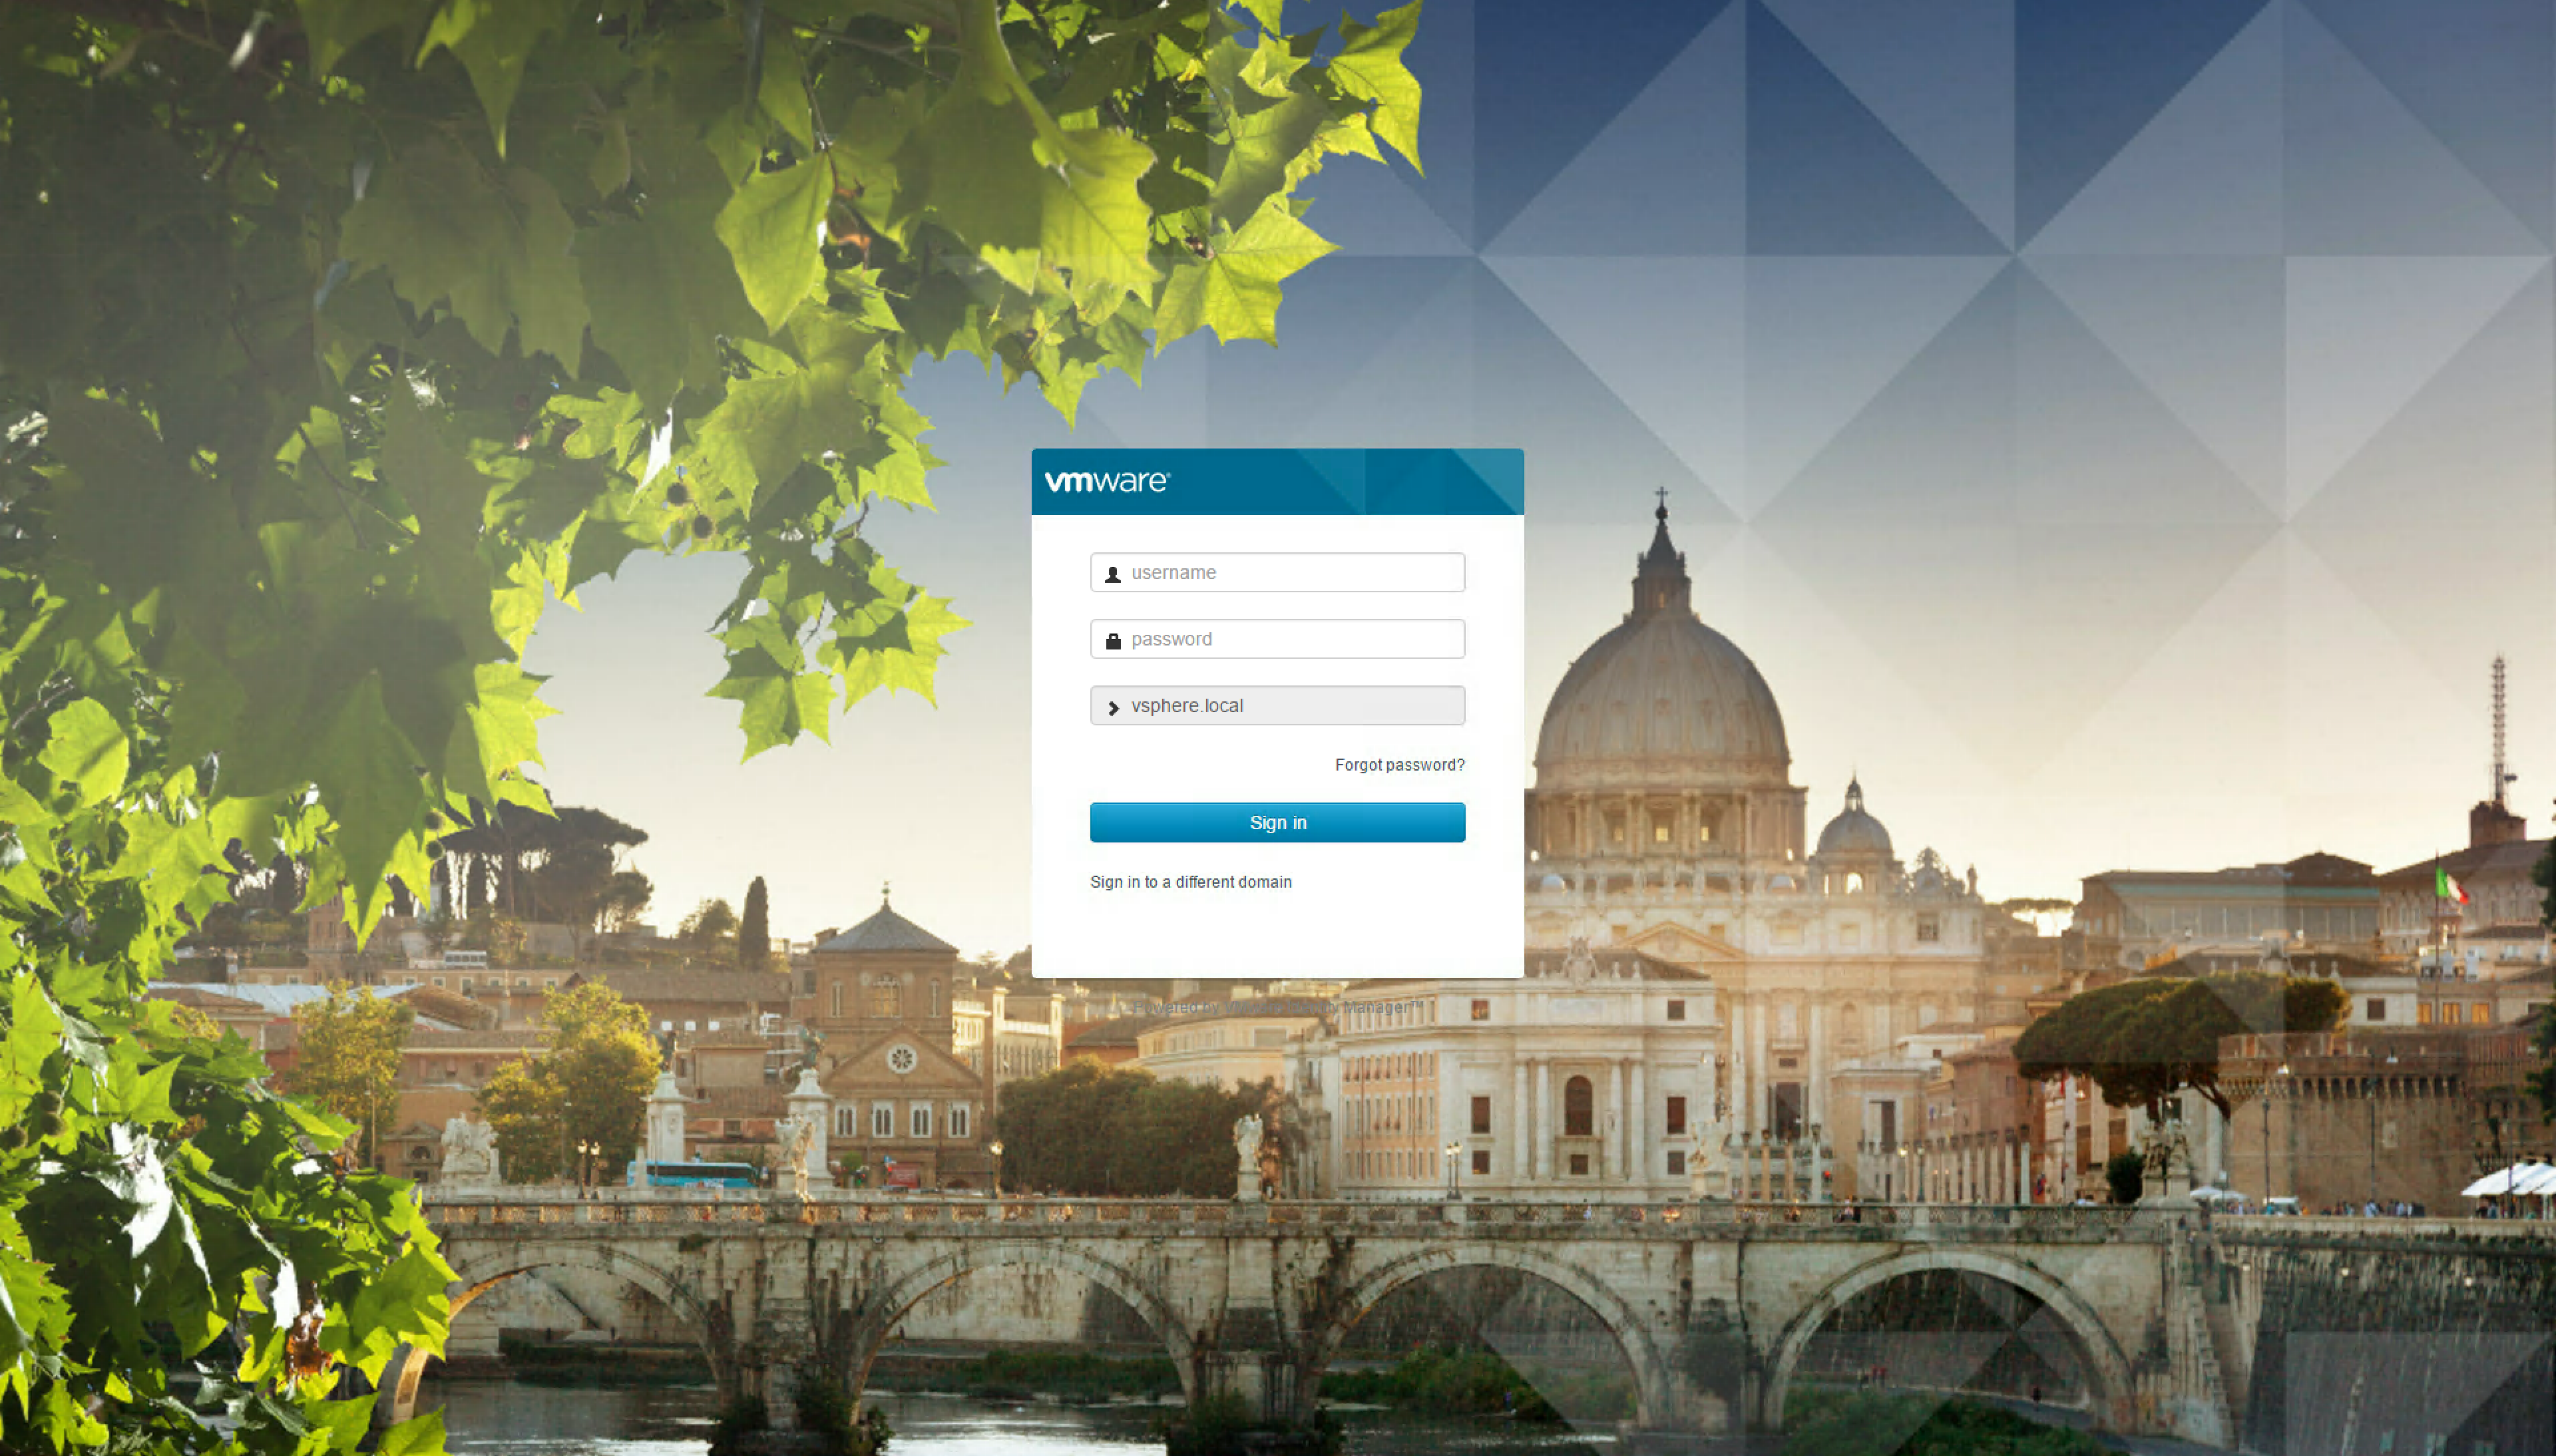
Once the installation has been completed, you are able to log in to the vRealize Automation web console. The installation automatically creates a first tenant – the default tenant. The name of the default tenant is vsphere.local and you have to login as a system administrator (with the password you have assigned during installation).
Tenant as an Organizational Unit
Tenants will be covered in detail further on, but for now, let’s explain what a tenant is:
- A tenant is an organizational unit in your vRealize Automation environment.
- Tenants allow the provisioning of resources (such as virtual machines).
- Different tenants can share hardware or have their own dedicated hardware.
- They are connected to a directory service such as Active Directory for user management.
System administrator privileges
When you log in for the first time, you will do so as a system administrator – however, there are many other roles in vRealize Automation and we will cover each of them. A system administrator has the following privileges and responsibilities:
- He is responsible for defining global settings such as branding, configuring inbound and outbound email server or checking the system log files.
- He can create additional tenants.
To log in to the portal, please open the URL http://<vra-automation-appliance.domain.name>/vcac and provide your username and password. If you log in with the configurationadmin username you will see lots of menus (as you have the maximum set of permissions available in vRealize Automation). On the other side, the administrator account only comes with the system administrator privileges and only shows the Administration menu with limited menu items.
5.1.1 Configuration of email settings
vRealize Automation can send email notifications as well as receive emails from users during runtime (this is especially useful for approval workflows). In order to configure the email settings, go to Administration > Email Servers and click on the [New] button in the header line of the main table. Once the modal dialog has opened, you can specify your inbound and outbound email settings. Please click on Test Connections before you save your configuration.
5.1.2 Branding of the system homepage
For many companies it is quite important to adapt the branding of the self-service portal in order to better reflect their corporate identity in vRealize Automation. You can change the following items within the user interface:
- Header logo
- Company name
- Product name
- Background color
- Text color
- Copyright notice
- Privacy policy link
- Contact link
You can find these configuration settings within the Administration > Branding menu (see Fig. 1).
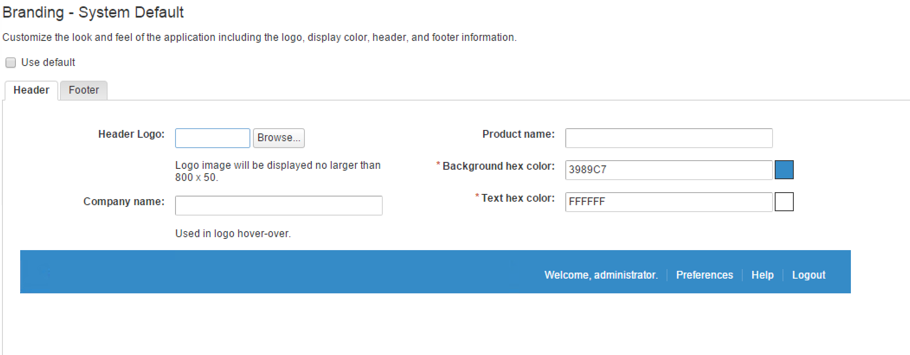 Fig. 1: vRealize Automation system branding
These settings apply as system settings to all of your tenants. However, you can override this configuration on a per-tenant basis and define additional settings (we will describe this at the end of this chapter).
5.1.3 Basic tenant settings
As discussed, there is already an ‘out-of-the-box’ default tenant that was created during the installation. Later on, we will walk through the creation of additional tenants. However, depending on your environments design, working with the default tenant might also be possible (we will discuss the design considerations later in this chapter). To configure the default tenant, go to Administration > Tenants, select the vsphere.local tenant and click on Edit (in the header of the Tenants pane. Configuring the tenant involves three different steps: First, you are providing some general settings like the name, the description, the contact email, and the URL. From the aforementioned settings, the URL is of special interest: This will be the login page for your tenant. In case of the default tenant, the URL is easy to remember. The URL for the login is just https://<vra-app.domain.local>/vcac. For all other tenants the URL is as follows: https://<vra-app.domain.local>/vcac/org/<tenant-name>. Please also consider that once a tenant is created, you are not able to change the URL anymore (see Error! Reference source not found.).
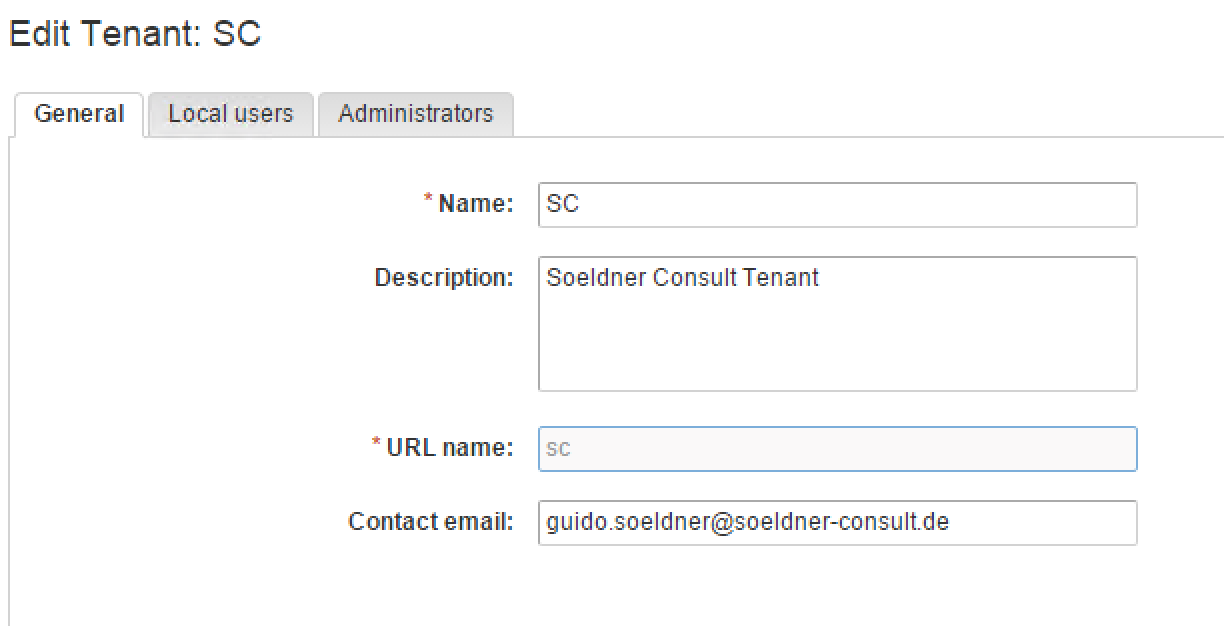 Fig. 2: Basic tenant configuration
The next step involves managing local users in your tenant. At this point in time, you are only able to manage local users (as opposed to prior versions of vRealize Automation). The last step lets you configure a tenant administrator and an IaaS administrator. In short, you need an IaaS administrator to connect your infrastructure compute resources to your cloud environment and a tenant administrator to control what users can do with your tenant (see Fig. 3).
 Fig. 3: Assigning administrator privileges
5.2 Directory Management
One of the new spotlight features of the new vRealize Automation 7 release is the integration of the VMware Identity Manager alias the Authentication Services. In prior versions, setting up authentication was quite painful. First, you either had to connect to your existing vSphere SSO or you had to deploy your own Identity Appliance. Both approaches were not really convenient. Relying on your vSphere SSO had the implication that you were (usually) not in control of the SSO appliance and deploying your own Identity appliance just meant to be responsible for another appliance. In addition, the biggest disadvantage was the limited feature set of the vSphere SSO component. The SSO component was designed to serve the needs of a vCenter environment, not the needs of a cloud enterprise solution. For that reason, VMware decided to integrate the Identity Manager as part of the vRealize Automation appliance.
The most important features of the newly integrated Identity Appliance can be summarized as follows:
- The user interface of the Authentication Services is integrated into the vRealize Automation UI, so there is a common look and feel.
- There is support for native Active Directory integration.
- Multiple domains can be connected to a single tenant.
- A domain can be connected to multiple tenants.
- A lot of authentication sources are supported. This includes the following sources:
- Local users with username and password
- Kerberos integration
- Radius (two-factor authentication with Radius backend)
- Certificate authentication
- RSA adaptive authentication
- RSA SecurID
- Third party SAML token support
- You can use smart cards for authentication.
- Multi-factor authentication is possible.
- Login auditing can be done.
- There is a scalability enhancement, so you can serve thousands of users with the Identity Manager.
- Because the Authentication Services are part of the vRealize Automation, they will provide automatically high availability alongside with your vRealize Automation appliances.
- Per tenant branding capabilities.
| Authentication sources in detail
As mentioned before, in most environments, vRealize Automation will be integrated with Active Directory-based authentication. In addition, a set of alternative authentication solutions are supported. Kerberos authentication provides single sign-on access to domain users. Once they are logged in to the enterprise network, no additional sign-in to vRealize Automation is required. The mechanism is based on Kerberos tickets distributed by the Key Distribution Center (KDC). Certificate-based authentication enables users to use certificates on their mobile devices or desktops. In addition, a smart card adapter is supported. In order to use certificate-based authentication, you have to distribute X.509 certificates. RSA SecurID is a well-known standard for performing two-factor authentication that is supported by vRealize Automation. In order to use RSA SecurID, users need a token – either software or hardware which is assigned to a computer user and generates an authentication code at fixed intervals. RADIUS is another option for two-factor authentication that can be connected to the VMware Identity Manager. When users sign in with their user name and passcode, an access request is submitted to the RADIUS server for authentication. RSA Adaptive Authentication is an authentication mechanism that incorporates fraud prevention and is used for multi-factor authentication. |
Having explained the feature set of the Authentication Services we can now go into details and show how to do the configuration. The first step – in most environments – is probably the integration into Active Directory, so let’s deep dive into this topic.
5.2.1 Managing directories
To set up a directory, please make sure that you are logged in as a user having tenant administrator privileges. Once logged-in, perform the following steps:
- Navigate to Administration > Directories menu and click the Add Directory button in the main pane.
- Choose either Active Directory over LDAP or Active Directory (integrated Windows Authentication). If you choose the latter, you will join the selected appliance (which is specified in the Sync Connector dropdown list) to the domain.
| Active Directory over LDAP or Active Directoy, Integrated Windows Authentication
If you plan to connect to a single Active Directory environment, you can use Active Directory over LDAP. The connector uses simple bind authentication in this case. On the other hand, if you need to connect to a multi-domain or multi-forest Active Directory environment, you need to choose Active Directory, Integrated Windows Authentication. When using the second approach, consider that domain controllers are selected at random. You can override this by creating the file /usr/local/horizon/conf/domain_krb.properties on the appliance. You can add your domain controllers as follows: <AD Domain>=<host:port>, <host2:port2>, <host2:port2> (for example: vra.lab=dc01.vra.lab:636). After that, don’t forget to change the owner of the file to horizon and group www. Restart the service by entering service horizon-workspace restart. |
- Next, we have to configure the Directory Sync and Authentication (see Fig. 4). First, choose a connector from the Sync Connector dropdown list.
- For Active Directoy, we choose Yes for the “Do you want this connector to also perform authentication?” checkbox fields.
 Fig. 4: Adding a directory
 - Enter the account attribute that contains the user name. This can be either sAMAccountName or UserPrincipalName.
- Next, check if your DNS server permits you to locate Active Directory domains. If this is not the case, provide the Active Directory Server Host alongside with the Server Port.
- In the Base DN field, specify from which point on you want to search for accounts in your directory (e.g. cn=users, dc=vra,dc=lab)
- Specify a user with privileges to serach for users in your directory in the Bind DN field alongside with a Bind DN Password.
- Click Test Connection.
- If test is successful, click Save & Next.
- Next, we can configure user mappings. The Identity Manager stores information about users in its own database. The sources of most columns are pre-configured, however, you can still choose where to load the manager data from (this is especially useful for approvals) and the display name. Once you are fine with the settings, click Next to continue.
- On the next screen, you can configure if you want to import and sync groups. Click on [+] button, specify the group DNs and click Find Groups to begin searching. If you are fine, click Next.
- Next, choose the users which should be synced. If you want to exclude any user, add him to the exclude list and click Next.
- Review your settings and finish the assistant.
Once the wizard is completed, you will be directed to a summary page, where you see your configuration, the status and are able to trigger a new Sync (see Fig. 5).
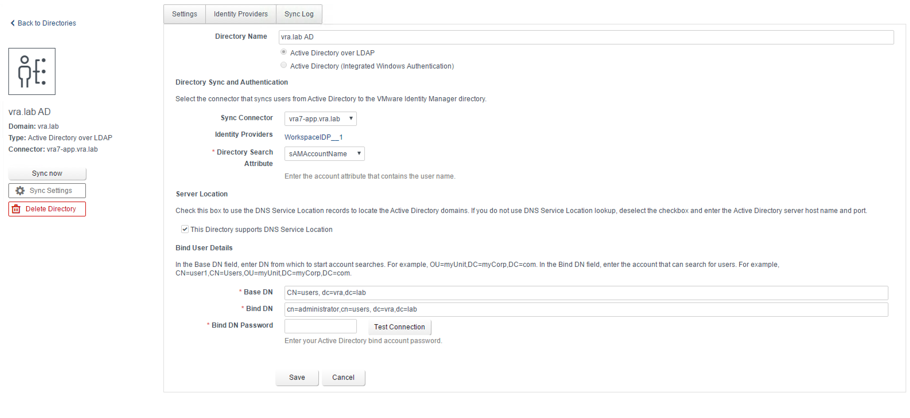 Fig. 5: Dictonary settings
| sAMAccountName or UserPrincipalName?
When running the wizard for adding a directory, you had to choose between the sAMAcountName and the UserPrincipalName (UPN) as an Active Direcotry attribute that contains the user name. From a technical point of view, a user account with a SAM Account Name of USERNAME has an UPN of USERNAME@DOMAIN. So no matter what format you choose, the same account will be specified. However, consider the following issue when choosing the SAM as the attribute for the username: You can also explicitly configure a user in different domains with the same SAM Account Name, but with a different UPN name. As a consequence, if you want to ensure that the SAM Account Name is working in a multi-domain environment, you`ll have to guarantee that the attribute is unique within the forest (and not just unique in the domain). On the other side, a configuration having a UPN will support a multi-domain environment without any problems. Tip: LDAP account information If you encounter any problems with authentication, please check your LDAP accounts. All accounts synced with Identity Manager should have first name, last name, and email address configured. This includes the Bind account as well. |
Configure Directory Management for High Availability
In most cases, the configuration is completed, once you have created an Active Directory link. However, if you run vRealize Automation in a clustered environment, there might be additional considerations to be taken into account. Remember, when adding a directory to a vRealize Automation tenant, you had to choose the appliance where the sync connector was running. If this appliance is failing, domain users cannot log on to the cloud environment anymore. To prevent such a scenario, you have to configure the other appliance with a connector to your directory source as well and connect it with your Identity Provider. However, there are some prerequisites that should be considered. First, you should have a vRealize Automation enterprise deployment and second, you need to configure a load-balancer. Having checked these prerequisites, you can perform the following steps for the configuration:
- Log in into your vRealize Automation deployment as a tenant administrator.
- Navigate to the Administration > Directories Management > Identity Providers menu and choose the Identity Provider that is currently in use.
- Now, you can add a connector by clicking the Add a connector drop-down list and choosing your second vRealize Automatoin instance.
- In the text field – Bind DN Password – provide the appropriate password.
- Click Add Connector.
- Now, the main connector appears in the IdP Hostname Change the host name to the load balancer.
| Background: Connectors
If you navigate to the Administration > Directories Management > Connectors page, you will already see a connector configured that is associated with your identity provider (and running on one of your vRealize Automation appliances). It is the connector’s responsibility to sync user and group data between the Identity Manager and your associated directory. The default connector is also configured as an identity provider and authenticates user to the service. In vRealize Automation, each vRealize Automation appliance contains its own connector. The actual work, however, is done by workers and not by the connector itself. Each connector uses one or more workers to sync user and group data and perform authentication. Each worker is responsible of a partition of the directory and can act as an identity provider. By default, there is one identity provider with one worker associated with it. A connector can be joined to a specific Active Directory domain. For example, when you configure Kerberos authentication, you must join the Active Directory domain that contains the user or has a trust relationship with the domain containing the user. Each worker can have multiple adapters configured. VMware supports the following adapters: Kerberos, Password, RSA Adaptive Authentication, SecureID, Certificate and Radius. |
5.2.2 Configuring Policies
From time to time you might have the requirement that authentication must work differently depending from where a user is logging into vRealize Automation or that a different kind of device is used. A typical use case is that users who are not logged in into the corporate network have to use multifactor authentication, while internal users can just log in using their username and password. In order to implement such requirements, we can edit the vRealize Automation default policy and add policy rules. Each rule specifies the following information:
- The network range where users are allowed to log in from (for example, from inside or outside the corporate network).
- The device type they are using.
- The ordering of the rules.
- Time-out settings for user session.
If you don’t have your network ranges configured, first go the Administration > Network Ranges menu and click the [+ Add Network Range] button. Next, provide values for the Name, Description and IP Ranges. Once finished, click on Save (see Fig. 6).
 Fig. 6: Configuring network ranges
Next, with the network range configured, we can add a policy rule. This can be done as follows:
- Navigate to the Administration > Directories Management > Policies
- In the Policy Rules section, within the table, click the [+] The dialog window opens (see Fig. 7).
 Fig. 7: Adding a policy rule
 - From the If a User’s Network Range is … drop-down list, choose your newly created network range.
- Choose the device in the and the user is trying to access conent from … drop-down list.
- In the then the user must authenticate using the following method… section, choose the combination of authentication mechanisms.
- Optionally, you can configure a failback method.
- Review and optionally change the value in the Re-authenticate after text box.
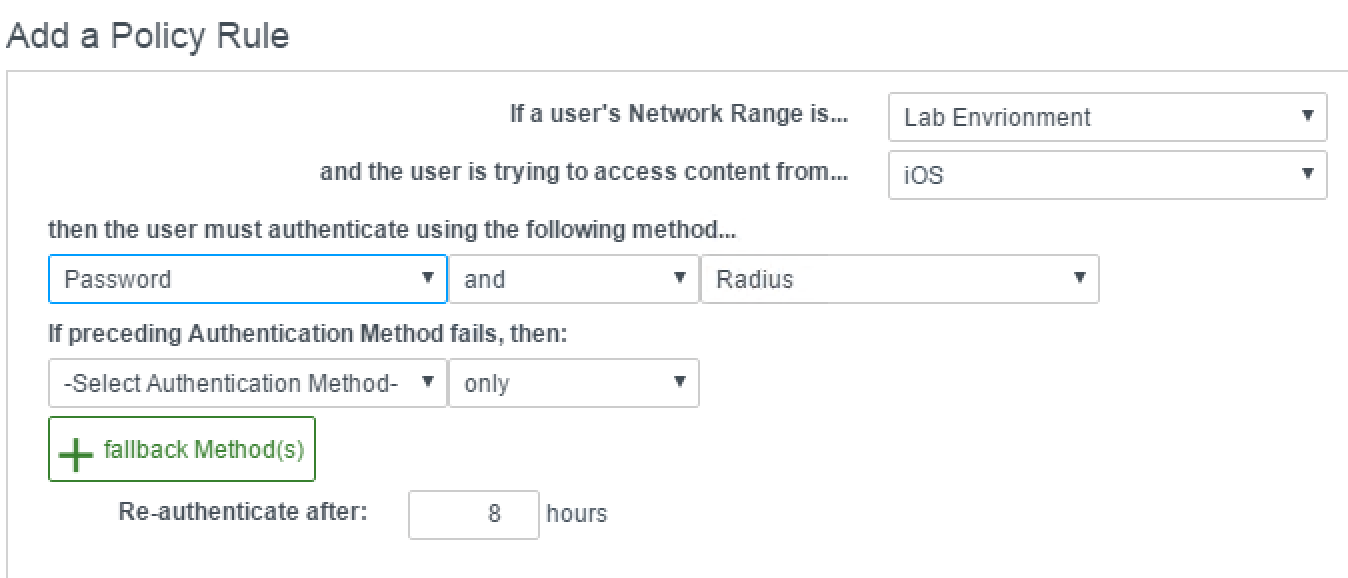 Fig. 7: Adding a policy rule
| Supported Devices
Right now, policy rules support the following devices:
|
5.2.3 Setting up Kerberos authentication
Domain users who have successfully logged in on a Windows operations system that is part of a Active Directory domain, can access the vRealize Automation portal without entering their credentials again. However, in order to configure that, Kerberos authentication must be configured in advance.
First, the connector must be joined to Active Directory:
- Log in as a tenant administrator and navigate to the Administration > Directories Management > Connectors
- Choose the connector to be configured and click on the Join Domain button on the right side.
- Provide the Domain, the Domain User and the Domain Password and click Join Domain (see Fig. 8).
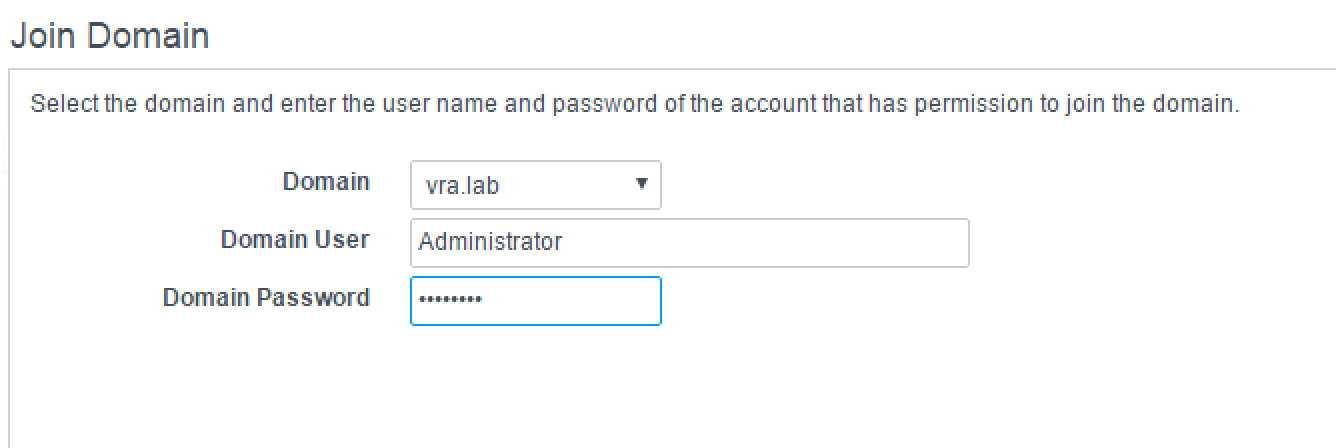 Fig. 8: Joining a connector to a domain
In the next step, we can configure the worker’s adapter:
- Within the connector’s row, click on the worker’s link.
- Select Auth Adapters.
- Within the adapters table, click on the KerberosIdpAdapter. Another window opens and you are redirected to the VMware Identity Manager (see Fig. 9).
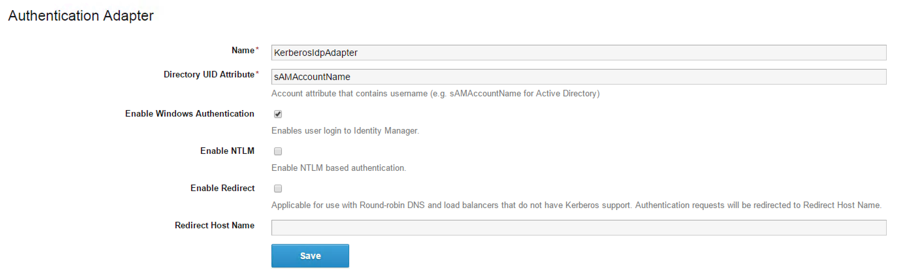 Fig. 9: Configuration of the Kerberos authentication adapter
 - Review the Name and optionally change it (the default is KerberosIdpAdapter).
- Within the Directory UID Attribute text box, please enter the account attribute that contains the user name (e.g. sAMAccountName for Active Directory).
- To extend authentication interactions between users‘ browsers and Directories Management, check the Enable Windows Authentication checkbox.
- To enable NTLM based authentication, please check the Enable NTLM Only activate this option if your Active Directory infrastructure relies on NTLM authentication.
- The next option, Enable Redirect, is only of interest, if you are using a round-robin DNS and your load balancer does not have Kerberos support. Authentication requests are redirected to Redirect Host Name. If this is selected, enter the redirect host name in Redirect Host Name text box. This is usually the hostname of the service.
- Click on the Save
Next, in order to let the authentication adapter come into effect, we have to change the default access policy:
- Navigate to the Administration > Directories Management > Policies page and edit your default policy.
- Within the Policy Rules section, create a policy rule for your network range with the Kerboros authentication method.
- Change the ordering of the policy rules accordingly (see Fig. 10).
- Click Save.
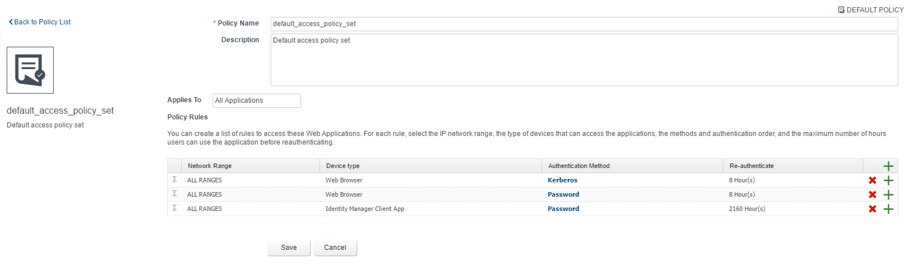 Fig. 10: Adding a Kerberos policy rule
Last but not least, we have to check the browser settings and allow users to automatically log in using our Kerberos authentication provider. Settings vary based on your browser. For Internet Explorer, perform the following steps:
- Open the Tools > Internet Options > Security menu and click on Custom Level and check if the Automatic logon only in Intranet option is set.
- In order to verify, that this instance of the connector virtual appliance is part of the local intranet zone, open the URL https://<myconnectorhost.domain.name>/authenticate/ and check if the zone is Local Intranet. If so, you are done.
- If not, select Tools > Internet Options > Security > Local intranet > Sites and check the option Automatically detect intranet network. Close all dialog boxes.
- In the Local Intranet dialog box, click Advanced and enter the URL (https://<myconnectorhost.domain.name>/authenticate/) in the Add this Web site to the zone text box. Click Add > Close > OK.
- Last, verify that Internet Explorer is allowed to pass the Windows authentication to the trusted site by opening the Advanced tab in the Internet Options dialog box.
- Select Enable Integrated Windows Authentication and click OK.
For Chrome you have to go through the same steps as for Internet Explorer, and then allow Chrome to use the Internet Explorer configuration.
Firefox is supported for Kerberos authentication as well and can be configured as follows:
- Enter about:config in the Firefox address URL text box and click I’ll be careful, I promise!
- Double-click negotiate-auth.trusted-uris, enter your connector URL (https://<myconnectorhost.domain.name>/) and click OK.
- Double-click negotiate-auth.delegation-uris, enter your connector URL (https://<myconnectorhost.domain.name>/authenticate) and click OK.
5.2.4 SAML-based authentication
We have just described how vRealize Automation can handle authentication based on password and Kerberos authentication providers. However, such an authentication can have limits. When you have a unified user repository such as Active Directory or LDAP, your users only need a single set of credentials – however, that only works within a single organization.
We mentioned before that vRealize Automation supports identity federation with SAML 2.0 (Security Assertion Markup Language 2.0), an open standard that many identity providers (IdPs) use. This feature enables federated single sign-on, so users can log in to the vRealize Automation portal without you having to create a user for everyone in the organization.
Advantages of using SAML
Using SAML has quite a lot of benefits. Some of them are listed below:
- There is no vendor lock-in, since SAML is an open standard. You can switch the vendor without an impact on the user experience.
- It is reusable, as several Service Provider (SP) can connect to one IdP for authentication and one SP can connect to several IdPs.
- Better accessibility.
- It eliminates additional credentials thus reducing opportunities for identity theft.
- There are also lower phishing opportunities by reducing the numbers of times the user has to log in.
How SAML works
After having given a motivation for using SAML and a brief overview of its advantages, let’s talk about how it works. First of all, it is important to know that there are different parties involved in a SAML communication. We can describe them as follows:
- First of all, there is the Identity Provider The Identity Provider maintains a directory of users and an authentication mechanism to authenticate them. So far, when talking about an Identity Provider, we always meant the integrated VMware Identity Manager, but there are others such as the Active Directory Federation Services (AD FS) that can be integrated into vRealize Automation. AD FS is a component of Active Directory developed by Microsoft that can be used to provide users with Single Sign On access to systems and applications located across organizational and security boundaries.
- Second, there is the Service Provider. A service provider is the application itself and implements the SAML 2 authentication. SPs can be web sites, SOAP web services, RESTful services, or our vRealize Automation portal. Generally speaking, the Service Provider is the target application that a user will try to use.
- Last but not least, users are using a device such as a web browser or mobile device to access the vRealize Automation portal. The principal must be registered in the IdP.
Let’s look closer at the sequence of steps to generate a SAML token, and then use it to gain access to an application or resource. Fig. 11 shows the basic steps necessary for SSO using SAML.
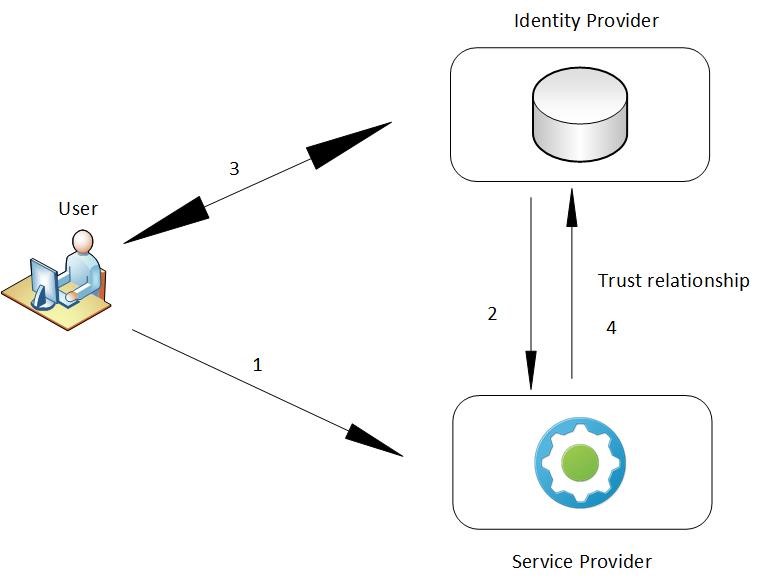 Fig. 11: SAML interaction
At runtime, the communication happens as follows:
- The user accesses the Service Provider with a SAML secured application.
- The SP sends a request to a pre-registered IdP for authentication. ‘samlp’ is the SAML 2.0 protocol namespace, ‘urn:oasis:names:tc:SAML:2.0:protocol’.
- If the user is not authenticated yet, the IdP interacts with the user to authenticate him.
- IdP sends a response to the SP with the token for the user
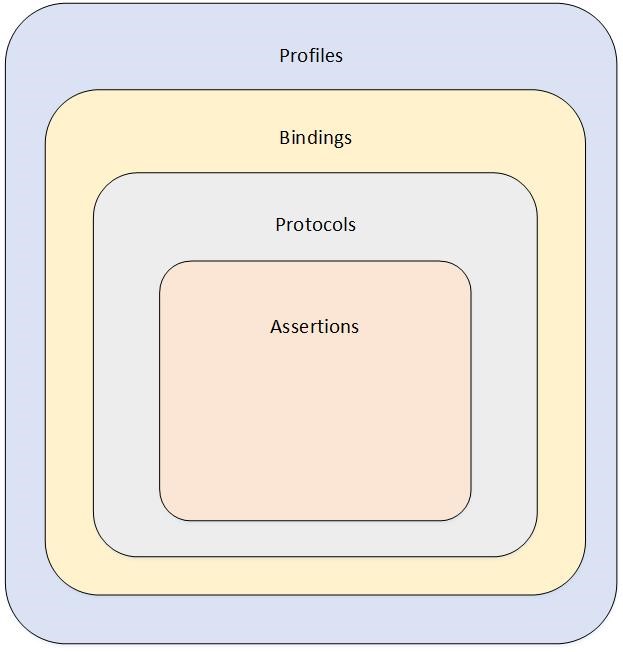
Within the SAML framework, there are four concepts: Assertions, protocols, bindings and profiles. Fig. 12 shows the relationship between these concepts. Let’s describe them briefly.
- A SAML assertion is a packet of information that contains required user attributes or one or more statements about the user. It is the IdP that generates such statements and it is the SP that consumes them. The SP can make access control decisions about the previously authenticated user by reading and checking that contextual information.
- Normally, assertions are created by the Identity Provider in response to a request made by the Service Provider. These response/ requests are known as SAML protocols.
- While the SAML protocols define what is being transmitted, there are several transport bindings that can be used to define how to transfer the data. Some of the popular bindings include – HTTP Redirect (GET) binding, SAML SOAP binding, and HTTP POST binding.
- SAML profiles define how bindings, protocols and assertions are combined to satisfy a particular use case. SAML profiles can be seen as templates, each profile uses different combination of bindings, protocols and assertions. One of the most used SAML profiles – especially important for vRealize Automation – is the Web Browser SSO Profile
5.2.4.1 Integration with SAML 2.0 based Identity Providers
With that knowledge in mind, we can discuss how to integrate SAML 2.0 based identity providers. We have just discussed the basic workflow during a Web Browser SAML interaction and have found out that a trust relationship between the service provider and the identity provider must be properly set up. Consequently, this means we need the third-party identity provider metadata information and add it to the vRealize Automation administration console. On the other hand, the service provider information of vRealize Automation must be obtained and be registered with the identity provider.
One of the most popular SAML 2.0 provider is Active Directory Federation Services (AD FS), so we want to briefly show how to configure a bidirectional trust relationship between vRealize Automation and AD FS.
AD FS is a software component that was developed by Microsoft and can be installed on Windows Server. AD FS uses a claims-based access control authorization model to maintain application security and implement federated identity. We have already discussed the key components in SAML, however with AD FS the naming is a little bit different, so it is a good idea to show the parallels between VMware Identity Manager and Microsoft AD FS (see Fig. 13).
| AD FS 2.0 | SAML 2.0 | Description |
| Security Token | Assertion | Collection of XML-formatted security information describing users, which is created and consumed during a federated access request. |
| Claim Provider | Identity Provider | Partner that creates security tokens for users. |
| Relying Party | Service Provider | Partner that consumes security token for providing access to applications. |
| Claims | Assertion Attributes | Data about users inside token. |
Fig 13: AD FS 2.0 and SAML 2.0 comparison
In the following, we will not show how to install and set up AD FS, because there are plenty of how-to documents for that (you can also find a document on the VMware website[1]). Instead, we will concentrate on the vRealize Automation part. The basic steps are as follows:
To configure a bi-directional trust relationship between vRealize Automation and Active Directory, you have to create a custom identity provider and add Active Directory metadata to this provider. Moreover, you must modify the default policy. Finally, you must configure Active Directory to recognize your identity provider.
Perform the following steps:
- Open a web browser and download the federation metadata file from AD FS. The file can be found at the following location: https://<AD FS server.domain.name>/FederationMetadata/2007-06/FederationMetadata.xml.
- Next, search for the word logout, and edit the location attribute to point to https:// servername.domain/adfs/ls/logout.aspx. For example:<SingleLogoutService Location=“https://iaas.vra.lab/adfs/ls/“ Binding=“urn:oasis:names:tc:SAML:2.0:bindings:HTTP-Redirect“/>should become<SingleLogoutService Location=“https://iaas.vra.lab/adfs/ls/logout.aspx“ Binding=“urn:oasis:names:tc:SAML:2.0:bindings:HTTP-Redirect“/>
- Next, log in into vRealize Automation as a tenant administrator and change to the Administration > Directories Management > Identity Providers page.
- Click Add Identity Provider.
- Provide a Identity Provider Name.
- Paste the modified XML in the Identity Provider Metadata text box and click Process IdP Metadata.
- Select the users that can authenticate using this IdP.
- Define the networks this IdP can be accessed from.
- Within the Authentication methods section, type the authentication methods along with the SAML context the IdP will use.
- Save the Directories Management metadata file as sp.xml. You will need this information when configuring the trust relationship in the AD FS configuration tool.
- Click Add.
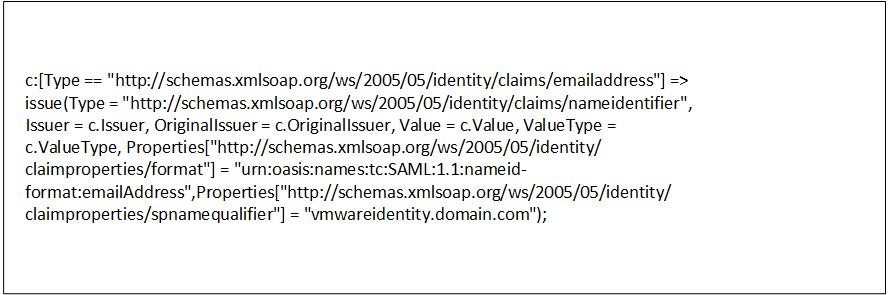 Fig. 14: SAML attributes
In addition to the service provider metadata that you just downloaded, you have to set up a claim rule in AD FS. The claim rule transforms the attributes retrieved from LDAP in the Get Attributes rule into the desired SAML format. After you create the rule, you must edit the rule by adding the following text depicted in Fig. 14.
| SAML Federation between directories
We have just described how to integrate a SAML 2.0 identity provider into vRealize Automation by setting up a trust relationship between the Identity Appliance and the SAML provider. However, besides that it is also possible to set up a SAML federation. This means that end users authenticate via their SAML provider web page and automatically obtain access to vRealize Automation (in contrast to setting up additional SAML based authentication stores). Currently, you can setup up such a configuration only by using the vCenter SSO (SSO2). The only supported end-to-end flow is where SSO2 acts as the Identity Provider and Directories Management as the service provider (SP). Because this scenario is not quite common, we will not discuss this topic in further detail at this point. |
5.2.5 Multifactor authentication
When setting up security, the most important question is always how to protect and secure your resources. We have learnt that vRealize Automation supports a variety of authentication sources. One of these methods is to use 2-Factor authentication.
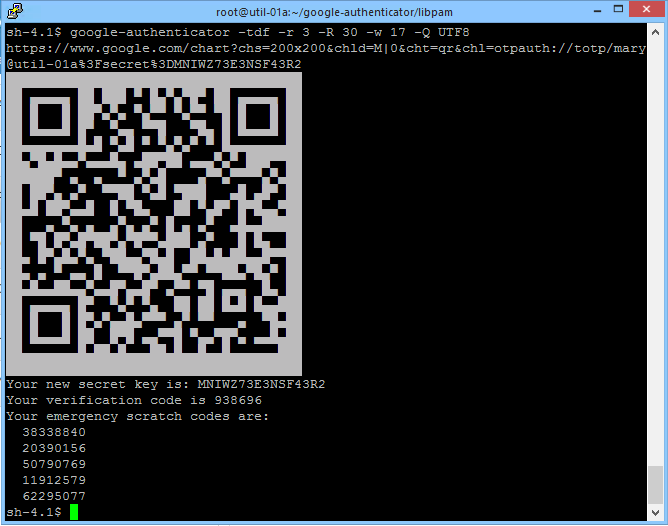
One way to implement such a scenario is to connect a Radius server to the Identity Appliance that can generate a QR code with the Google Authenticator software (see Fig. 15). People with access to the virtual machine can scan the QR code with their smartphones and use the token to log in to vRealize Automation.
Right now, using this feature is quite complicated as you first need to have access to a virtual machine generating the QR code, scan the code and type in the token code along with your password within the vRealize Automation logon screen. However, if you are still interested in implementing such a scenario, Jon Schulman has published an interesting post on the VMware blog[2] that describes how to setup a FreeRADIUS server with Google Authenticator on CentOS and how to integrate the server in vRealize Automation.
5.3 Tenant Branding
At the beginning of the chapter, we have already shown how to configure the basic branding on a system level. You can override these settings on a per-tenant basis as well. Once logged in as tenant administrator, settings can be changed within the Administration > Branding page. Just like the system settings, the following configuration can be changed:
- Header logo
- Company name
- Product name
- Background color
- Text color
- Copyright notice
- Privacy policy link
- Contact link
Besides that, it is possible to change the login screen branding. Tenant administrators can change the logo, a background image, background color, the color of the login header dialog and the login button color (see Fig 16.).
5.4 Summary
This chapter showed how to perform basic tenant settings. One of the biggest changes compared to older vRealize Automation releases was the integration of the Identity Services – a solution with much more features and better scaling that the old vSphere SSO component.
[1] https://www.vmware.com/pdf/vidm-adfs-integration.pdf
[2] http://blogs.vmware.com/management/2016/02/configuring-vra-7-for-2-factor-authentication.html
Recent Comments