
Now that we have taken a closer look at vRealize Automation, its design and its components in the first three chapters, we can now start with the deployment of vRealize Automation.
Although vRealize Automation is a complex product, the installation can be quite smooth – if properly planned.
In this chapter, you will learn:
- How to deploy the vRealize Automation appliance.
- How to install and configure vRealize Automation.
- How to change certificates.
In order to install the product, you have to first deploy the vRealize Automation appliance and provide a Microsoft SQL Server instance. Once this has been done, you have to prepare the IaaS nodes in order to run the vRealize Automation Installation wizard. The steps needed to perform the installation are shown in Fig. 1.
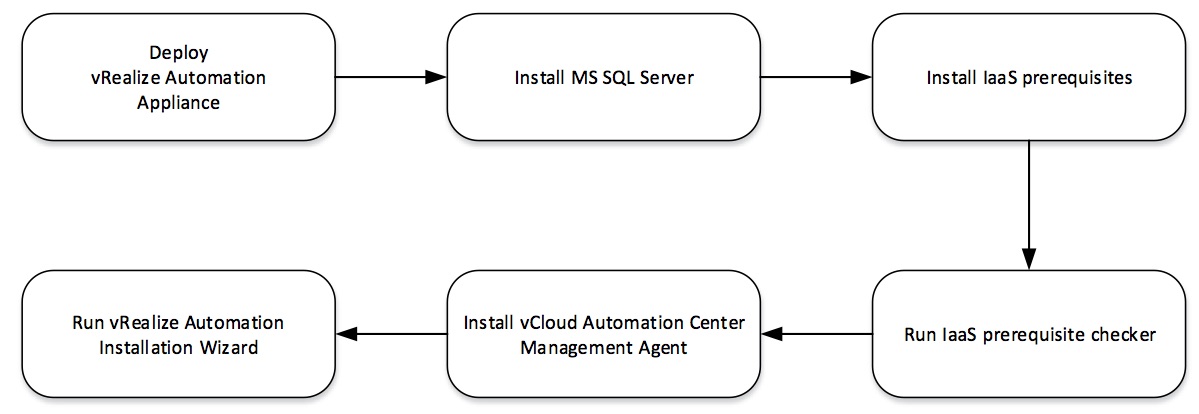 Fig. 1: Installation steps
4.1 Deploying the vRealize Automation Appliance
Similar to many other VMware products, the deployment of the appliance is a quite straightforward process. However, before beginning with the deployment process, make sure that you have correct DNS names for all the machines in your vRealize environments. vRA internally uses the fully-qualified domain (FQDN) names for communication. Please also be aware that no underscore (“_”) is allowed in any FQDN. Once these prerequisites have been fulfilled, we can begin with the deployment.
Please consider that for a minimal installation or a proof-of-concept deployment self-signed certificates are fine. However, if you plan a distributed or a production ready deployment, a multi-use certificate, such as a Subject Alternative Name (SAN) certificate, wildcard certificate or any other method of multi-use certification as long as you satisfy the trust requirements, is recommended.
We will use the classical vSphere Client, but needless to say, the Web Client can also be used for the deployment.
| Generating signed certificates
Anybody who was already in charge of replacing certificates in a vRealize Automation environment, has most likely felt the pain when managing the certificates. Unfortunately, there is no central place where all the certificates can be managed and rolled-out to the various components. This basically means, that you have to run OpenSSL commands for each host, create various template files, export CSR and come back to the nodes later. Last but not least, the different nodes in a vRealize Automation environment need their certificate in a different format. Luckily, VMware has published a vRealize Certificate Generation tool that relieves you from the burden of manually doing all these steps by yourself. The included certgen tool reads your certificate information and automatically creates the required private key and certificate request. Once you have obtained the root certificate from your CA and requested your certificate from there, the tool helps you with converting the certificate into the right format. The tool itself comes with a pretty good documentation, so we will not cover how the tool works within the book. |
To deploy the appliance, please go through the following steps:
- Open the vSphere Client and choose File > Deploy OVF Template in the menu.
- The assistant opens and asks you to choose a source file for deployment. Click on the Browse button, search for your appliance file (with the .ova or .ovf ending) and click Open and then Next.
- Review the settings on the OVF Template Details screen and click Next to continue.
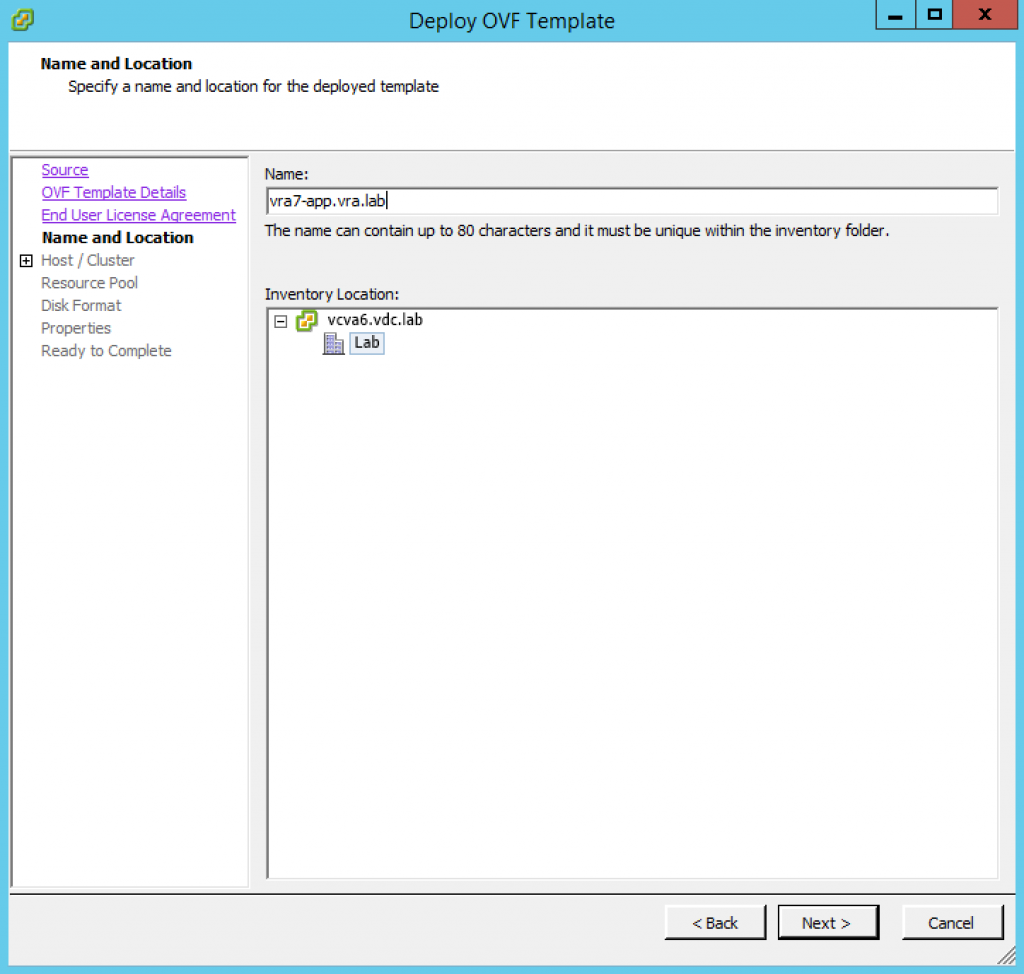 Fig. 2: Choose name and location
 - Confirm the End User License Agreement by clicking on Accept and continue with Next.
- The dialog Name and Location asks you to specify a Name and the Location in the vSphere inventory. Please provide the values and continue with Next (see Fig. 2)
- Please choose the Cluster where your appliance should be deployed, on the Host / Cluster Proceed with Next.
- The next page is about the Resource Pool. Specify the pool to be used and carry on with Next.
- On the page Disk Format, you can choose if you want to have your appliance deployed as: Thick Provisioned Lazy Zeroed, Thick Provisioned Eager Zeroed or Thin Provisioned. Click on Next
- The next step deals with networking. Please choose the network to which your appliance should be connected (dropdown list Destination Network) and continue with Next.
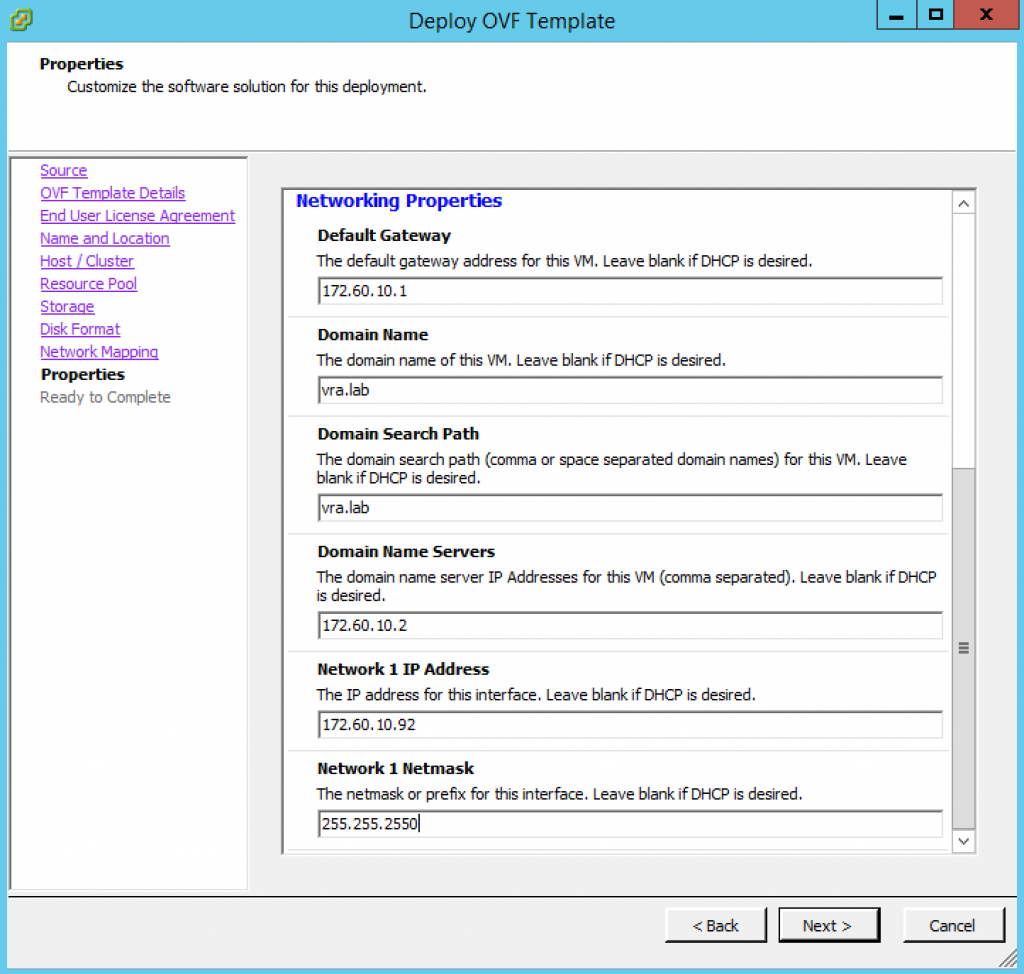 Fig. 3: Appliance properties
 - You need to specify a couple of properties on the Properties dialog box ( Fig. 3):
 Fig. 2: Choose name and location
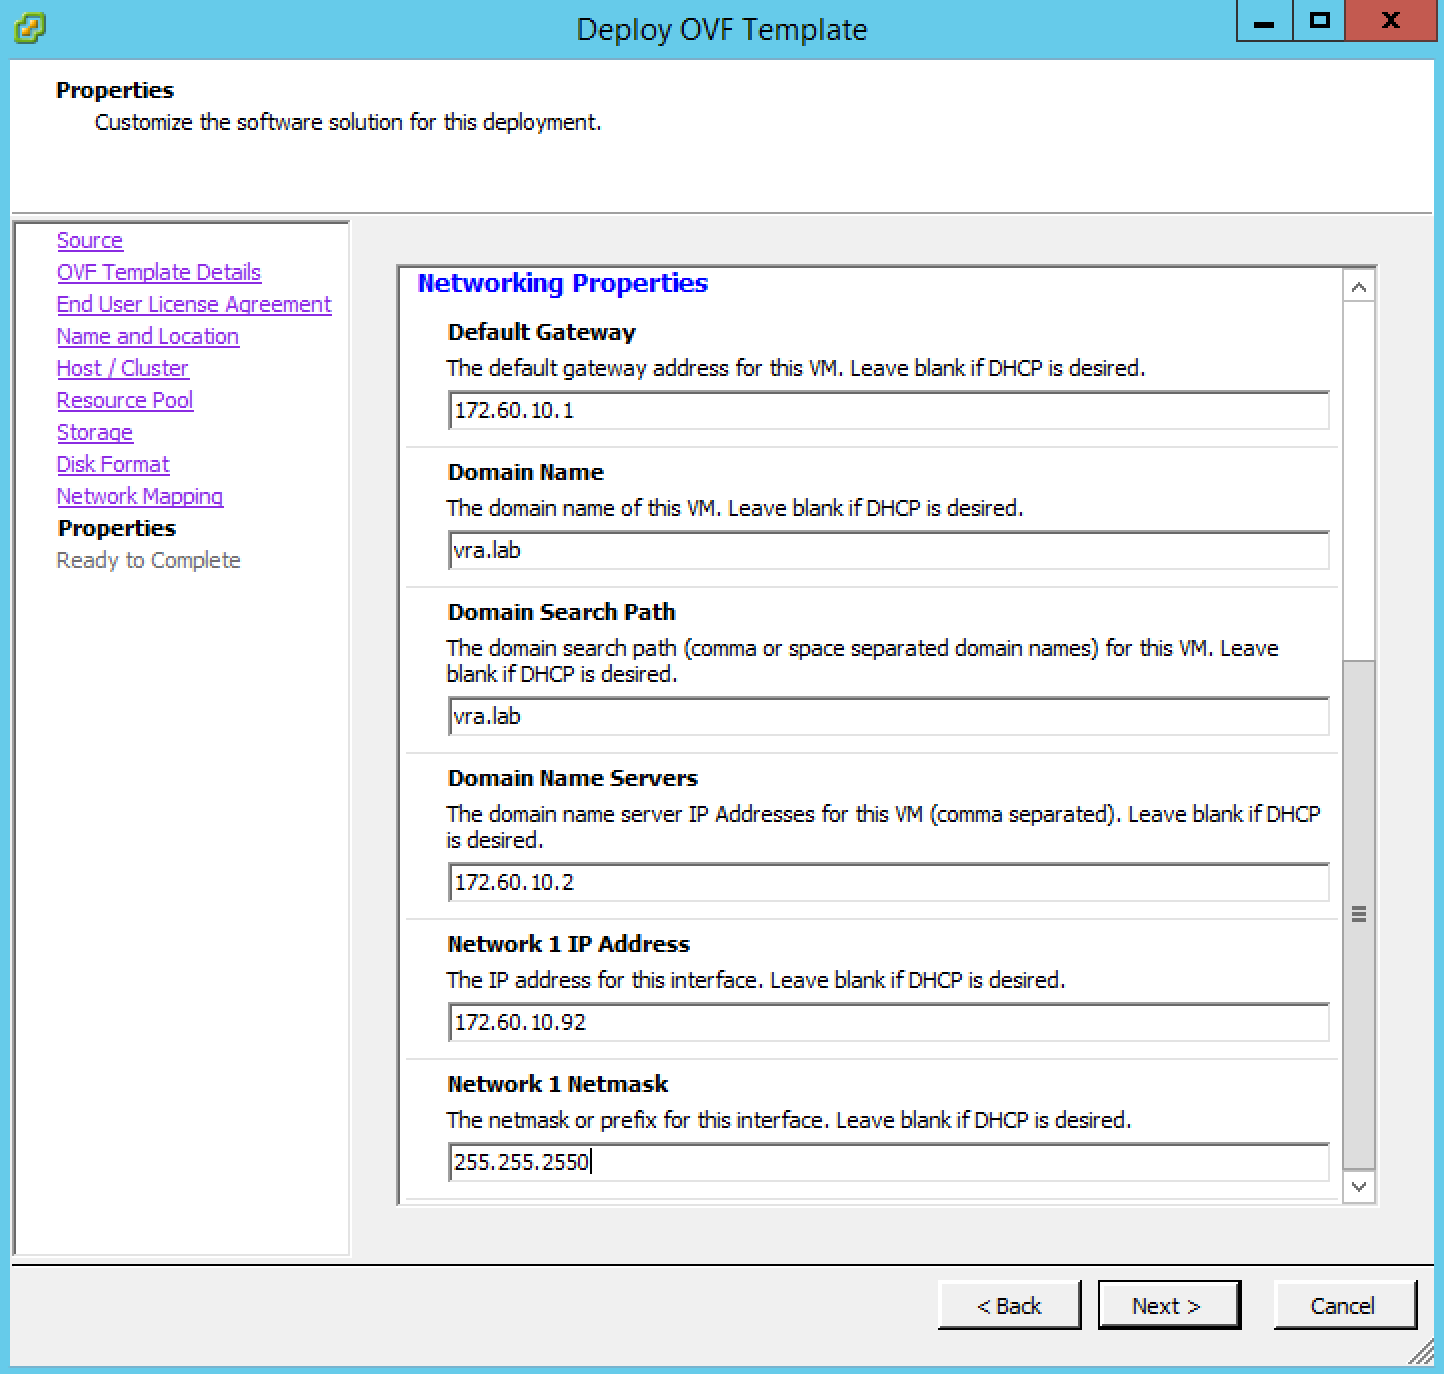 Fig. 3: Appliance properties
- Enter and confirm a password for the root account of the appliance in the Initial root password
- Specify if you want to enable root access via SSH, using the Enable SSH service in the appliance
- In the Hostname textbox, please specify the full host name (FQDN) of your virtual machine.
- Define the Default Gateway, DNS Server, Network 1 IP Address and Network 1 Mask within the Networking Properties
- Click Next to continue.
- On the last Ready to Complete screen, please review your settings, choose Power on after deployment and start the deployment process with Finish.
4.2 Installation of vRealize Automation
After the vRealize Automation appliance has been deployed, we can continue with the installation and configuration of its components. However, before being able to install the IaaS components, you have to ensure that you meet the vRealize Automation installation requirements for Windows. As there are quite a lot of requirements to meet and a missing requirement can lead to a failed installation, VMware provides a prerequisite checker to make sure all the requirements are met. There is even a prerequisite installer that can automatically download and install all requirements (however, this tool is not officially supported and must be downloaded from a VMware blog; see e.g. link in section 4.2.1.6).
4.2.1 Installation requirements
In short, any virtual or physical machine that hosts an IaaS component must meet configuration requirements. The same applies to the Microsoft SQL Server. So let’s summarize the requirements.
4.2.1.1 IaaS database requirements
When installing the host for the MS SQL Server, please make sure the following requirements are met:
- The TCP/IP protocol is enabled on the MS SQL Server host.
- The Microsoft Distributed Transaction Coordinator Service (MS DTC) is enabled on all SQL nodes in the system. MS DTC is required to support database transactions and actions such as workflow creation.
- If you have a firewall running between the database server, Web servers or IaaS servers, deactivate the firewall or open the ports needed (MS SQL server uses port 1433 and MS DTC requires the use of port 135 over TCP and a random port between 1024 and 65535).
- If using SQL Server Express, the SQL Server Browser service must be running.
4.2.1.2 IaaS (Windows Server) Requirements
However, before we can start with the installation, we should first consider the following issues:
- The user performing the installation must have local administrator privileges.
- It is best practice to have a dedicated service account for vRealize Automation. The recommended way is to create an Active Directory user and add this user to a local administrator group on all IaaS components.
- If we have a dedicated node for the Microsoft SQL Server, we need privileges for the server. A good practice would be to create a database for vRealize Automation first and then assign the database owner role to the vRealize service account.
The installation itself has the following prerequisites:
- Installation of Microsoft .NET 4.5.2.
- PowerShell must be installed (minimal version 2.0).
- Microsoft Internet Information Server 7.5
- Java 1.7 64 bit must be installed on the machine running the primary Web component to support the deployment of the MS SQL database during installation. Please also configure %JAVA_HOME% as the environment variable for the installation path and add the %JAVA_HOME%\bin\java.exe binary to the PATH variable.
Regarding Microsoft Internet Information Server (IIS) 7.5, there are a couple of configuration steps to be taken:
- Configure the following modules:
- Windows Authentication
- Static content
- DefaultDocument
- ASPNET 4.5
- ISAPIExtensions
- ISAPIFilter
- You also have to ensure that the following is set correctly:
- Windows Authentication enabled
- Anonymous Authentication disabled
- Negotiate Provider enabled
- NTLM Provider enabled
- Windows Authentication Kernel Module enabled
- Windows Authentication Kernel Mode enabled
- Windows Authentication Extended Protection disabled
- For certificates using SHA512, TLS1.2 must be disabled on Windows 2012 or Windows 2012 R2 servers.
- Last but not least, check the following IIS Windows Process Activation Service roles:
- ConfigurationApi
- NetEnvironment
- ProcessModel
- WcfActivation (Windows 2008 only)
- HttpActivation
- NonHttpActivation
4.2.1.3 IaaS Manager Service
There are also a couple of prerequisites for the IaaS Manager Service:
- Microsoft .NET Framework 4.5.2 must be installed.
- PowerShell must be installed (minimal version 2.0).
- The SecondaryLogOnService must be running.
- The IIS must be installed and configured as described above
- Please ensure that no firewalls can exist between DEM host and Windows Server (or the port 443 as well as the required ports of the MS DTC are open).
4.2.1.4 Distributed Execution Manager
- Microsoft .NET Framework 4.5.2 must be installed.
- PowerShell must be installed (minimal version 2.0).
- The SecondaryLogOnService must be running.
- Please ensure that no firewalls can exist between DEM host and Windows Server (or the port 443 as well as the required ports of the MS DTC are open).
4.2.1.5 Other pre-requisites
Micosoft SQL Server
Furthermore, you need a Microsoft SQL Server for IaaS components. During the installation, the database schema will be created. The database name itself will be specified during the installation. For the installation, the “database owner” role is recommended. However, this still assumes that you have created the database by yourself. If the installation procedure should also create the database, system administrator privileges are needed for the MS SQL Server.
Time synchronization
Also consider that time synchronization is crucial in a distributed environment. On Windows machines, you can configure NTP (port 123 must be open) or you can use the W32Time service. On the Linux appliances, you can configure NTP as well or let the VMware tools synchronize the time (if your ESXi server already have a valid NTP configuration).
If you plan to use a vSphere endpoint (what you will most likely do), please consider that you need a domain or local account that has the appropriate level of access configured for vCenter.
| Loopback protection
If you choose a distributed deployment, please consider the fact that only the first IaaS Web server node runs the Model Manager (the Model Manager is responsible for persisting, versioning, securing and distributing model elements). Loopback protection can be disabled on all IaaS machines as a best practice, but actually the configuration is only needed on the primary Web server. For checking how to disable the loopback protection, please consult the Microsoft documentation or follow the instructions on the prerequisite checker during the installation. |
4.2.1.6 Automated Installation of Prerequisites
Luckily, there is a PowerShell script available[1] on the VMware blogs, which unburdens you from most of the configuration tasks. This script was especially developed for vRealize Automation 6, but as the prerequisites on the Windows machine have remained more or less the same with the new vRealize Automation version, it is still possible to use the same script. Please note that there is no warranty from VMware regarding this script. However, in most environments, it will run without modifications (as a recommendation, before running the script, please take a snapshot of the machine). Nevertheless, it is still a good idea to take a closer look at its logic, so that you can modify it if required. The script is specifically designed for a complete installation of the Windows components on a single node. If you have a distributed environment, you should take a deeper look at the script, so that you can understand which parts of the script need to run on the different nodes. If you need to execute the scripts, please follow these instructions:
- Install Microsoft .NET framework 4.5.2.
- Run Windows PowerShell with Administrator privileges.
- Change to the folder where the script is located.
- Run the command Set-Execution-Policy unrestricted.
- Start the script and provide all the requested information. The script will take a couple of minutes to run (see Fig. 4).
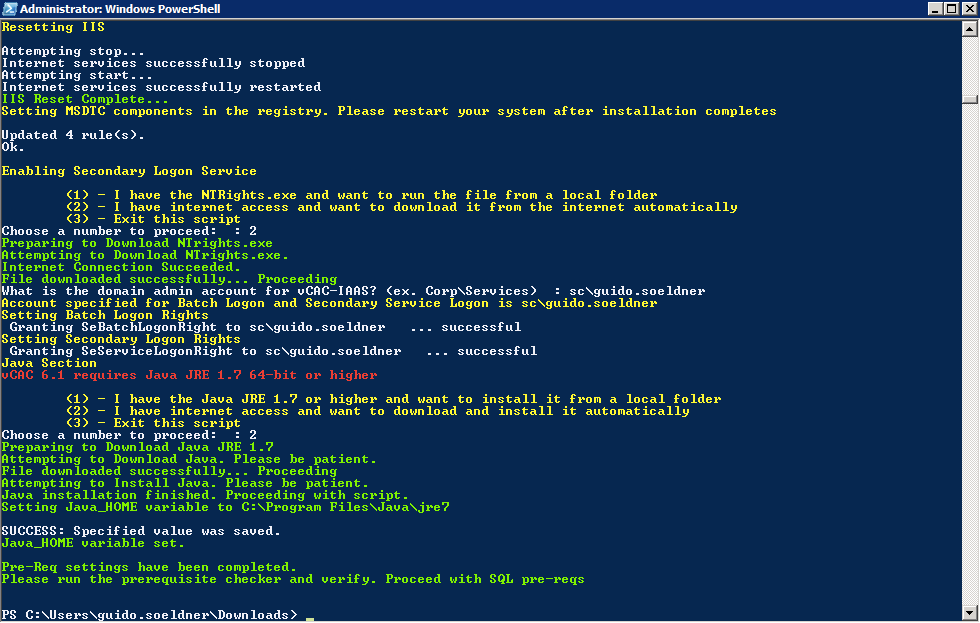 Fig. 4: Automated installation of prerequisites
| Tip: Taking snapshots
As discussed, the installation is very time-consuming and there is plenty of room to make mistakes. While some mistakes can be easily reverted, others may well require reconfiguring some parts from scratch (especially the Windows components). Now that all prerequisites have been met, it is a perfect time for creating a snapshot of all components involved in the installation. |
| Tip: Prerequisite Checker
From time to time, the Prerequisite Checker complains about issues, which have already been fixed. If that is the case, a reboot might help. |
4.2.2 vRealize Automation Installation
In previous releases, the installation of vRealize Automation was a time-consuming and a complex task – especially when performing a distributed installation. VMware has addressed this issue in the current version and is providing a wizard based deployment. The wizard works both for simple deployments with all the IaaS components on one node as well as for a distributed environment. The wizard not only configures the Linux appliance for you, it will also perform the installation of the IaaS components. Nevertheless, if you want to perform a customized installation or want to add additional components, you can still run the installer as in the previous releases.
4.2.2.1 vCloud Automation Center Management Agent Installation
Before starting the wizard-based deployment, there is a final task to do: The vCloud Automation Center management agent must be installed on all the IaaS nodes participating in the installation. We already have introduced the management agent in chapter 2, so you will surely remember that the management agent is responsible for collecting support and telemetry information. It also registers the IaaS nodes with the vRealize Automation appliance and that’s the reason why we have to install it before-hand.
Perform the following steps for the installation of the management agent:
- Open your browser from the IaaS node and open the VMware vRealize Automation IaaS Installation page (https://<vRA host.domain.name>:5480/installer).
- Click on the Mangement Agent Installer download link.
- Launch the installer file.
- Once the setup wizard has been started, click Next on the Welcome dialog.
- On the End-User Licence Agreement dialog accept the license agreement and click Next to continue.
- Accept the default location (C:\Program Files (x86)\VMware\vCAC\Management Agent) and click Next.
- Provide the following input on the Management Site Service dialog (see Fig. 5):
- Management Site Service Address: The URL of your vRealize Automation appliance, in combination with the port (https://<vRA host.domain.name>:5480).
- Virtual Appliance username: This is the root user.
- Password: You specified the password during the deployment of the vRealize Automation appliance process.
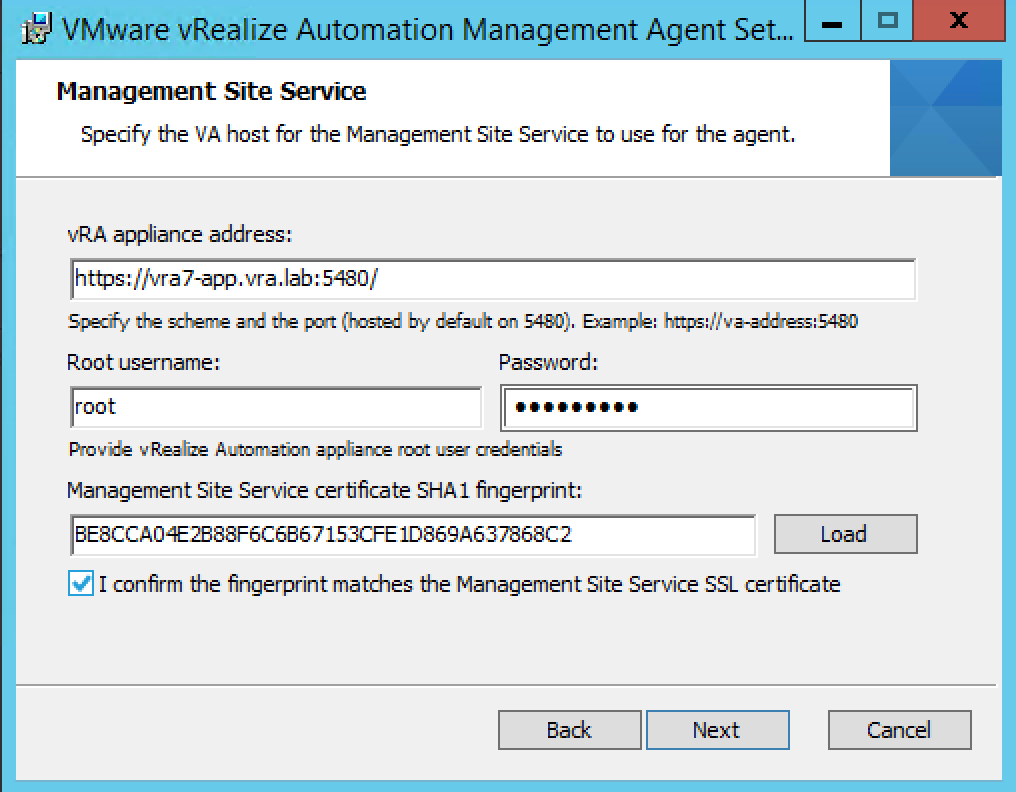 Fig. 5: Installing the vCloud Automation Center management service
- Click on Load to download the management site certificate SHA1 thumbprint and accept the checkbox to confirm that the thumbprint matches to your management site SSL certificate. Click Next to continue.
- In the Service Account Configuration dialog, enter the service account credentials for the management service. This should be a domain account. Continue with Next.
- Review your current hostname and clickt the Resolve button to check if your hostname can be resolved. Continue with Next. The installation begins.
- Once the installation has been completed successfully, click the Finish button to quit the wizard.
4.2.2.2 vRealize Automation Installation Wizard
Due to the fact that the installation process was quite complex and painful in former releases, the vRealize Automation appliance now ships with a wizard for the installation and configuration of the vRealize Automation environment. There are two different types of installation in the wizard: Minimal and enterprise.
In the remainder of this chapter, we will show how to install vRealize Automation in a load balanced, high-availability environment. The wizard will take care of configuring the appliance itself as well as installing all the necessary components on the IaaS nodes. Needless to say that you are still free to launch the old installer files by yourself to perform a custom installation or to modify your environment.
So with this knowledge in mind, let’s start the installation.
| Tip: Exit wizard
Do not cancel or exit out of the wizard at any time. If you exit the wizard, you might not be able continue the wizard and will have to go through the manual installation. |
- Open a web browser and open the vRealize Automation appliance VAMI page (https://<vRa host.domain.name>:5480).
- Log in as user root and with your assigned password.
- On the first screen, click Next to continue.
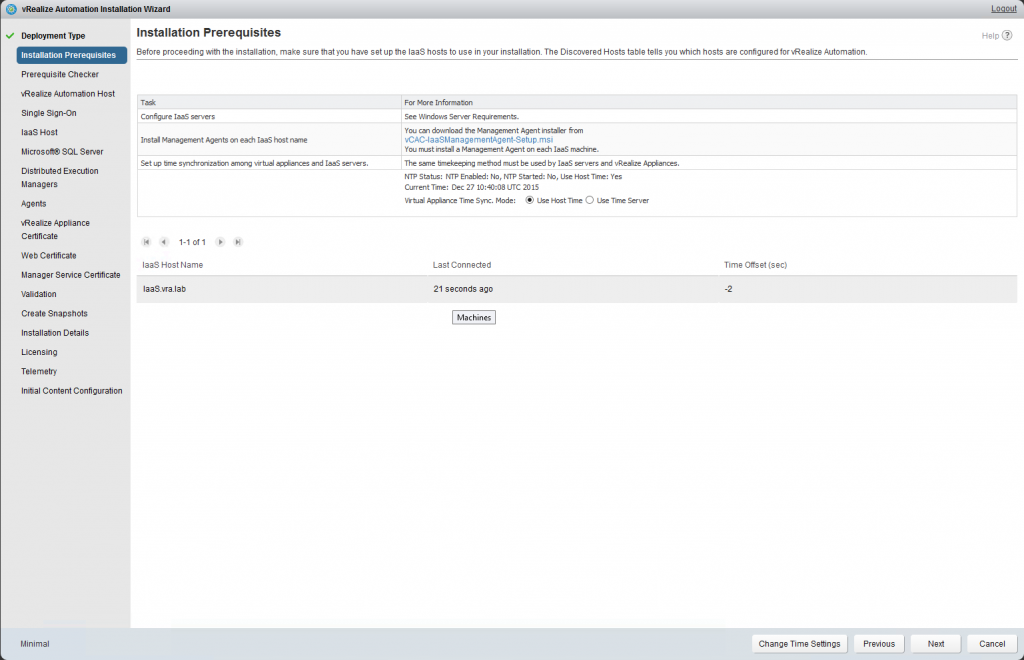 Fig. 6: IaaS hosts installation prerequisites
 - In the End-User Licence Agreement dialog accept the license agreement and click Next to continue.
- The next page lets you choose the deployment type. Select the Enterprise deployment type and check the Install Infrastructure as a Service Click Next to continue
- The next screen sumarizes the installation prerequisites (see 6). Check that your configured IaaS hosts appear in the lower section of the screen and check if the last connection time is lower than 3 minutes and the time offset only shows a small amount of seconds. Click Next to continue.
- The next screen is where you can assign additional vRealize Automation appliances. If you want to setup up a cluster, please add the additional appliance along with its credentials. Continue with Next.
- You can assign the IaaS server roles on the next screen (see Fig. 7). Select on which hosts you want to have the web component, the manager service, the DEM and the proxy agent installed and click on Next to continue.
- The next screen lets you define the entry point for your application. If you only have one vRealize Automation appliance, select Resolve Automatically and review the vRealize Address. In case that you want to deploy several appliances, type in the address of your load balancer and click on Next to continue.
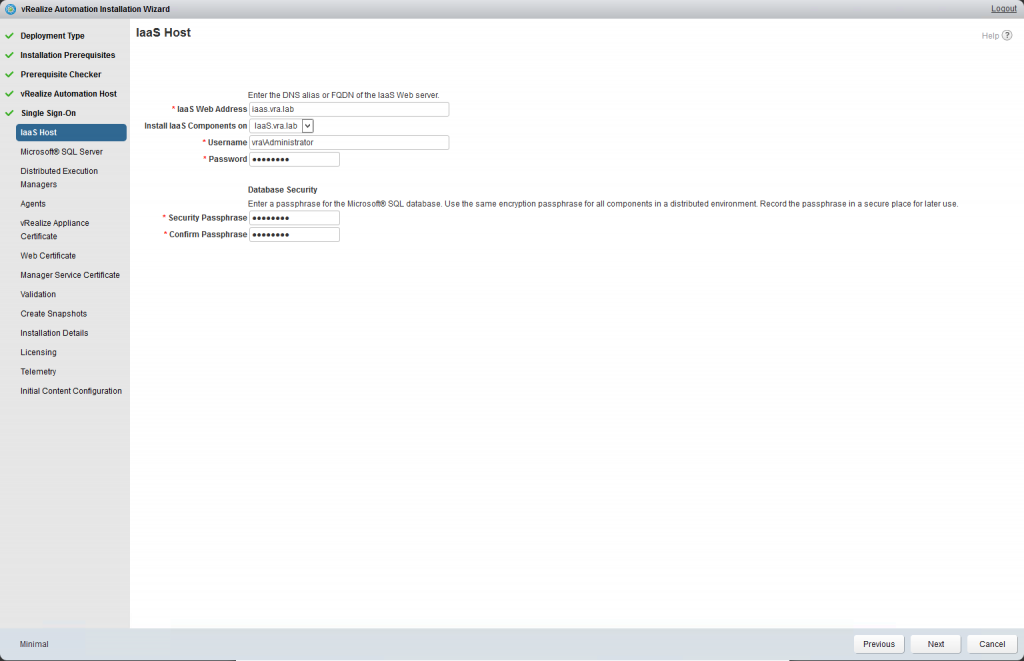 Fig. 7: IaaS server roles
 - In the next step, the Authentication Services are getting configured. Therefore, the default tenant needs to be created. At this point, we have to assign a password for the system administrator. As vRealize Automation 7 does not rely on vSphere SSO anymore, the user will be a local user. Once you have typed in the password, click Next to continue.
- As you have seen in chapter 3 within the vRealize Automation design section, the vRealize Automation appliance needs a connection to the IaaS web server as well as to the manager service. Therefore, specify the corresponding URLs in the IaaS Web Address and Manager Service Address In an enterprise deployment scenario, you might want to specify a load balancer. If that’s the case provide the hostnames for the load balancers instead. Furthermore, you have to specify a Security Passphrase for the database encryption (please consider that if you loose the passphrase, you will not be able to restore your database from a backup). Click Next to continue.
- The next screen asks for the MS SQL Server database configuration. The following input is required (see Fig. 8):
- Server name: Type in the name of your server if you use a dedicated instance. If you are using a named instance, type in the name in the format server\instance.
- Database name
- Create new database or Use existing empty database
- Default settings: De-active the checkbox to override default settings.
- Windows Authentication: If you are working with SQL authentication, deactivate the checkbox and provide the credentials.
- Advanced configuration: If you don’t want to use the default database location, provide an alternative installation path.
 Fig. 8: MS SQL Server configuration
Click Next to continue.
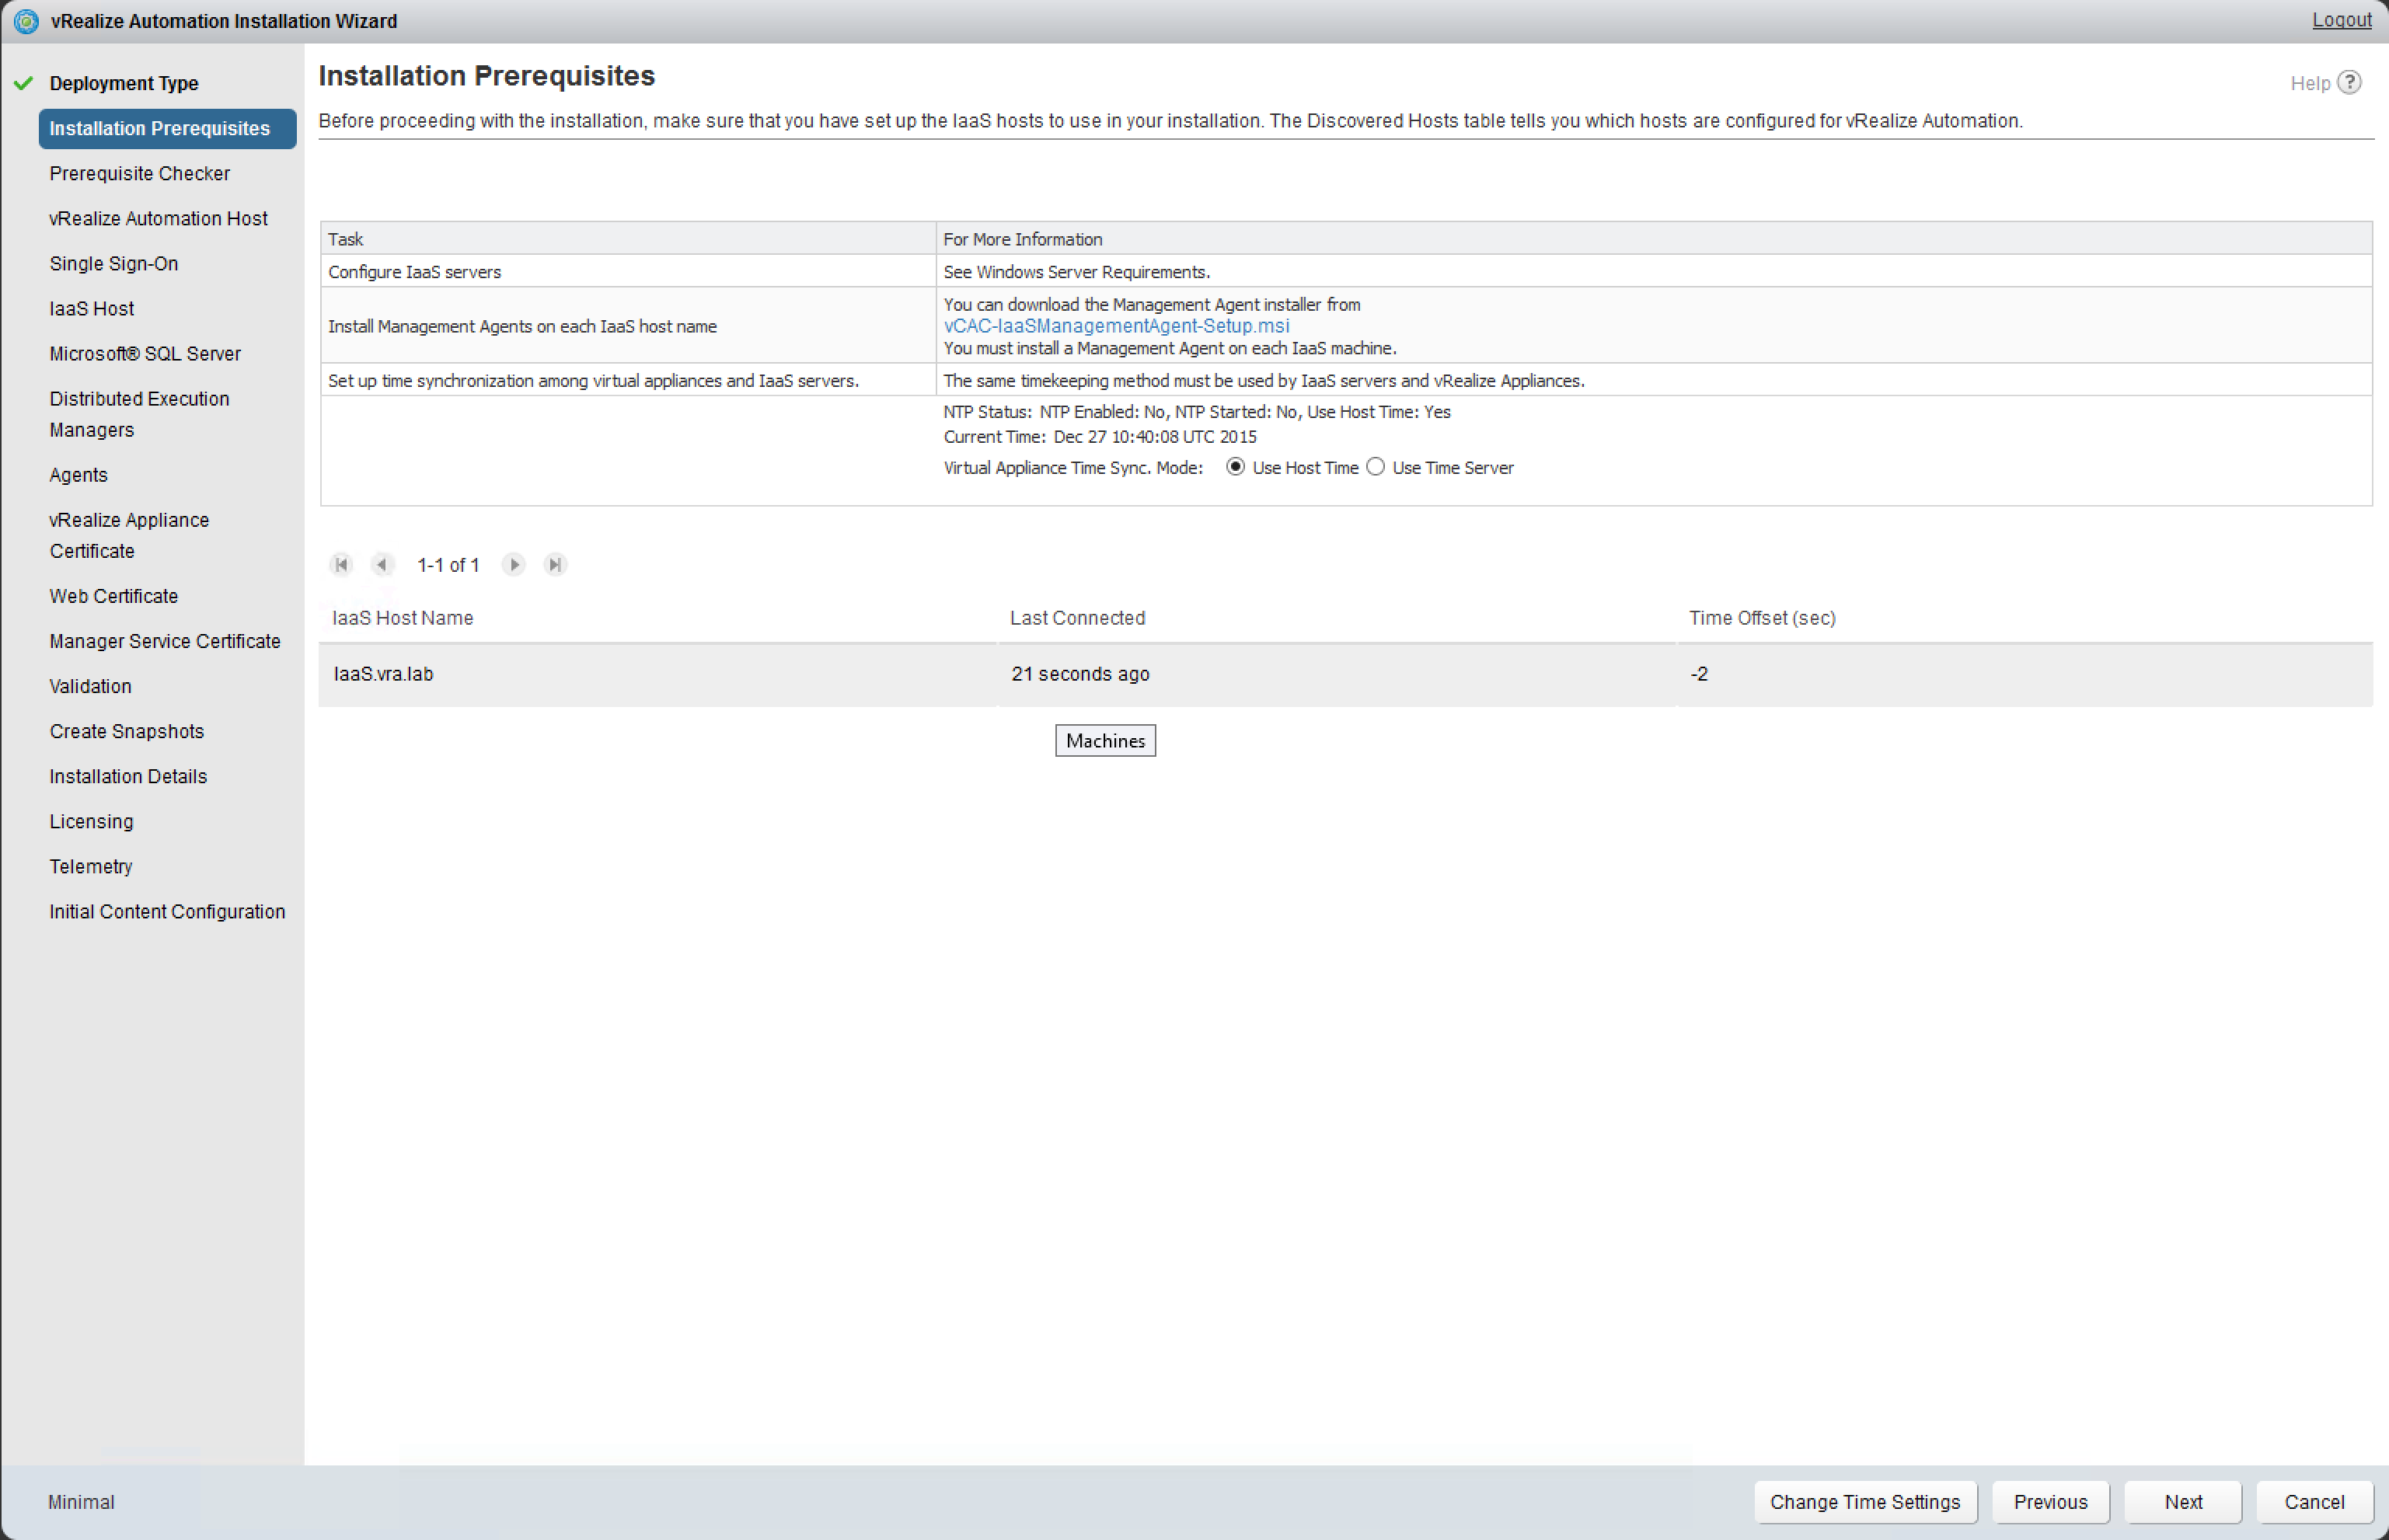 Fig. 6: IaaS hosts installation prerequisites
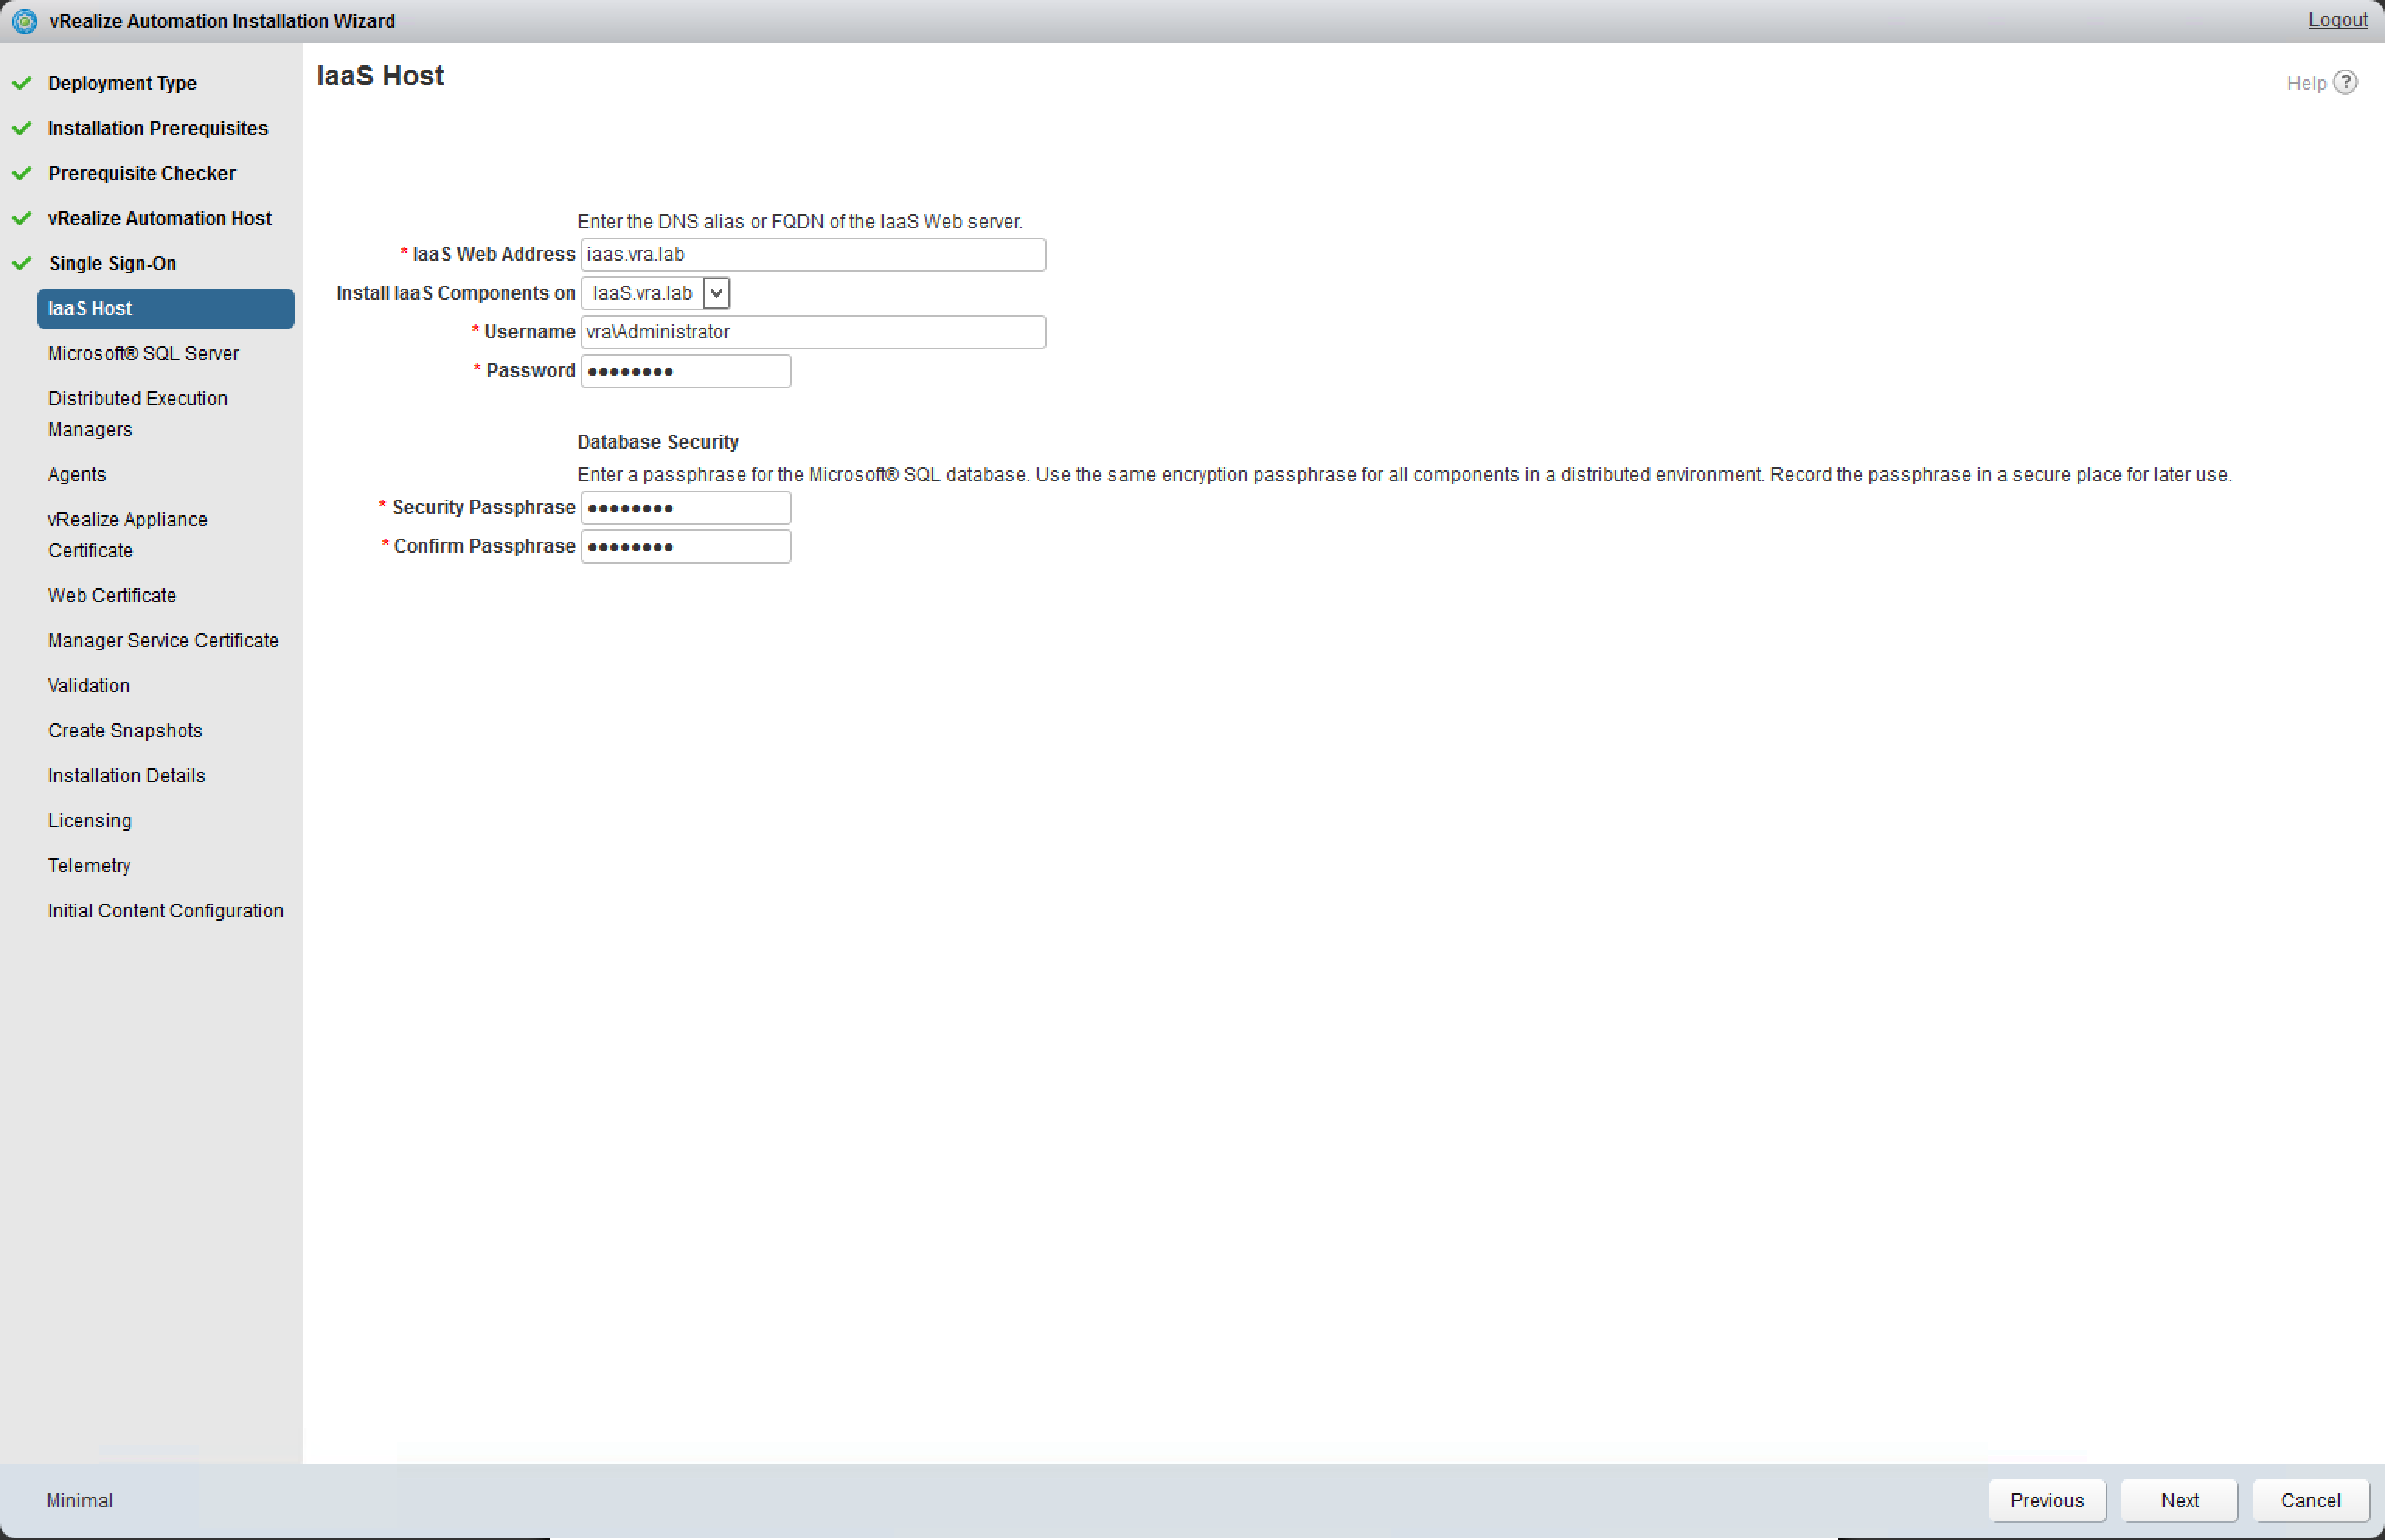 Fig. 7: IaaS server roles
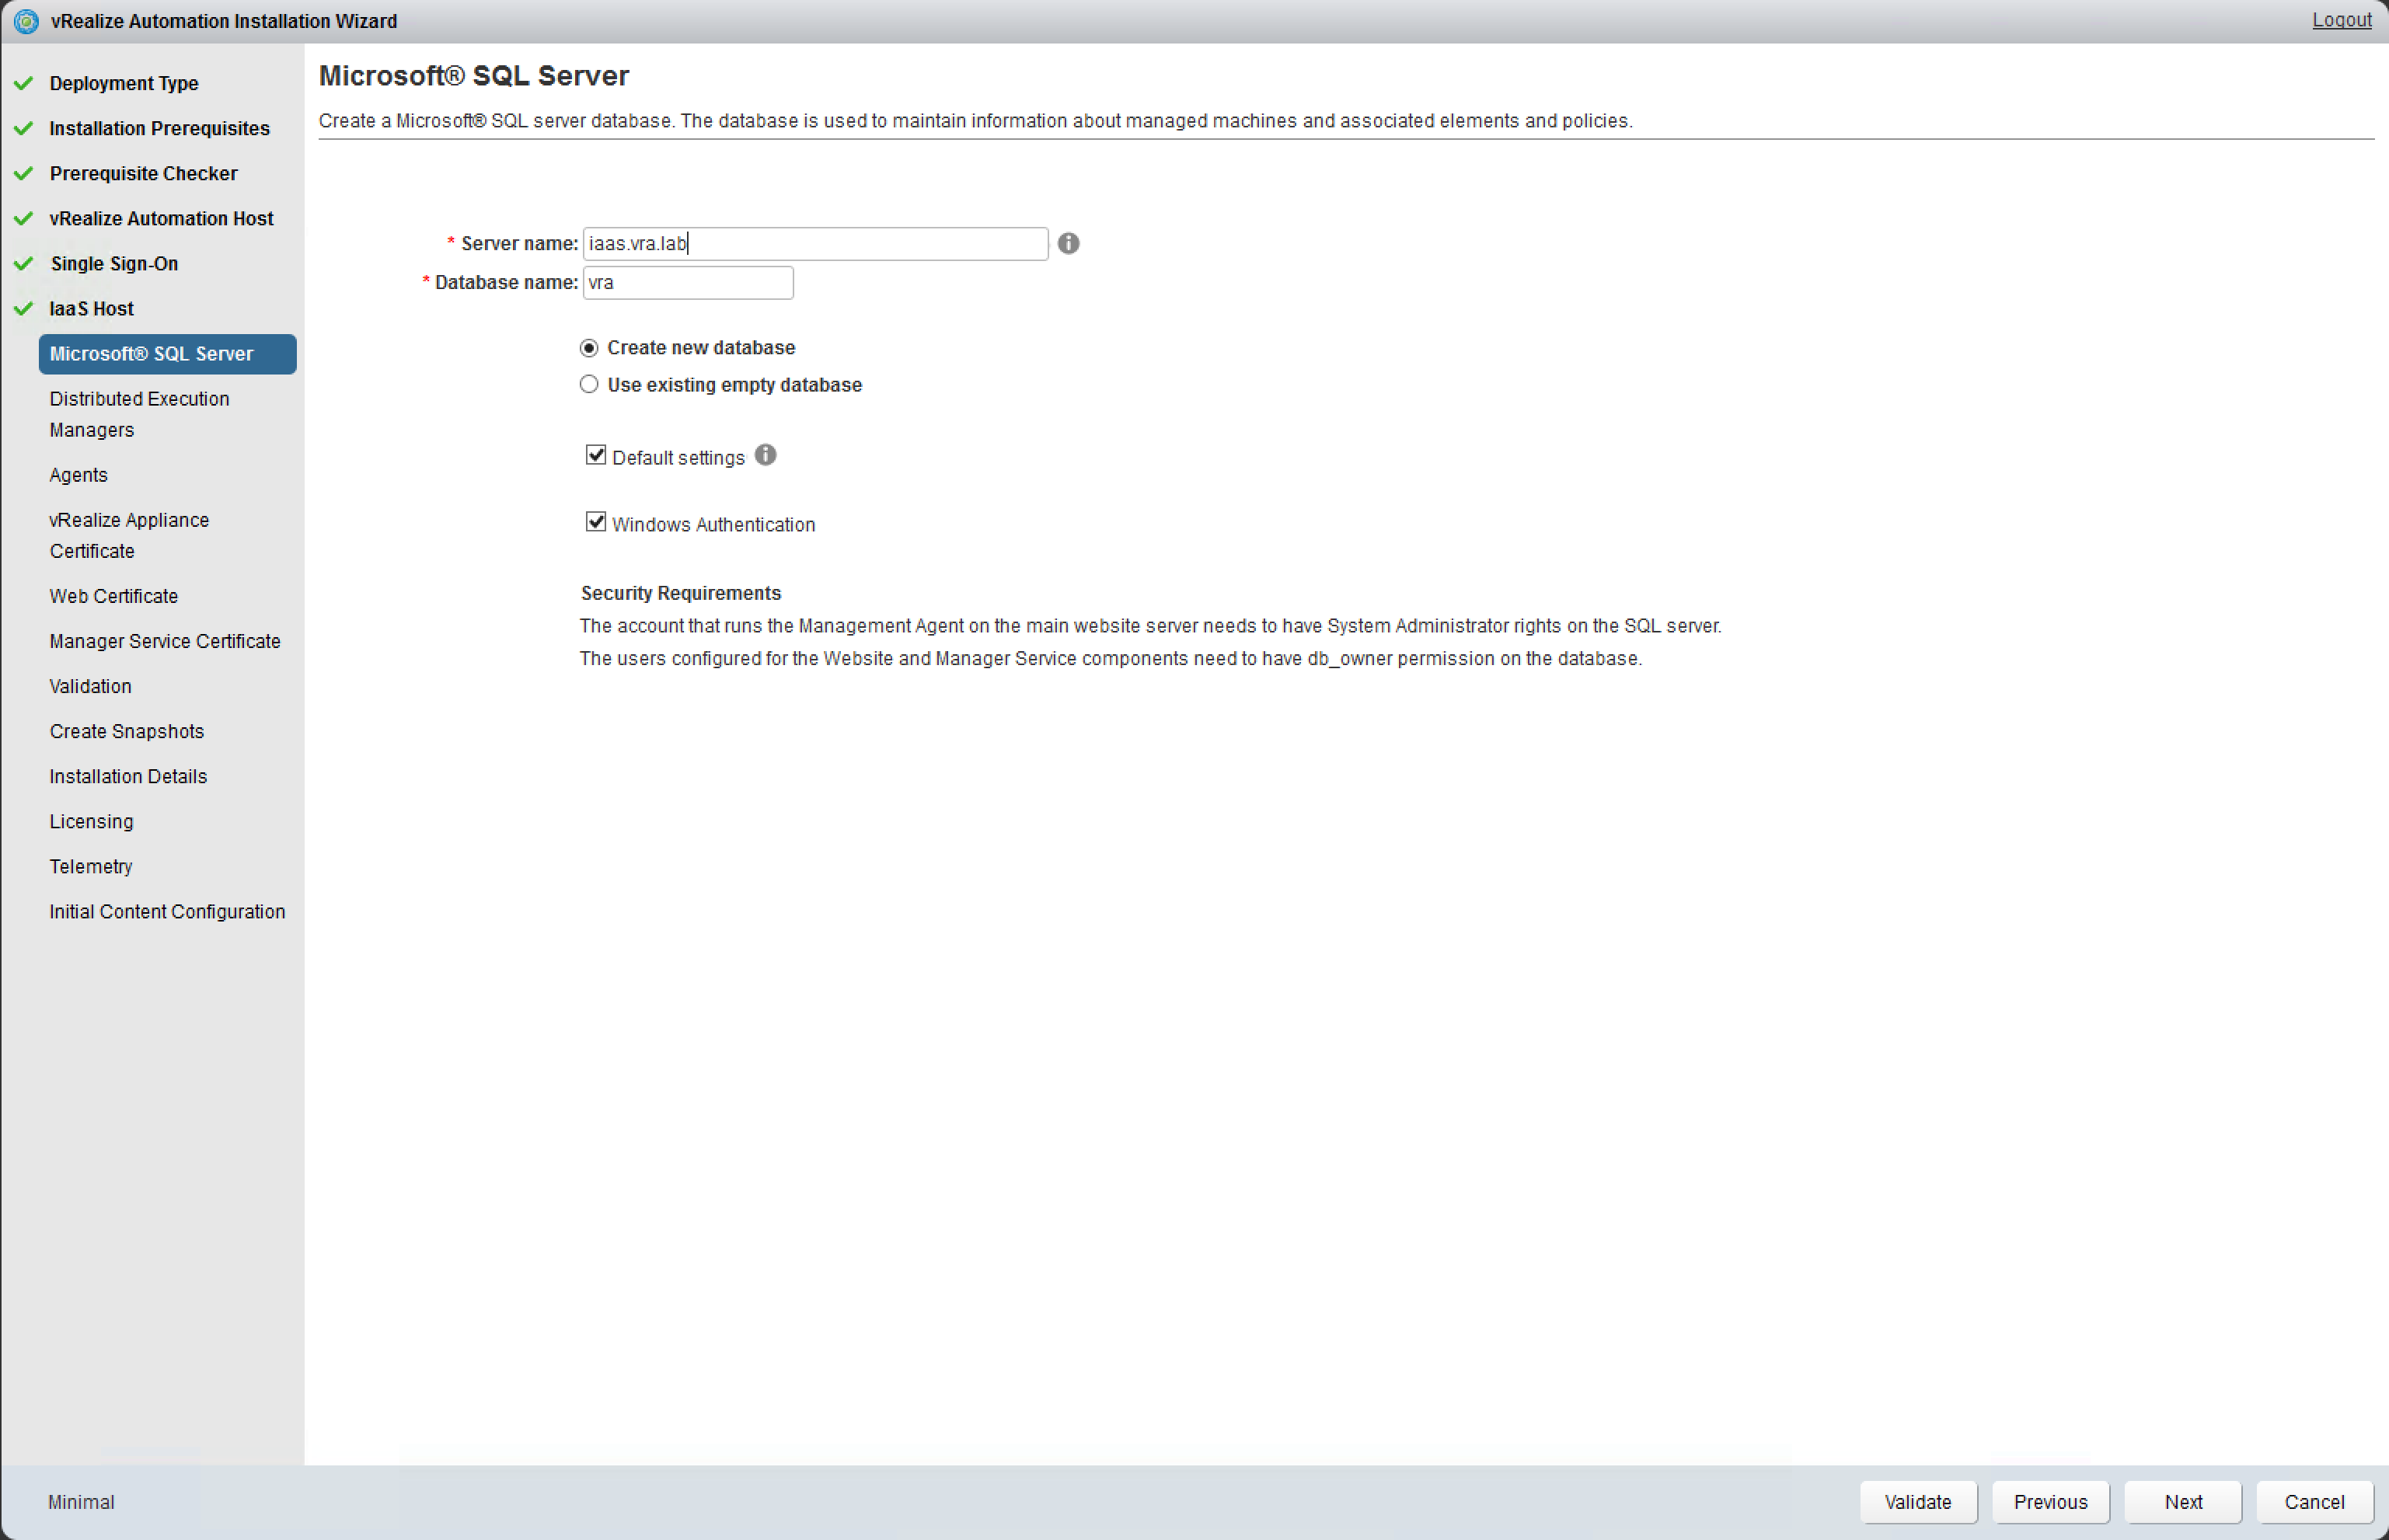 Fig. 8: MS SQL Server configuration
- The next task will specify the details for the Distributed Execution Manager. For each DEM to be deployed, select the IaaS node, where the DEM should run, and specify the DEM name and its credentials. Optionally, you can modify the Instance Description and the Installation Path.
- On the next screen, thethe agents are being configured. Most implementations will use a vSphere agent, but as you know there are other agents available as well. Provide the following input for the agent configuration as shown in Fig. 9):
- IaaS Host Name: This selects the node where the agent will be installed.
- Agent Name (example: vCenter)
- Endpoint (example: vCenter)
- Username (format: domain\user)
- Password
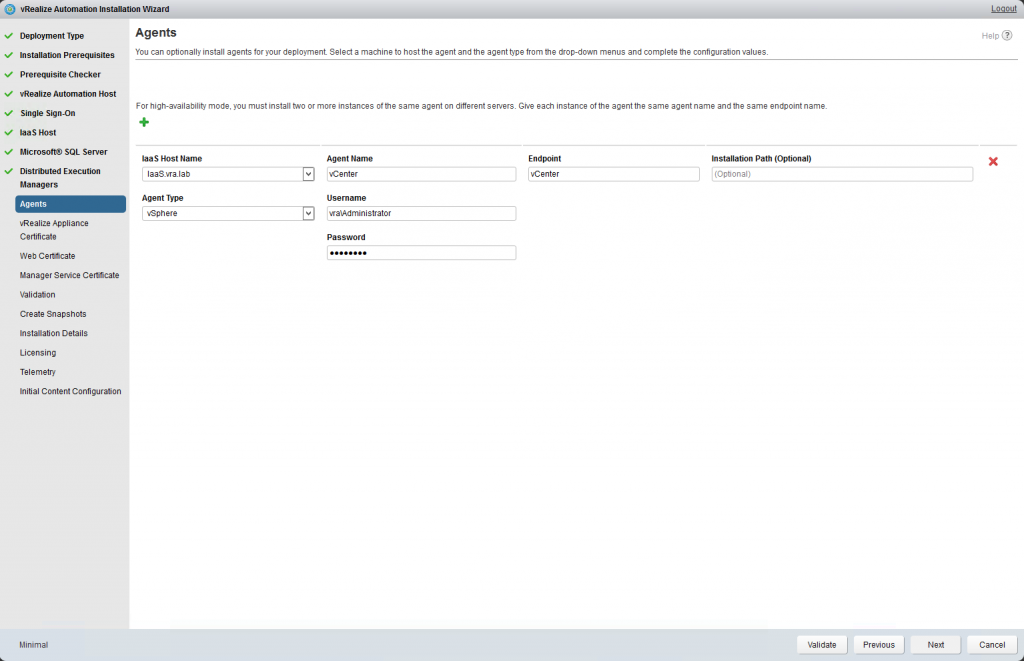 Fig. 9: Agent configuration
Click Next to continue.
- The next dialog will handle the vRealize appliance certificate settings. You have the choice between generating a self-signed certificate and importing an existing certificate (it must be in the PEM format). In order to generate a self-signed certificate, activate the Generate Certificate checkbox and provide the following input:
- Common Name: The name of the vRealize appliance
- Organization
- Organizational Unit
- Country Code
Once the certificate is generated, the Keep Existing option is enabled. Verify that it is selected and click Next to continue.
- Within the next step, we have to configure the certificate for the IaaS web server. The configuration options are pretty similar to the preceeding step, except that you can provide a certificate thumbprint, it you have already a certificate deployed in the certificate store on the IaaS servers. Provide the input on the screen and click Next to continue.
- Now we have to create a certificate for the manager service as well. On the Manager Service Certificate screen, review the Common Name of the IaaS manager service node and provide a value for the Organization, Organizational Unit and Country Code. After the certificate is generated, verify that the Keep Existing checkbox is enabled. Click Next to continue.
- At this point in time, all the necessary information to start the installation are collected. However, the wizard provides an additional validation step in order to guarantee that the installation runs smoothly. The process takes around five minutes. When the validation is completed, review the status. If any component fails, go back in the wizard and rewiew your settings. If everything works, click Next to continue (see Fig. 10) .
 Fig. 10: Validation details
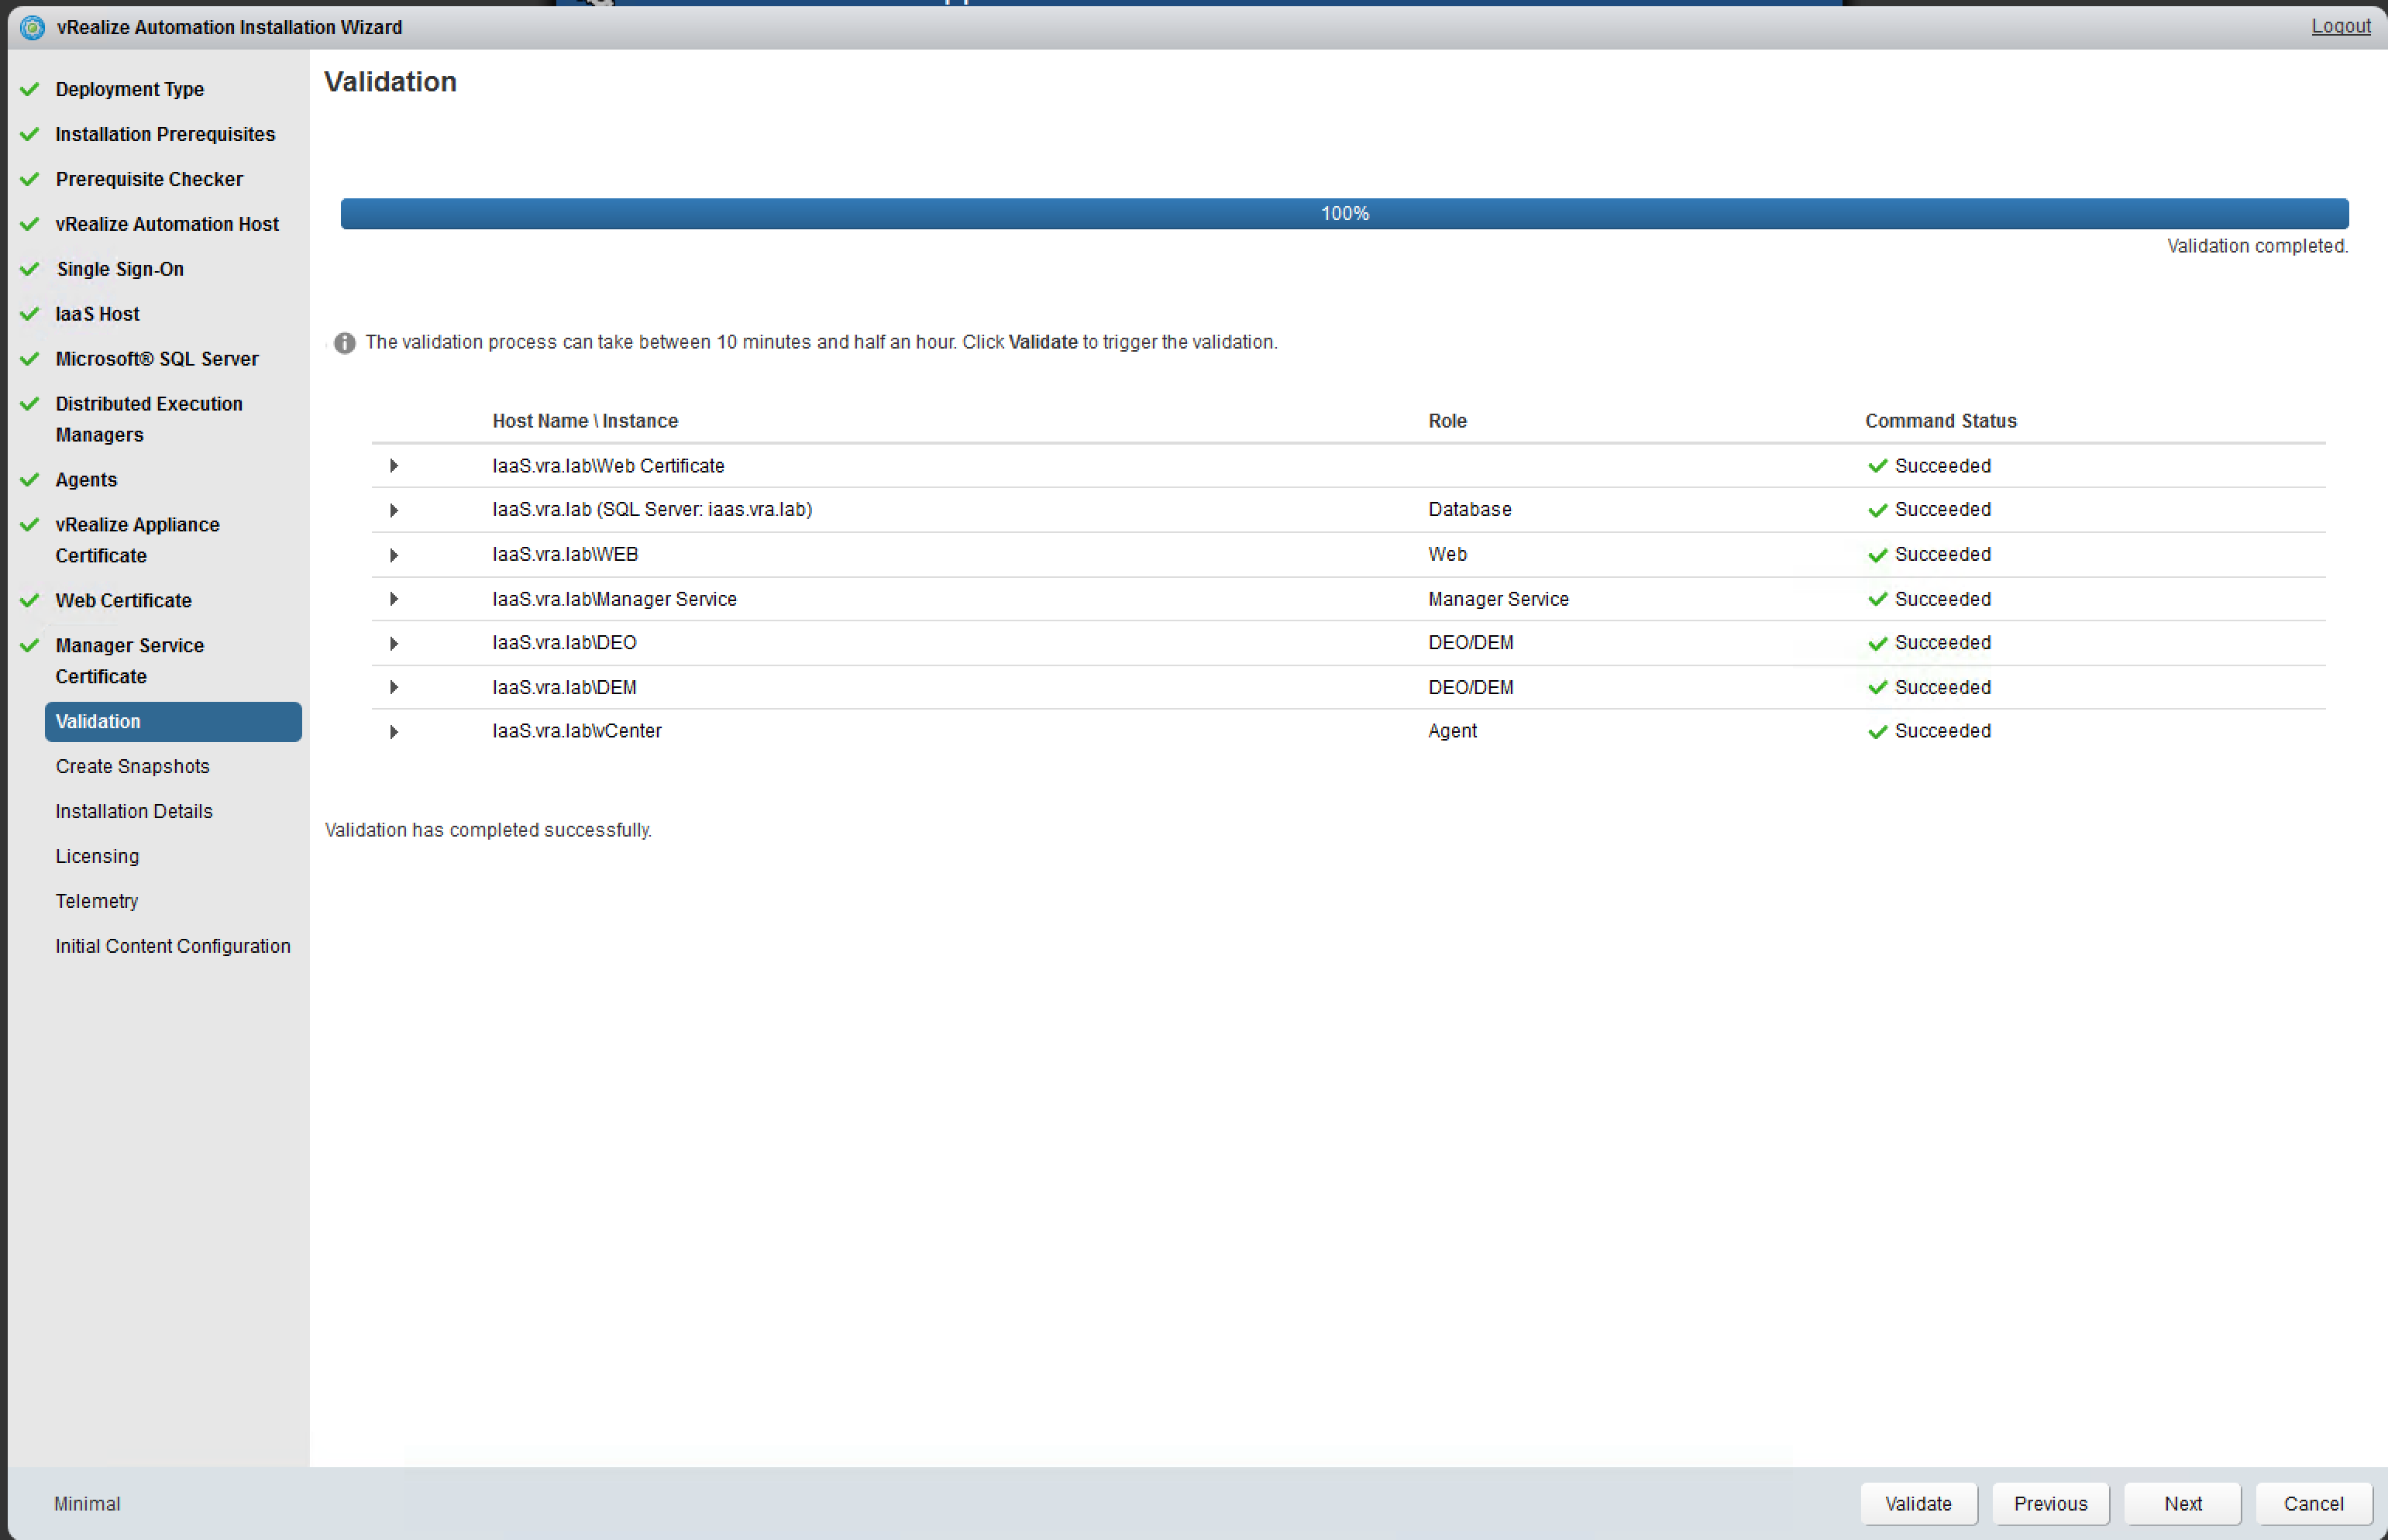 Fig. 10: Validation details
| New User: configurationadmin
In the previous versions, setting up a user having the complete set of permissions within the whole vRealize Automation environment has been quite cumbersome. To address this issue, the vRealize Automation installation wizard can create an admin user called “configurationadmin” that is granted the following privileges (please note that we will cover the different roles within vRealize Automation later in detail):
|
- Before the wizard actually begins the installation, the wizards provides a point where snapshots of the environment can be created. In case of a failure, that’s an convenient way to restore your machines. It is highly recommended to create a snapshot. Continue with Next The installation process starts.
- The installation approximately takes between 20 and 30 minutes. Once finished, a confirmation will appear on the screen. After that, click Next.
- After the installation has succeeded, we still have to provide a license key. Enter the key and click Next to continue.
- The Telemetry screen lets you configure if you want to participate in the Customer Experience Improvement Program. Make your choice and click Next to continue.
- The last screen helps you to create the configurationadmin user (see information in the text box). This step is optional. If you do not want to create the initial context, click Next. Otherwise, enter a password for the configurationadmin account in the Password Please reenter the password in the Confirm password text box, click Create Initial Content and Next.
| Creating an Inital Context
When selecting the configurationadmin user to create, vRealize Automation also creates an initial context. That just means it configures the cloud environment with some basic settings including a user account with appropriate permissions to perform most of the actions needed in the environment. |
Installation failures
If you perform an installation and some issues occur that are preventing the installation from finishing, you have the choice between resetting your snapshots or retrying the installation. Any problems that are found are flagged and have some detailed information about the failure alongside the steps to fix the issue. Once you have fixed the issue, you can retry the installation. Depending on the situation, perform the following steps:
- If the Retry Failed button is enabled, please review the failure, make the required changes and click Retry Failed.
- If the Retry All IaaS button is enabled, please review the failure, revert to the old IaaS snapshots, delete the created MS SQL database (if you are using an external database), make the required changes and click Retry all IaaS.
- If the failure concerns the virtual appliance, review the failure, revert all servers to snapshots, make the required changes and run the wizard again from scratch.
vRealize Automation load balancing considerations
VMware recommends to use a load balancer in any enterprise deployment. While you could use any load balancer that supports session persistence, VMware has just now officially tested the following load balancers:
| Product |
Version |
| F5 BIG IP | Tested with version 11.6 |
| NSX | 6.1.3, 6.1.4 (versions below 6.1.3 are not supported) |
Besides these aforementioned load balancers, there are also customers who deployed a Citrix Netscaler, Riverbed Stingray, Apache HA or other load balancer – that basically works fine, however it is not officially supported by VMware.
When setting up a load balancer for vRealize Automation, please consider the following issues:
- Where do you want to terminate SSL traffic? Either you manage certificates at the load balancer level and work with self-signed certificates at the vRealize Automation nodes or you configure SSL passthrough. This greatly facilitates the deployment, reduces the operational overhead and eases the communication.
- How to handle session persistence? Load balancers provide different algorithms for that issue.
- Can you configure email notifications, SNMP traps or any other form of alerts in case a node behind the load balancer goes down? vRealize Automation does not perform automatic failover for its embedded PostgreSQL database, but you could script the failover based on notifications (however, please consider that NSX currently does not support notifications for such a scenario).
- Do you setup a one-arm or multi-arm topology? One-arm deployments are working like NAT, multi-arm deployments act like a gateway for the client nodes. The most common deployment is a one-arm deployment, but depending on your load balancer used, multi-arm might also be possible.
4.2.2.3 vRealize Automation Manual Installation
As an alternative to the installation wizard, you can install vRealize Automation through the vRealize Automation appliance management console and the IaaS manual installer. This was also the way how vRealize Automation was installed in prior versions. Basically, using the wizard is the preferred way, but in case of modifying a running environment (for example when adding another IaaS node), using the manual installer might be necessary. If you do not intend to perform a manual installation, you can safely skip this section. To perform the installation, please consider the following necessary steps:
- Set up the vRealize Automation appliance.
- Install the IaaS componenents on the Windows nodes.
- Install additional agents, if required.
- Perform post-installation tasks, such as configuring the default tenant.
Setting up the vRealize Automation appliance
We already have described in detail how to deploy the appliance, so at this point we will only address how to configure the appliance. In order to configure everything, we have to work through the following steps:
- Configure the time zone.
- Check the host settings.
- Configure SSL.
- Configure the SSO settings.
- Import a license.
Let’s start with the time synchronization:
- Navigate to the vRealize Automation appliance by entering its fully qualified domain name (http://vra -app.domain.name:5480).
- Login with user name root and the appropriate password.
- Navigate to Admin > Time Settings.
- Select an option from the Time Sync Mode You can either configure a time server or use the host time.
- Click Save Settings and then Refresh. Verify that the value in Current Time is correct.
- Optionally, you can change the Time Zone from the System
- Click Save Settings.
Next, we can take a look on the host settings:
- Navigate to vRA Settings > Host settings (see Fig. 11).
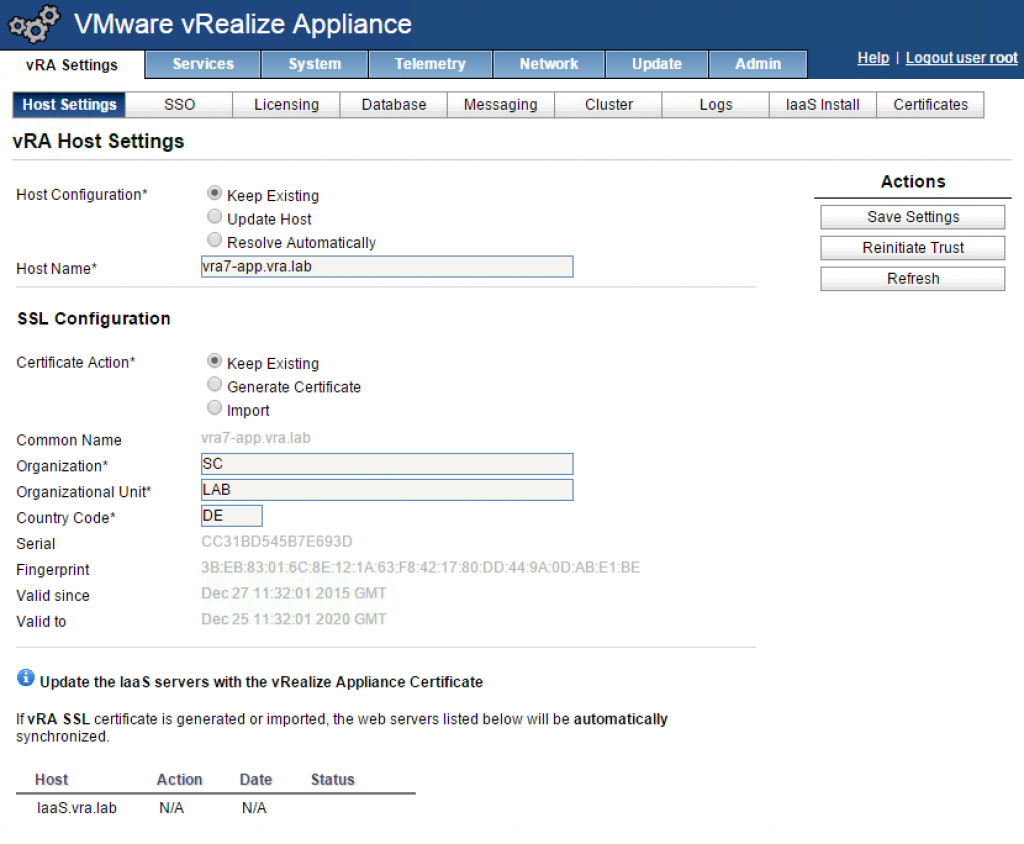 Fig. 11: vRA Host settings
 - Review the Host Name of the appliance. If you want to specify the name of the current host for the vRealize Automation appliance, select Resolve Automatically. For new hosts, select Update Host (remember to use the load balancer name if you are using one).
- Go to the SSL Configuration
- If you want to generate a new self-signed certificate, please provide the following input:
- Common Name: FQDN of your vRA appliance.
- Organization: Usually your company.
- Organization Unit: Tends to be the department.
- Country Code: Code of your country (e.g. DE for Germany)
- If you want to import a certificate, copy your private key and your certificate including the BEGIN CERTIFICATE header and END CERTIFICATE footer to the appropriate text boxes.
- Click Save Settings to save your host settings and SSL configuration.
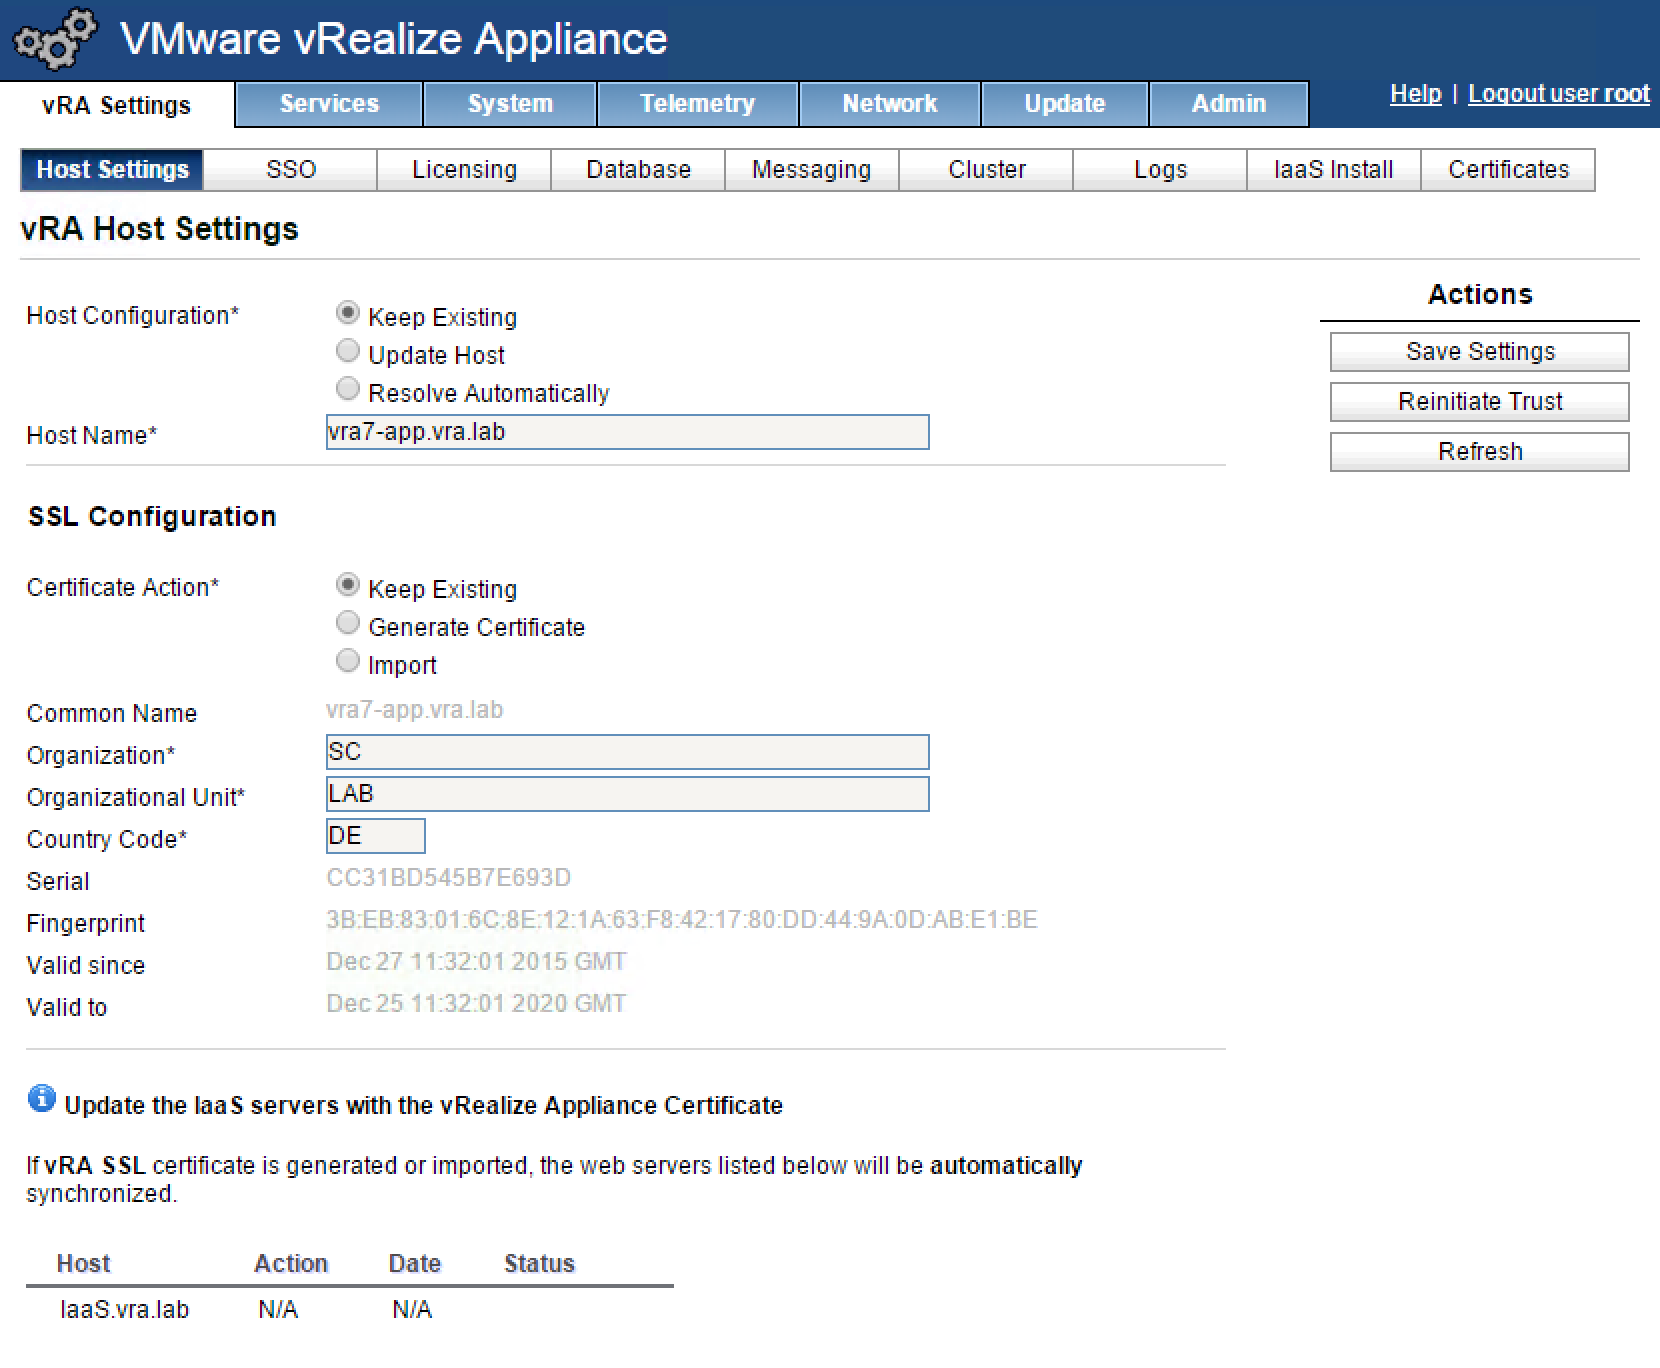 Fig. 11: vRA Host settings
The SSO settings can be configured quite quickly:
- Go to vRA Settings > SSO.
- Review and provide values for the SSO default tenant, SSO Admin User, SSO Admin Password and Confirm Password text boxes.
- Click Save Settings.
The last step is to enter a license key:
- Navigate to vRA Settings > Licensing.
- Click Licensing.
- Enter a valid license key and click Submit Key.
Installation of IaaS components
Once the vRealize Automation appliance has been successfully deployed, it is time for installing the IaaS components. Before beginning with the installation, please consider that all clocks on the different vRealize Automation nodes need to be synchronized. On Windows machines, this can be achieved via the VMware tools or with a configured NTP server. Once time synchronization is working, the installation can begin. As we have already covered the prerequisites for IaaS components, we will directly show how to perform the installation in the following.
First of all, we need the installation source. To download the setup file, please open the vRA Appliance page (https ://<vRA appliance.domain.name>:5480/installer). In the end, click on the IaaS Installer link. Please also make sure that the location of the vRA Appliance is coded within the setup-filename (setup_hostname@5480.exe). Consequently, if you change the filename, it might not be possible to run the installation properly.
| Tip: Create a snapshot
As with the installation with the wizard, this is an appropriate time to take a snapshot of your system. If anything fails within the installation, you can revert to your snapshot and do the installation again. |
To perform the installation, we must complete the following tasks:
- Start the installation with administrator privileges (right click > Run as administrator).
- Click Next on the Welcome
- Accept the end user license agreement by clicking the I accept the terms in the license agreement checkbox and proceed with Next.
- The next page requests the User name and the Password for the vRA Appliance. Type in root as username and your assigned password. Click on the Accept certificate checkbox and continue with Next.
- On the Installation Type dialog, choose Complete Install and click Next.
- In the next step, the Prerequisite Checker If everything is fine, proceed with Next. Otherwise click on any issue, fix the requirement and check again.
- The next step is based in the Server and Account settings:
- User name: This is the user that will be used to run vRA. As discussed it is best to use a special service account for vRA.
- Password: Type in the password for your service account.
- Passphrase: All sensitive information in vRA will be encrypted and decrypted by using this passphrase. Please do not forget the passphrase; once you have assigned one, it is not possible to change it.
- Specify your database information in the Microsoft SQL Server Database Installation Information If you are using Windows authentication, there is no need to specify a username and password. Otherwise, provide your SQL Server credentials.
- Click on Next to continue.
- Now it is time to specify a service name for the DEM Manager and DEM Orchestrator (see Fig. 12). In order to deploy virtual machines to a vSphere environment, the vSphere Agent is a prerequisite. If you have an installation with a single node, stick with the provided values and click on Next.
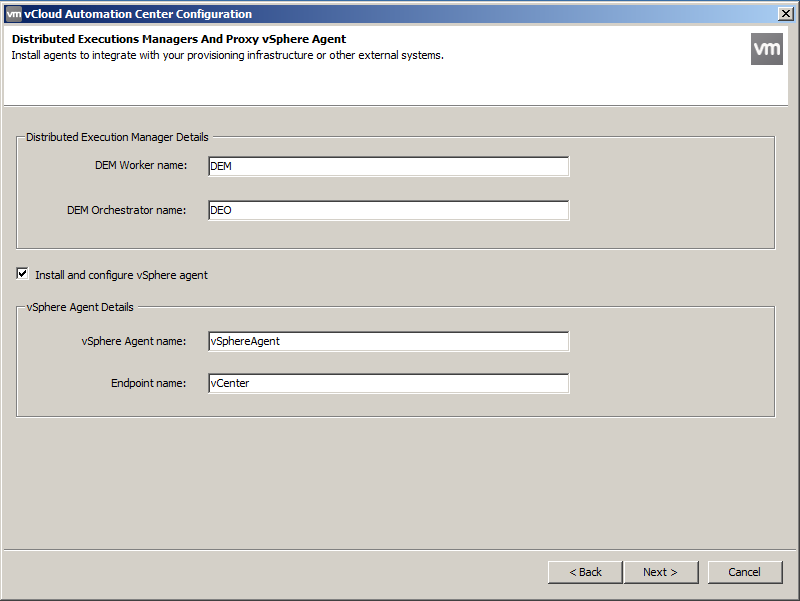 Fig. 12: DEM Configuration
 - The next dialog requests all information needed in order to register the IaaS components within the vRA Appliance (see Fig. 13):
- Firstly, review the vRA Appliance server name in the Server textbox, load and check the SSO Default Tenant name and download the certificate. View the certificate and set the Accept Certificate
- Secondly, type in the name of the SSO Administrator (administrator@vsphere.local) along with its password. Click on Test – the test should pass.
- Finally, enter the hostname or IP address of the local machine. Again, click on Test to check if the settings are valid.
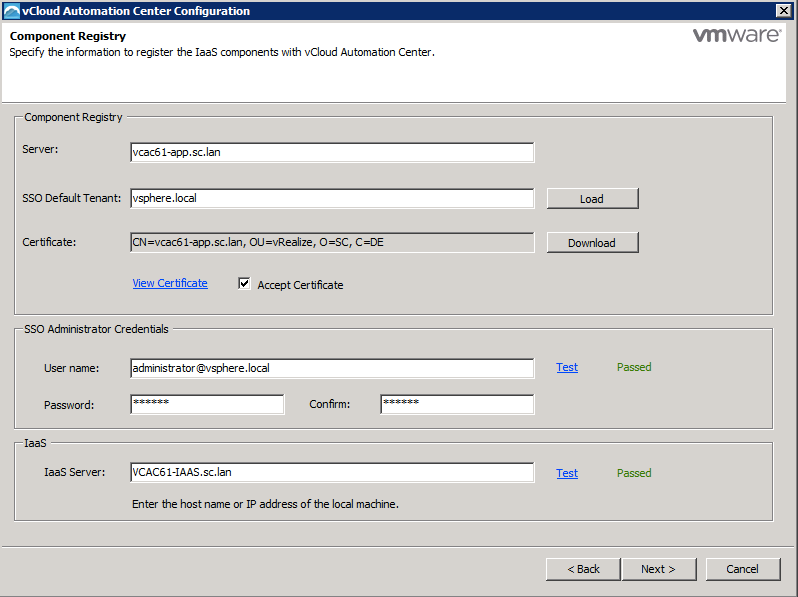 Fig. 13: IaaS registration
- The last screen summarizes all these settings. Please review the output and start the installation. Depending on your hardware, the installation will need between 5-15 minutes to finish. Once the installation has successfully completed, the wizard will ask you to work through the initial system configuration.
4.2.3 Setting up clusters
If you perform a distributed installation, you might have more than one vRealize Automation appliance. Having more than one appliance requires a load balancer behind which the appliances can be placed. Before the setup, please consider that every appliance needs time synchronization configured correctly. Joining an appliance to a cluster happens on the management console. The join operation automatically copies appliance configuration information for the cluster to the newly joined appliance. This includes certificates, SSO information, licensing, database and messaging information. The configuration process has to be performed on each node that is being added to the cluster.
In order to join a new node to the cluster, perform the following steps:
- Open a web browser and open the vRealize Automation appliance VAMI page (https://<vRa host.domain.name>:5480).
- Log in as user root and with your assigned password.
- Navigate to vRA Settings > Cluster (see Fig. 14).
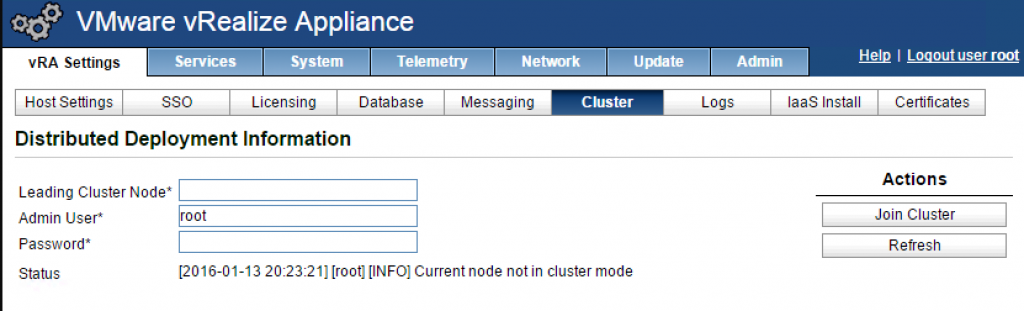 Fig. 14: Join Cluster
 - Enter the FQDN of a previously configured vRealize Automation appliance that has already been joined to the cluster in the Leading Cluster Node
- Type in the Admin User
- Provide the Password.
- Click Join Cluster and continue past any certificate warnings.
- Once the join is completed, navigate to Services menu and check if all services are working correctly. You can click the Refresh button to monitor the progress of the services startup.
 Fig. 14: Join Cluster
4.2.4 Testing of a distributed environment
Once a distributed installation has been successfully completed, it is crucial that the different components are working. Hence, the distributed deployment should be validated. There are different scenarios that should be tested:
- First of all, make sure that each appliance is working correctly.
- There should be a test for the appliance database failover and failback.
- The appliance database replication should be tested.
So let’s discuss how these tests can be implemented.
4.2.4.1 Validation of appliances
As we know, all appliances in a cluster are placed behind a load-balancer. If we want to test the functionality of the appliances, the only step is to temporally disable all other appliances in the load balancer configuration and try to access the vRealize Automation appliance by using the FQDN of the load balancer in the browser. If it works, we can change the load balancer configuration to temporally disable the appliance and enable another one. Once you have done this for each of the nodes participating in a vRealize Automation cluster, you can know for sure that your cluster is working correctly.
4.2.4.2 Database failover and failback test
The next testing scenario is slightly more difficult. As you know database servers can work together to allow a second server to take over quickly if the primary server faces any errors due to which he can not work fully functionally anymore. In vRealize Automation 7, the embedded vPostgres databases work in an active-active fashion. One node maintains the master database, and the other nodes keep read-replicas. However, as already discussed in the previous chapters, there is no automatic failover. There is one active master and if this active master is down, you have to manually bring up the passive read-replica to become the new current active node. With that knowledge in mind, we can discuss the procedure of performing a failover.
- Log in into your master appliance using SSH as root.
- Next stop the master database by typing in the following command:service vpostgres stop
- Now log in into the secondary appliance as root.
- Run the following commands to promote the replica database to master:su – postgres/opt/vmware/vpostgres/current/share/promote_replica_to_primary
- The next step is to setup a new read replica. So log in into your original primary appliance and issue the following command (don’t forget to replace the value for the hostname):su – postgres/opt/vmware/vpostgres/current/share//run_as_replica -h master database appliance -b -W -U replicateThe parameters have the following meaning:
- [-h] The hostname of the master database server. Post 5432 is assumed.
- [-b] Take a base backup from the master (this destroys the content of the current data dictionary).
- [-W] Prompts the password of the user performing the replication.
- [-U] The user performing the replication. In vRealize Automation, this user is replicate.
- Enter the replicate user password when prompted.
- Next, the thumbprint of the primary machine is validated. Enter yes.
- Enter the postgres user password.
- Enter yes in response to the following message:WARNING: The base backup operation will replace the current contents of the data dictionary. Please confirm by typing yes.
If you want to perform a failback, you can use the same set of commands (however, don’t forget to replace the hostnames accordingly).
4.2.4.3 Validate the replication
After having performed a failover and failback test, it is time to validate the replication process. Once again, you have to login into both the master and the replica database using SSH and run a set of commands. So let’s discuss in detail how to achieve this:
- Log in into the appliance that hosts the master database using SSH.
- First of all, check if the WAL process (Write-Ahead Log) responsible for writing the transaction logs is running correclty:ps –ef | grep walThe output should be similar to this:postgres 4784 4779 0 21:42 ? 00:00:00 postgres: wal writerprocesspostgres 20901 4779 0 22:49 ? 00:00:00 postgres: wal sender process replicate10.26.36.64(55887) streaming 0/70000B8
- Next, the pg_is_in_recovery command can be used to validate if the master database is ready for read-write connections (which sould return false for the master):su – postgres/opt/vmware/vpostgres/current/bin/psql vraSELECT PG_IS_IN_RECOVERY()The command returns f for false.vcac=# SELECT pg_is_in_recovery () ;pg_is_in_recovery——————–f(1 row)
- Quit psql using the \q command.
- Now we can log in into the replice database using SSH.
- Once again, issue the pg_is_in_recovery This time, the result should be true:su – postgres /opt/vmware/vpostgres/current/bin/psql vra SELECT pg_is_in_recovery () ; The command returns t for true:vcac=# SELECT pg_is_in_recovery () ;pg_is_in_recovery——————–t(1 row)
- Quit psql using the \q command.
4.3 Using CA-signed certificates and replacing certificates
While it is quite common to run a server with self-signed certificates for testing, or even a small environment, it is still recommended to use CA-signed certificates. Notwithstanding security concerns, this can also be important for user experience. As end users can access the service catalog of vRealize Automation, they might be confused with any warning messages related to self-signed certificates. Uploading a certificate during the installation wizard has just been shown. Changing certificates however is not trivial in most of VMware’s products and this is especially true for vRealize Automation (however, it has become a little bit easier with the latest release, as there is no dedicated SSO node needed anymore). The reason behind this: All vRealize Automation installations are distributed environments – that means we have a minimum of two machines. That’s motivation enough to describe the process of changing certificates in detail.
4.3.1.1 Considerations before changing the certificates
Before we start changing the certificates, we should discuss which steps are essential and if there is any preliminary work to be carried out.
First of all, troubleshooting certificate issues is never easy. Therefore, all steps should be taken with care and double checking is a must here. However, in the real world, even with care, many things can easily go wrong. In that case, it is always convenient to be able to revert to a former state. Hence, a set of snapshots for all machines involved is certainly very useful.
Further to this, VMware recommends using either a domain certificate or a wildcard domain certificate in distributed environments.
Furthermore, when changing certificates, you have to keep in mindthat there is a dependency between the different components. Based on this scenario, it might not be enough to just replace the certificate, instead you still have to register the certificate with other components in order to keep the trust relationship between the various components. Furthermore, when changing a certificate on a component type, you have to ensure that you also change the certificate on all other nodes of the same type (in case of the vRealize Automation appliance this means, changing the certificate one node requires the updating of all other nodes as well). When changing certificates, please also note the order in which you have to replace certificates:
- First of all, change certificates on the vRealize Automation appliances.
- Second, change the certificate on the IaaS component (this could be the IaaS server as well as the management agent).
However, just changing the certificate is not enough. You still have to re-register the updated note with the other components in order to keep the trust relationship. Now, with having discussed the basic steps necessary to update certificates, we can now go into the details of the implementation.
4.3.1.2 Preparations
If you don’t have any running certification authority running, now it is the proper time to do so (if there is a running certification authority you can skip these steps). We will show these steps on a Windows system.
- Install the Windows Role Active Directory Certificate Services.
- Check that this role also has the role services Certification Authority and Certification Authority Web Enrollment activated (see Fig. 15) and then continue with Next.
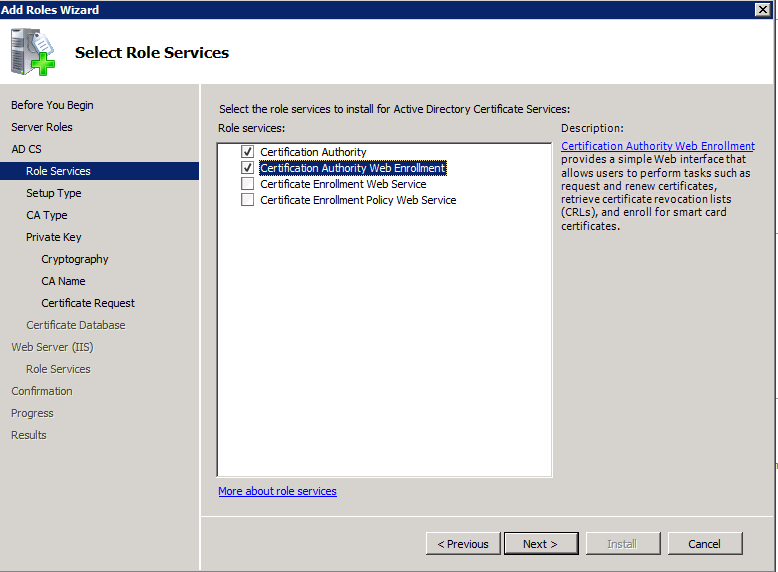 Fig. 15: Active Directory Certification Services Configuration
 - On the mask Specify Setup Type, please choose Enterprise and then Next.
- Select Root CA on the next page (Specify CA Type) if you are configuring your first CA and continue with Next.
- The next screen (Set up Private Key) lets you create your new private key. Click on Next to continue.
- The next step in the process is to configure the cryptography settings for your CA (mask Configure Cryptography for CA). Please ensure you have the following settings (see Fig. 16) and click on Next.
- CSP: RSA#Microsoft Software Key Storage Provider
- Key character length: 2048
- Hash algorithm: SHA1
 Fig. 16: Configuration of CA cryptography
- Please define a name for your CA on the Configure your CA Name page and continue with
- The last step of the wizard is to define the validity period of your certificates (Set Validity Period). Click on the Next button and finish the wizard.
Updating the vRealize Automation appliance certificate
The next step, within the configuration, is to create a vRealize Automation certificate template. This template can be reused for all other subsequent templates. We will also update the Microsoft CA settings, in order to allow Subject Alternative Names (SANs) within the attributes. We will continue with the following steps:
- Use a Remote Desktop Connection to connect to your CA Server.
- Click on Start > Run and type msc. Click on OK and wait until the Certificate Template Console opens.
- Search your web server (it is located in the middle of the window in the Template Display Name area).
- Right click the web server and choose Duplicate Template.
- On the Duplicate Template mask, please select Windows Server 2003 Enterprise for backward compatibility.
- Move on to the General
- Type a name for your template (e.g. vRealize Template)
- Change to the Extensions
- Choose Key Usage and click on Edit.
- Make sure that the option Signature is proof of origin (nonrepudiation) is selected.
- Check the Allow encryption of user data checkbox and click on OK.
- Click on Application Policies and then on OK.
- Click on Add and select Client Authentication.
- Click OK and once again OK.
- Change to the Subject Name
- Make sure the checkbox Supply in the request is set.
- Click on the tab Request Handling.
- Check the option Allow private key to be exported is activated.
- Save the template wit OK.
Once we have finished these configuration steps, we can continue with adding this template to the list of Certificate Templates:
- Go to your CA Server, click on Start > Run and type msc.
- Expand the left node with the [+]
- Right click Certificate Template and select New > Certificate Template to Issue from the context menu.
- Find your vRealize Template and click on OK to finish.
As well as creating the certificates for the IaaS components, we also need certificates for the Linux appliance. This can be done via OpenSSL on both the Linux and windows operating systems. You will need a running OpenSSL installation, with version 1.0.0 or upwards.
4.3.1.3 Updating the vRealize Automation appliance certificate
The following steps have to be taken, in order to create and configure the vRealize certificates:
- Create a Certificate Signing Request (CSR).
- Create the certificates.
- Convert the certificate to the PEM format.
- Upload the certificate.
| Tip: Configuration file
Use a configuration file for your CSR. When creating a CSR, we need to specify some basic information about the CSR itself. We will use a configuration file to store this information. This approach increases the reuse of the data and is a good way to document your settings. |
Create a Certificate Signing Request
Open a text editor (on the computer with OpenSSL installed) and paste the following configuration:
[ req ]
default_bits = 2048
default_keyfile = rui.key
distinguished_name = req_distinguished_name
encrypt_key = no
prompt = no
string_mask = nombstr
req_extensions = v3_req
[ v3_req ]
basicConstraints = CA:FALSE
keyUsage = digitalSignature, keyEncipherment, dataEncipherment, nonRepudiation
extendedKeyUsage = serverAuth, clientAuth
subjectAltName = DNS:vra7app, IP:10.10.1.40, DNS:vcra7app.vra..lab
[ req_distinguished_name ]
countryName = DE
stateOrProvinceName = BY
localityName = Nuremberg
0.organizationName = SC
organizationalUnitName = SC
commonName = vra7app.vra.lab
Before saving the file, make sure to replace all the server names and IP addresses with your own settings. Then save the file as vrealize.cfg.
Now we have the input needed to create the CSRs and export the private key. Go to your command prompt, change to the bin-directory of OpenSSL and type the following commands:
openssl req -new -nodes -out c:\certs\vrealizeva\rui.csr -keyout c:\certs\vrealizeva\rui-orig.key -config c:\certs\vrealizeva\vrealizeapp.cfg
Now we have to convert the certificates into the RSA format. This can be done as follows:
openssl rsa -in c:\certs\vrealizeva\rui-orig.key -out c:\certs\vrealizeva\rui.key
Creation of certificates
The next step in the process is to create the certificates in the Microsoft CA.
- Open a browser and log in on the Microsoft CA web interface (http://<CA-Server>/CertSVR).
- Click on the link Request Certificate > Advanced Certificate Request. On the next page, choose Submit a certificate Request by using a base-64-encoded CMC or PKCS #10 file, or submit a renewal request by using a base-64-encoded PKCS #7 file.
- Copy the content of the csr file into your clipboard and paste it into the field Base-64-encoded certificate request.
- Please make sure you have selected the vRealize Automation certificate template (see 17).
- Click on Submit.
- On the next page, Certificate Issued, select the Option Base64 encoded.
- Click on Download certificate and save the file in the directory where you saved your CSR and configuration file.
- Return to CA main page and click on the link Download a CA Certificate, certificate chain or CRL.
- Choose the option Base64 encoded.
- Click on the link Download a CA certificate chain.
- Save the file as p7b.
- Double click the 7b file and navigate to cachain.p7b > Certificates.
- Next, export the Root certificate. Right click on the root certificate and choose All Actions > Export from the context menu. Continue with Next.
- On the next page, choose Base64-encoded X.509 (.CER) and click on Next to continue.
- Save the file as Root64.cer and finish the wizard with Next.
Convert the certificate to the PEM format
Before we can upload the certificates, there is one last step – we must convert them to the correct format. Remember the Automation Appliance needs the PEM format (if you already have your certificates in the PEM format, you can skip this step). So run the following commands for the conversion:
openssl pkcs12 -export -in C:\certs\vrealizeva\rui.crt -inkey C:\certs\vrealizeva\rui.key -certfile c:\certs\Root64.cer -name “rui” -passout pass:Vmware1! -out C:\certs\vrealizeva\rui.pfx
openssl pkcs12 -in C:\certs\vrealizeva\rui.pfx -inkey C:\certs\vrealizeva\rui.key -out C:\certs\vrealizeva\rui.pem –nodes
Upload the certificates
Finally, we can upload the certificates to the Automation Appliance. You can do that by following these steps:
- Log into your vRealize Automation appliance (https://<vRA app.domain.name:5480)
- Click on the SSO tab and then on SSL.
- Choose Import PEM encoded certificate in the Choose Option dropdown list.
- Open the rui.key-file, copy the content to clipboard and paste to the file RSA Private Key (see Fig. 17).
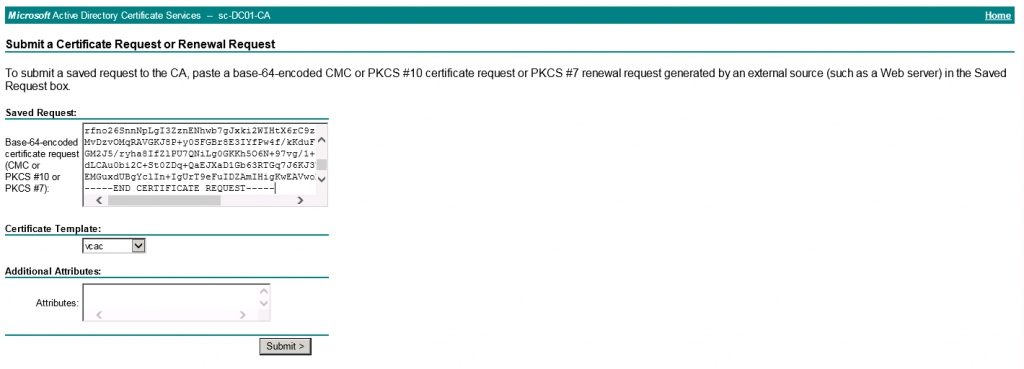 Fig. 17: Certificate request
 - Open the rui.pem-file, copy the content to clipboard and paste to the field Certificate.
- Type in your password in the Pass Phrase
- Click on the button Replace Certificate.
 Fig. 17: Certificate request
Update the IaaS servers with the new certificate
In the final stage, we must perform an update of the IaaS components. It is sufficient to update the Model Manager – vRealize will update the other components in the background.
To start the procedure, open command prompt with administrator privileges and change to the following directory:
C:\Program Files (x86)\VMware\vCAC\Server\Model Manager Data\Cafe
Now you can run the following command to re-establish the trust relationship between the vRealize Automation appliance and the IaaS server:
vcac-Config.exe UpdateServerCertificates -d vra_database -s sql_database_server -v
If you are using a self-signed certificate or certificates signed by a custom certificate authority (CA), please also verify that the Windows servers that host the Manager Service, DEMs, and IaaS Website trust the new certificate and its certificate chain. Also, add the virtual appliance certificate to the trusted store if it is not trusted and recheck that Windows servers now trust the certificate and its certificate chain.
Once finished, restart your IIS server by typing in the command iisreset.
4.3.1.4 Creating and uploading certificates for the IaaS components
From a conceptual point of view, the steps taken to replace certificates for the IaaS components resemble those of the appliances:
- Create the CSR.
- Create the certificate by means of the Root-CA.
- Upload the certificate to the IIS manager.
- Upload the certificate to the Manager Service.
We have already shown how to conduct the first two steps, so we will immediately start here with the third step. Please also note that if you run IIS and IaaS Manager Service on different nodes, you might have to create two different certificates.
Upload the certificate to the IIS Server
Before we can use the certificate, we first have to register it with Windows. Work through the following steps:
- Click on Start > Run and type mmc.exe to open the Microsoft Management Console.
- Click File > Add/Remove Snap-in.
- Within the list of Snap-ins, on the left area of the screen, choose the Certificates Snap-in and add it to the list of Snap-ins via the Add buttons, click on OK.
- Choose Computer Account on the next page and continue with Next.
- Now we have to select Local Computer and can end the wizard by clicking on Finish and then OK.
- The Certificate Snap-in now lets us add certificates. Right-click the folder Personal and choose All Tasks > Import.
- Upload the certificate.
[1] http://blogs.vmware.com/PowerCLI/2014/12/vrealize-automation-vra-6-2-pre-req-automation-script-formerly-vcac.html
Recent Comments