
So far, we have discussed various aspects of extending vRealize Automation. This involved using custom properties, the guest and the bootstrap agent along with software components, the vRealize Designer, the vRealize Orchestrator and finally the Advanced Service Designer. However, for the sake of completeness, there are still some smaller topics to be covered. In particular, we want to discuss the following issues:
- Infrastructure as code
- Scripting vRealize Automation
- Automating the installation
23.1 Infrastructure as Code
Basically, Infrastructure as Code can be understood as automating the deployment as well as the provisioning and configuration of an entire infrastructure. Basically, by providing blueprints vRealize Automation already supports administrators to achieve this goal. We have learnt how to create blueprints, but in order to use blueprints in all our environments, there is more to be done: There must be a possibility to export and import blueprints.
As well as being importable and exportable, blueprints can be considered similar to application code. Blueprints can be stored in a code repository and can be version- controlled. This helps to track and maintain different versions of the code and audit changes.
| Why using Infrastructure as Code
Automating the deployment of infrastructure bears many advantages, among others: Identical infrastructure can be deployed across all environments including development, QA, testing, and production setups. This also allows to create production-like setups for testing the code during development and testing phases. It also becomes easier to perform frequent testing of the code for the deployment infrastructure. By using scripts instead of manual testing, frequent and instantaneous testing is possible. This allows engineers to fail early and fail fast if there are any errors in the code and fix it without wasting any more time. Last but not least, infrastructure as code allows to create self-documenting systems. |
23.1.1 Using the Cloud Client for Infrastructure as Code
Unfortunately, blueprints cannot be imported and exported by means of the graphical user interface. Instead, the Cloud Client is needed. Basically, the Cloud Client is a command-line utility that provides verb-based access with a unified interface across vRealize Automation APIs. This helps users to easily code their own deployment scripts or recipes and integrate them with their own run books while still having the governance and lifecycle management of vRealize Automation.
In particular, the Cloud Client can help in the following use cases:
- Browsing the catalog and submit a request
- Approving a catalog request
- Managing provisioned machines
- Creating tenants and groups
- Configuring IaaS, including endpoints, data collection, and reservations
- Managing catalog services and entitlements
- Importing and exporting blueprints and other content to human-readable format
- Submitting authenticated vRealize Automation API calls from the command line
- Automating updates to VM reservations following SRM failover
- Executing vRealize Orchestrator workflows
In order to use the Cloud Client, we have to download the latest vRealize CloudClient. The current version at the time of writing this document is 4.2 (you can find the tool on the VMware Developer Center[1]). Once the tool is downloaded, it must be extracted and finally we can go to the extracted bin directory. Depending on your operation system, either run the cloudclient.bat or the cloudclient.sh script.
Now let’s use the tool to log on to vRealize Automation. First, you should set a couple of environment variables in order to use the auto-login feature of the Cloud Client (the following commands are stored in a shell script in order to provide reusability):
#!/bin/sh

export vra_server=server_name

export vra_username=user1

export vra_keyfile=keyfile.enc

#export vra_password=#If you want to use cleartext password, use this instead of       #vra_keyfile

export vra_tenant=vsphere.local

#Uncomment below and replace with valid cloudclient home path (unless you already have this environment variable set)

export cloudclient_home=/path/to/cloudclient
Once, you have saved the environment file, you can load it from the command line similar as shown in the following:
$clocudclient/bin/cloudclient.sh
If you start the Cloud Client for the first time, you are asked to accept the license agreement and to add the certificate information to the local Cloud Client trust store. Once logged in, you might receive the message that your session is INACTIVE. Next, log in into the IaaS server:
vra login iaas --server <your IaaS Serve> --user <user@domain> --password xyz
Next, you can make sure that you are authenticated:
vra login isauthenticated all
Once these steps are completed, we can begin to work with the Cloud Client shell.
In order to list all available blueprints within your vRealize Automation environment, you can issue the following command (see Fig 1):
vra blueprint list
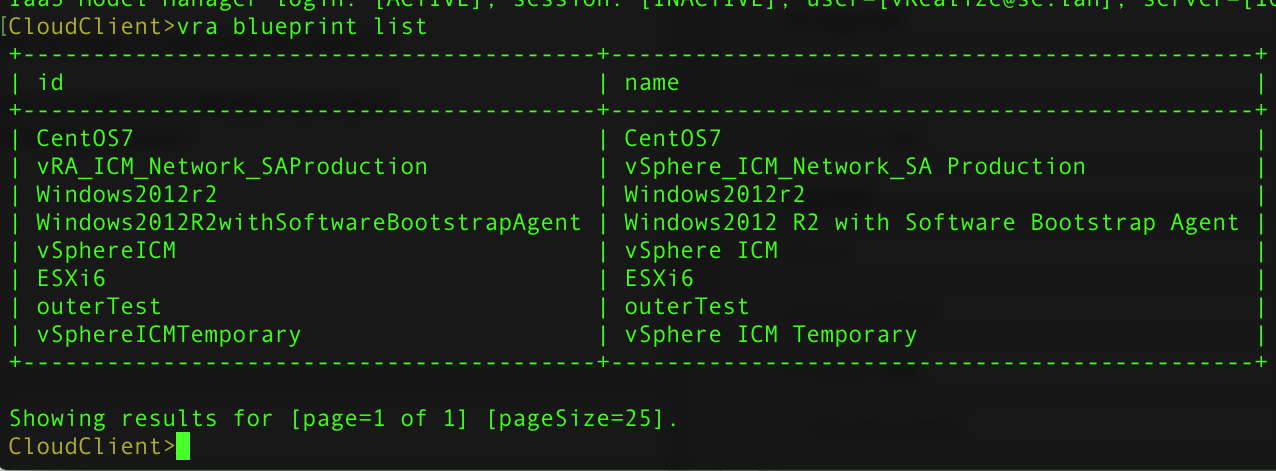
Fig 1: Using Cloud Client to show all blueprints
When importing and exporting items from vRealize Automation, it is always a good idea to create a package to group items together. First let’s try to show all items that can be managed by using the Cloud Client (not only IaaS blueprints, but also property groups, software components and XaaS items):
vra content list
Next, let’s create a package to group elements that should be exported and imported as a single unit. This can be done as follows:
vra create package <packagename> --ids <comma separated list of ids>
--description <a small description>
However, in order to issue this command, you have to first look up the IDs of the items. Once you have created your package, you can show it via the command line (see Fig 2):
vra package list
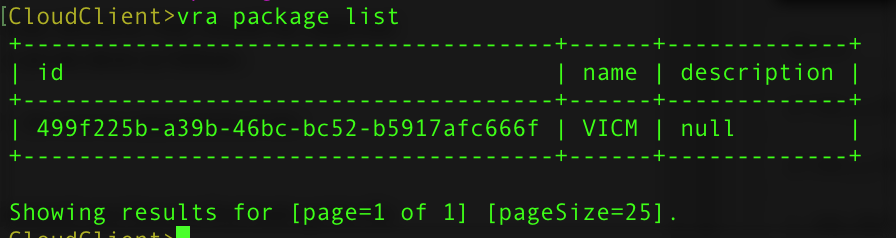
Fig 2: List of packages in Cloud Client
Finally, we can export the package by issuing the following command:
vra package export –pkgID <package id> --path <path for export>
That concludes how to work with the Cloud Client. If you need more samples, you will see additional Cloud Client samples on the VMware download page.
The next step of setting up a real Infrastructure as Code process would be to use a version control system such as Git for storing your packages. Once this has been done, you can even go a step further and use a continuous integration system like Jenkins. Jenkins is an extensible automation server that can be used as a simple continuous integration (CI) server. For all people who are interested in that, there is a vRealize Automation plugin for Jenkins provided by Kris Thieler[2].
23.2 Scripting vRealize Automation
We have already seen how to use the Cloud Client to create scripts for vRealize Automation. Besides using the Cloud Client, there are other possibilities as well:
- First of all, you can work with the vRA REST API
- Second, you can use PowerShell
23.2.1 Using the vRA REST API
vRealize Automation is shipped with a RESTful API that can be used for automation. In order to make REST calls, you can either trigger REST calls from a programming language like Java or .NET, use the curl command line tool or use Postman that eases triggering REST calls. vRealize Automation provides the following REST API services:
- Advanced Designer Service
- Approval Service
- Branding Service
- Catalog Service
- Component Registry
- Composition Service
- Content Management
- Event Broker Service
- Fabric Service
- Identity Service
- Licensing Service
- Management Service
- Network Service
- Notification Service
- Plug-In Service
- Portal Service
- Properties Service
- Reservation Service
- Software Services
- vCO Service
- WorkItem Service
As you can see there are plenty of different REST API services available that can be used to configure and manage vRealize Automation programmatically. In addition, VMware provides documentation for the REST API services:
- There is a programming guide that introduces how to work with the REST API and shows various REST calls (the programming guide can be found within the Developer Resources section of the vRealize Automation documentation). However, documentation is not available for every single REST call, only for the most important one.
- In addition, there is a REST API reference (see Fig 3), which provides documentation for every single REST call. The reference can be browsed online from the Developer Resources or be downloaded as a zip file.
With that knowledge in mind, we can discuss how to perform a REST call. However, please consider that before being able to perform a request to vRealize Automation, a bearer token is needed for authentication. You can acquire the bearer token from the vRealize Automation identity service. Once obtained, the bearer token must be added in any subsequent request within the request header and is valid for the next 24 hours.
Using bearer tokens
vRealize Automation provides the following methods to manage bearer tokens (see Table 1):
| Method | URL | Description |
| POST | /tokens | Authenticate the user with the identity service /tokens and generate a new token. |
| HEAD | /tokens/tokenID | Validate the token ID |
| DELETE | /tokens/tokenID | Deletes the token ID |
Table 1: REST Methods for managing bearer token IDs

Fig 3: REST API documentation
In order to make a call for the bearer token, we need to forward the following parameters to the vRealize Automation server:
- Host: The host domain name of the vRealize Automation server
- Username of a tenant administrator
- Password of a tenant administrator
- Tenant URL token, the tenant name
When sending a HTTP request via curl, the username, the password and the tenant must be coded as JSON, the host will be the destination where to send the request to. That’s enough knowledge to show a sample request:
curl --insecure -H "Accept: application/json" -H 'Content-Type: application/json' --data '{"username":"configurationadmin@vsphere.local", "password":"VMware1!","tenant":"SC"}' https://vra7-app.sc.lan/identity/api/tokens
The insecure-option is also noteworthy and allows us to call a host with a self-signed certificate. If everything works correctly, the output should look similar to the following:
{"expires":"2016-09-03T17:01:02.000Z",

"id":"MTQ3Mjg5MzI2MjgyNjpkYTEwOGE1YmZmYTk2MGI1MzQwZDp0ZW5hbnQ6U0N1c2VybmFtZTpjb25maWd1cmF0aW9uYWRtaW5AdnNwaGVyZS5sb2NhbGV4cGlyYXRpb246MTQ3MjkyMjA2MjAwMDpkNGQ5ODJkMWZmMzIxYTI4NjEzNzQ3ODUxOGNkYmJjYTk4ZTBkYmU0YmM3YWY2OWUzMWYzMjdiODc2OTlhYjhmNTIzZmU1ODYxNGUyNGM5MmUxNzZiODMyMjEwZWVhOTQ4YWFkNTBiOWY4YzY0YTU2Y2NjOWFkOTQ2NmMyYmMyMg==",

"tenant":"SC"}
On the other side, If anything goes wrong, you have to grep the output to find out the possible root cause. The following status codes exist for the bearer token:
| Status code | Description |
| 204 | The request succeeded. |
| 401 UNAUTHORIZED | You must have authentication credentials to access the resource. All requests must be authenticated. |
| 403 FORBIDDEN | Your authentication credentials do not provide sufficient access to the resource. |
| 404 NOT FOUND | Could not locate the resource based on the specified URI. |
| 405 METHOD NOT ALLOWED | The HEAD method is not supported for the resource. |
| 500 SERVER ERROR | Could not create or update the resource because of an internal server error. |
Table 2: Bearer token status codes
Once we have figured out how to request a bearer token, we still need to find a way how to store the bearer token within a variable in order to submit it as authorization header in subsequent calls. So let’s rewrite our curl-invocation:
DATA=`curl -s –insecure -H “'Content-Type: application/json’ –data ‘{“username”:”configurationadmin@vsphere.local", "password":"VMware1!","tenant":"SC"}'  <a href="https://$VRA/identity/api/tokens%60">https://$VRA/identity/api/tokens`
</a>

export TOKEN=`echo $DATA | grep -Po ‘(?<=”id”:”)[\w\d=]*(?=”)’`

AUTH=”Bearer $TOKEN”
The fist command stores the result of the curl-command within the DATA variable. We can parse it and store it in another variable called TOKEN. Subsequent request expects an authentication header having the format “Bearer <TOKEN>”, which is prepared in the last command. Such a request looks like this (the following command queries for catalog items within the service catalog):
curl --insecure -H "Content-Type: application/json" -H "Authorization: $AUTH” <a href="https://vra7-app.sc.lan/catalog-service/api/consumer/entitledCatalogItems">https://vra7-app.sc.lan/catalog-service/api/consumer/entitledCatalogItems</a>
Using Postman
If you are working a lot with REST API services, you certainly want to have a tool to test your REST invocations before putting them in your script. One of the tools that can help you with that is Postman. Postman allows users to quickly put together both simple and complex HTTP requests. Postman is available as both a Google Chrome Packaged App and a Google Chrome in-browser app. The packaged app version includes advanced features such as OAuth 2.0 support and bulk uploading/importing that are not available in the in-browser version.
Fortunately, the vRealize Automation community also provides a Postman collection. If you are interested in that, you will find the collection at github[3].
23.2.2 Using PowerShell for automating vRealize Automation
While the REST API offers the full-feature set of vRealize Automation, REST programming is still a lot of work. Fortunately, there is a community project called PowervRA[4]. For the initial release, there are already over 60 functions available covering a sizable chunk of the vRealize Automation REST API.
23.3 Automating the vRealize Automation installation
With version 7.1 of vRealize Automation, VMware also provides the possibility of a silent installation. This is useful in a variety of use cases, for example if you want to perform an unattended installation, repeatedly want to redeploy the same environment or want to perform a scripted installation. A scripted installation basically consists of two parts:
- First, a silent installation of the management agents residing on the Windows hosts has to be performed.
- Second, there is a configuration file on the vRealize Automation appliance to be edited. Once this has been done, the unattended installation can begin.
Let’s discuss those steps right now.
23.3.1 Perform a silent installation of the management agent
There is a PowerShell script on the vRealize Automation installation page that can be downloaded to trigger the management installation. You can find the script named InstallManagementAgent.ps1 at the following URL: https://<vra7-app.domain.name>:5480/installer. Once you have downloaded the file, edit the script and replace the following configuration settings:
- vRealize Automation appliance URL
- vRealize Automation root user account credentials
- vRealize Automation service user credentials, a domain account with administrator privileges on the IaaS Windows servers
- Folder where you want to install the Management Agent, Program Files (x86) by default
- (Optional) Thumbprint of the PEM format certificate that you are using for authentication
23.3.2 Start of the unattended installation
The unattended installation can then be started from the vRealize Automation appliance. However, there is also a configuration file that must be edited. The file is called ha.properties and can be found within the /usr/lib/vcac/tools/install directory. There are plenty of settings to be configured, among others:
- vRealize Automation or suite license key
- vRealize Automation appliance node FQDNs
- vRealize Automation appliance root user account credentials
- IaaS Windows server FQDNs that will act as Web nodes, Manager Service nodes, and so on.
- vRealize Automation service user credentials, a domain account with administrator privileges on the IaaS Windows servers.
- Load balancer FQDNs
- SQL Server database parameters
- Proxy agent parameters to connect to virtualization resources
- Whether the silent installer should attempt to correct missing IaaS Windows server prerequisites
Once all settings have been configured, the installation can be finally triggered by issuing the vra-ha-config.sh command in the same directory.
23.3.3 The installation command line
In addition to the silent installation, there is also an installation command line that helps to perform installation adjustments after the initial installation. The command is called vra-command.sh and can help you within the following scenarios:
- Adding another vRealize Automation appliance to an existing installation.
- Setting the host name that users point a Web browser to when they access vRealize Automation
- Creating the IaaS SQL Server database
- Running the prerequisite checker against an IaaS Windows server
- Importing certificates
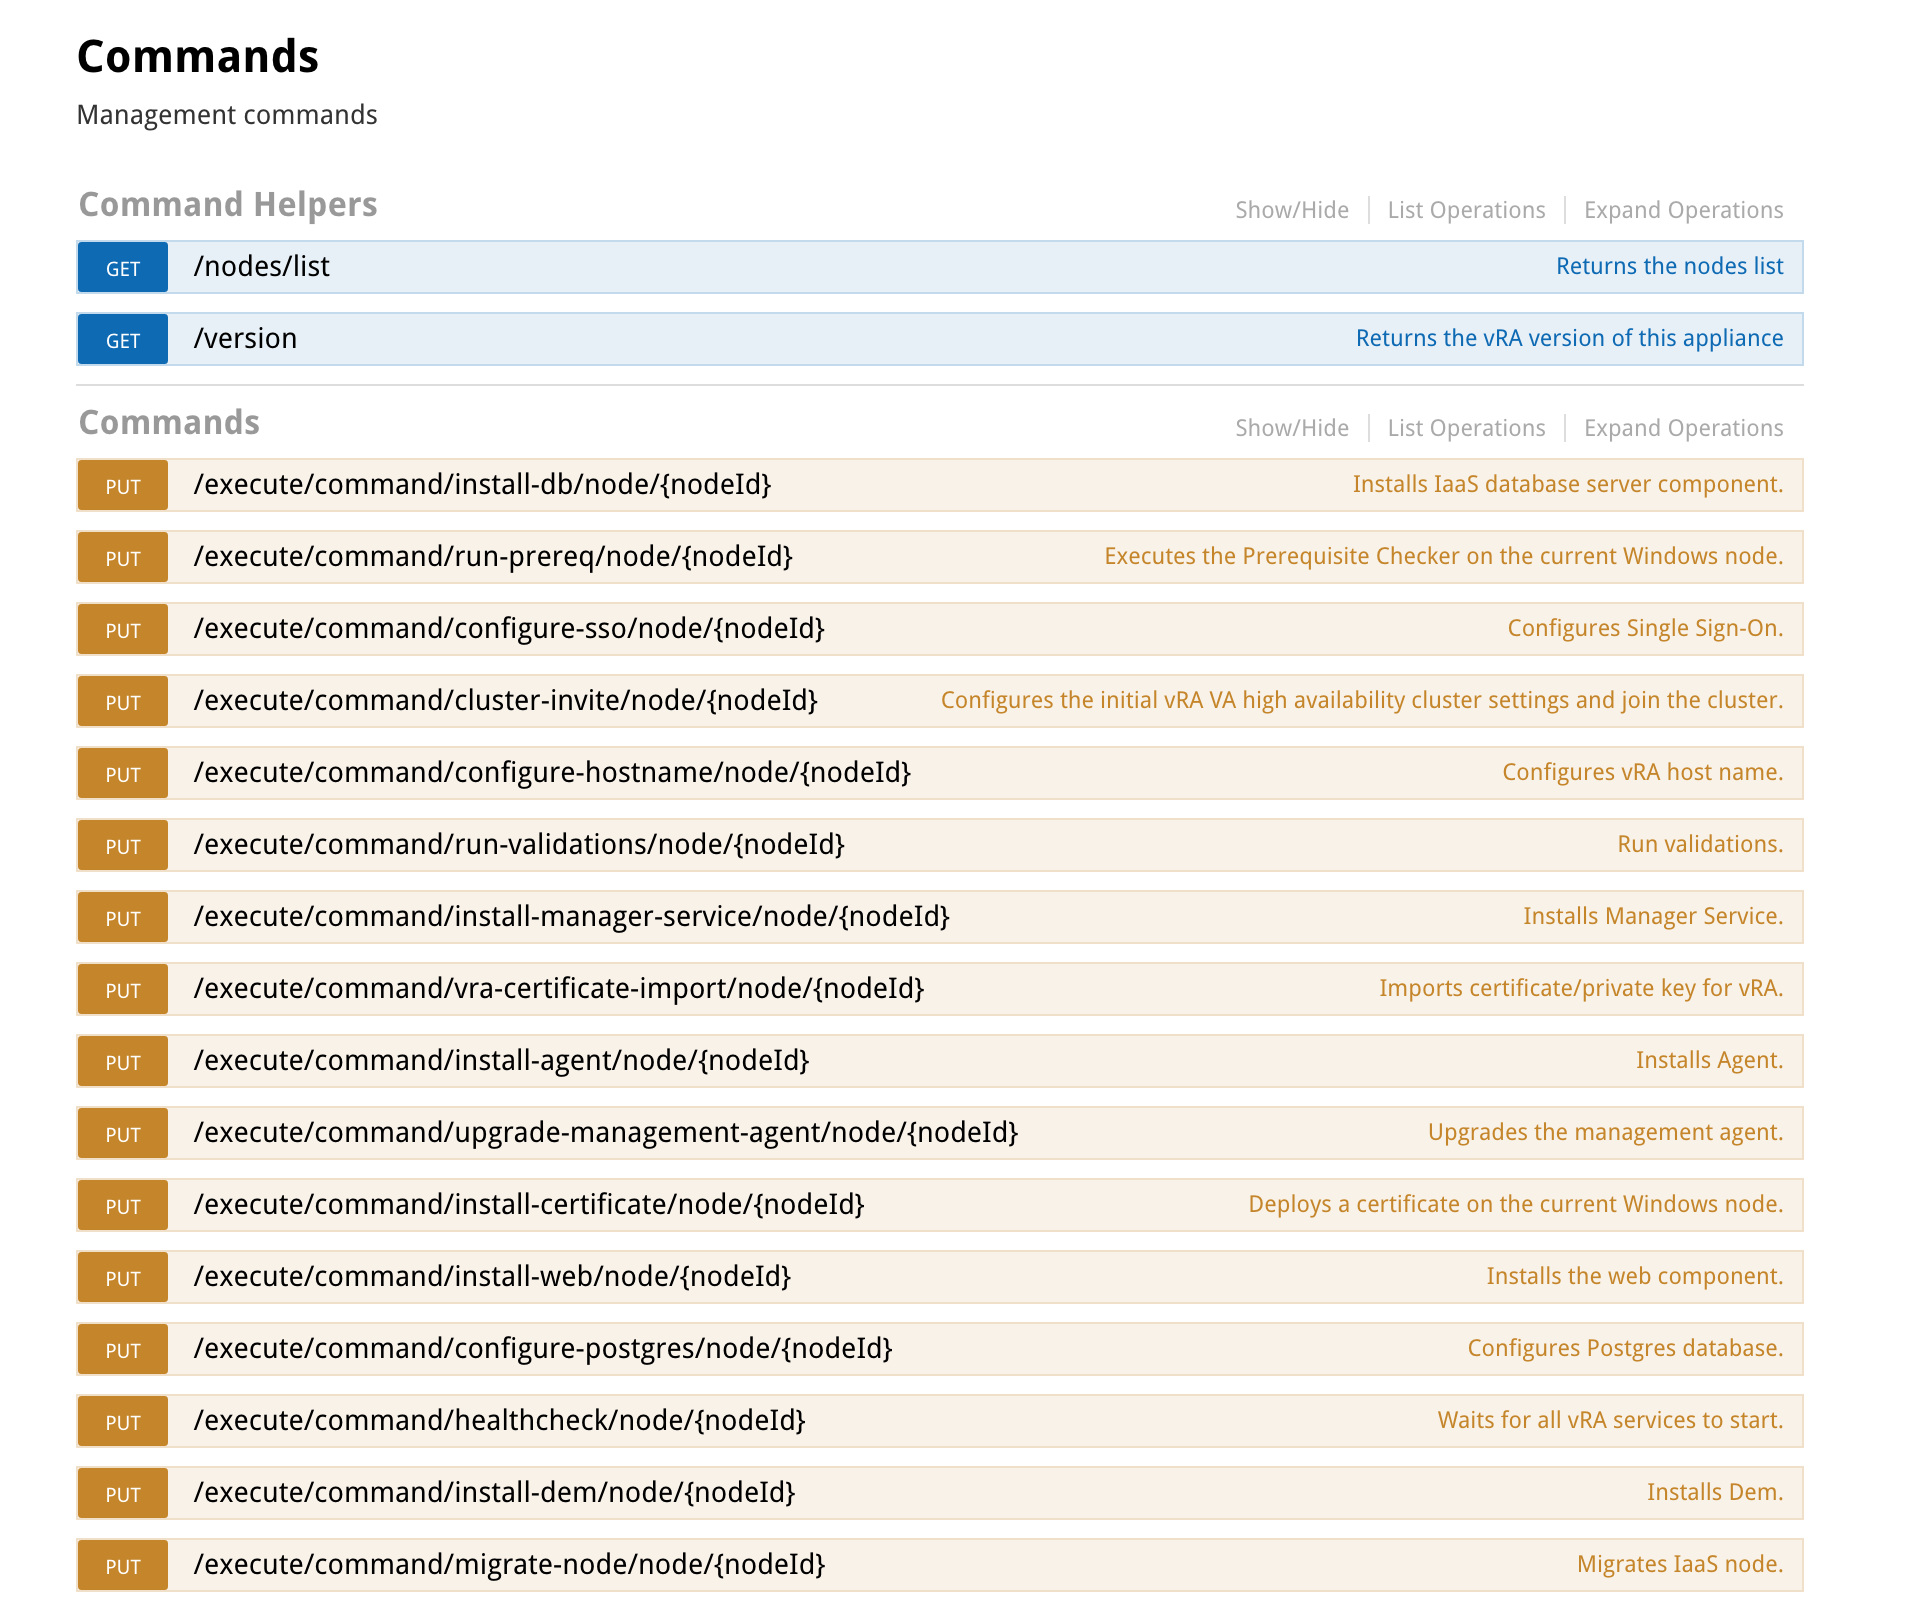
Fig 4: Swagger interface with guided commands
To see the syntax of the command options, you can type in vra-command help and vra-command help <command-name>.
23.3.4 The REST interface
Last but not least, the installation can also be automated using REST calls. vRealize Automation provides a set of guided commands that are accessible via the vRealize Automation appliance VAMI webpage. Similar to the vRealize Orchestrator page, there is a Swagger user interface where all the commands can be seen and tested from. The interface is accessible via the URL https://<vra7-app.domain.name>:5480/config (see Fig 4). We have already shown how to user the Swagger API in chapter 21, so we will not cover how to use Swagger here once again.
23.4 Summary
This chapter discussed how to automate vRealize Automation. We first talked about blueprint as code to streamline the blueprint creation and update process. We then introduced various ways to automate vRealize Automation, among others the Cloud Client, the REST API and the community PowerShell commandlets. Finally, we showed how to automate the installation itself.
[1] https://developercenter.vmware.com/tool/cloudclient/4.2.0
[2] https://wiki.jenkins-ci.org/display/JENKINS/VMware+vRealize+Automation+Plugin
[3] https://github.com/grantorchard/postman-collections/blob/master/VMware%20vRealize%20Automation%207%20-%20Complete.json.postman_collection
[4] http://www.jonathanmedd.net/2016/03/introducing_powervra.html
Recent Comments