
We have already talked a lot about services. Providing services instead of just resources to your consumers bears a lot of advantages:
- First, you can provision any services and resources you want. You can have them when you need them and do not need to wait a long time. If you need more resources, you can scale-out quickly.
- Another advantage is that you can replicate quickly. Instead of building everything by hand, you can structure your solution as a series of scripts and applications. That means you can deploy and rebuild them when needed.
- You can also build up and tear down easily. Since you are provisioning on demand, it is quite easy for you and your users to build up a large set of servers and tear it down once you don’t need it anymore.
So far, we have talked a lot about provisioning infrastructure resources. However, provisioning is not limited to deploying machines – basically you can set up any service and publish it to the self-service catalog. In vRealize Automation, these services are called Anything as a Service (XaaS).
When setting up those XaaS services you need at least the Advanced Edition of vRealize Automation. The tool to create these services is called the Advanced Services Designer. From a technical point of view, there are three components, which work together to provide XaaS services:
- The vRealize Orchestrator, which runs the services as workflows in the background.
- The Advanced Service Designer (ASD), which helps to create a graphical frontend for the Orchestrator workflow.
- The self-service catalog, which hosts the published services.
In the remainder of this chapter, we will dive into the basics and further customizations of the ASD. First of all, we show common use cases for the ASD. Then we will explain the steps to configure the ASD. At the end we will discuss some example use cases that have been implemented with the ASD.
22.1 XaaS concepts and use cases
It is quite easy to explain what can be done with the ASD on a conceptual level:
- First of all, the resources provisioned by the XaaS services have to be defined. This can be a user, a file, a cluster, a LUN on a storage, a virtual machine, a cloud service or anything else. These resources are called custom resources.
- After resources have been created, it might be possible to perform some actions on them. For example, a user created by vRealize Automation can be deleted or deactivated. As with a virtual machine, actions can be defined on any service. Because these actions are not performed at the same time as the creation, but at any time, these actions are also called day-2 operations. The actions itself are called resource actions.
- To create a new XaaS service, you have to create a service blueprint. Designing a service blueprint means creating the user interface for an Orchestrator workflow, assigning the result to a custom resource and publish it to the service catalog.
- It is also possible to provision infrastructure compute resources via the ASD. However, when doing so, you should create a mapping between the vRealize Automation catalog resource type and the Orchestrator inventory type. This mapping is called resource mapping.
With this knowledge in mind, we can find use cases for the ASD. Basically, the ASD is useful for all kind of processes that can be automated and published as a service within the self-service catalog. Examples comprise:
- User administration such as the creation of new accounts, activating and deactivating accounts or resetting passwords.
- Automating email configuration, e.g. setting up a new mailbox.
- Providing storage – also called Storage as a Service.
- Creating networks.
- Performing backups and recovery.
- Security and compliance processes.
- Installation of new software or updates.
- Invoking any cloud service.
In many cases, the examples given for the ASD seem to be quite trivial. However, when you consider that many help desks spend most of their time with such tasks, you can better appreciate the benefits of automating them. That does not mean you should automate everything in a single leap, rather you could automate processes as and when the need arises.
The ASD is also very important to third-party vendors, as it allows them to integrate their solutions into vRealize Automation. They need only deliver Orchestrator plug-ins, which can then in turn be invoked from vRealize Automation. There are already examples of such plug-ins and they are very suitable for being integrated within the ASD. For example, storage workflows from EMC or the NetApp WFA Command package.
22.2 Advanced Service Configuration
Before being able to work with the Advanced Service Designer, there is some configuration work to be done. This involves the following issues:
- Assigning the appropriate roles to the users.
- Configuring the ASD endpoints.
- Configuring the Orchestrator plug-ins for the ASD.
22.2.1 Role assignment
Before being able to configure the ASD, we have to make sure to have the proper permissions: We need to have the XaaS Architect role. This role allows the setting up of the ASD components as described later in the chapter. The configuration can be done as follows:
- Change to the Administration > Users & Groups > Directory Users and Groups
- At the upper right-hand side in the Search box, type in the name of the user, to which the XaaS architect role is assigned.
- Select the found user and click on View Details.
- On the Details tab, please make sure that the XaaS Architect role is selected and click Finish (see Fig 1).
- Log out and log in again to vRealize Automation.
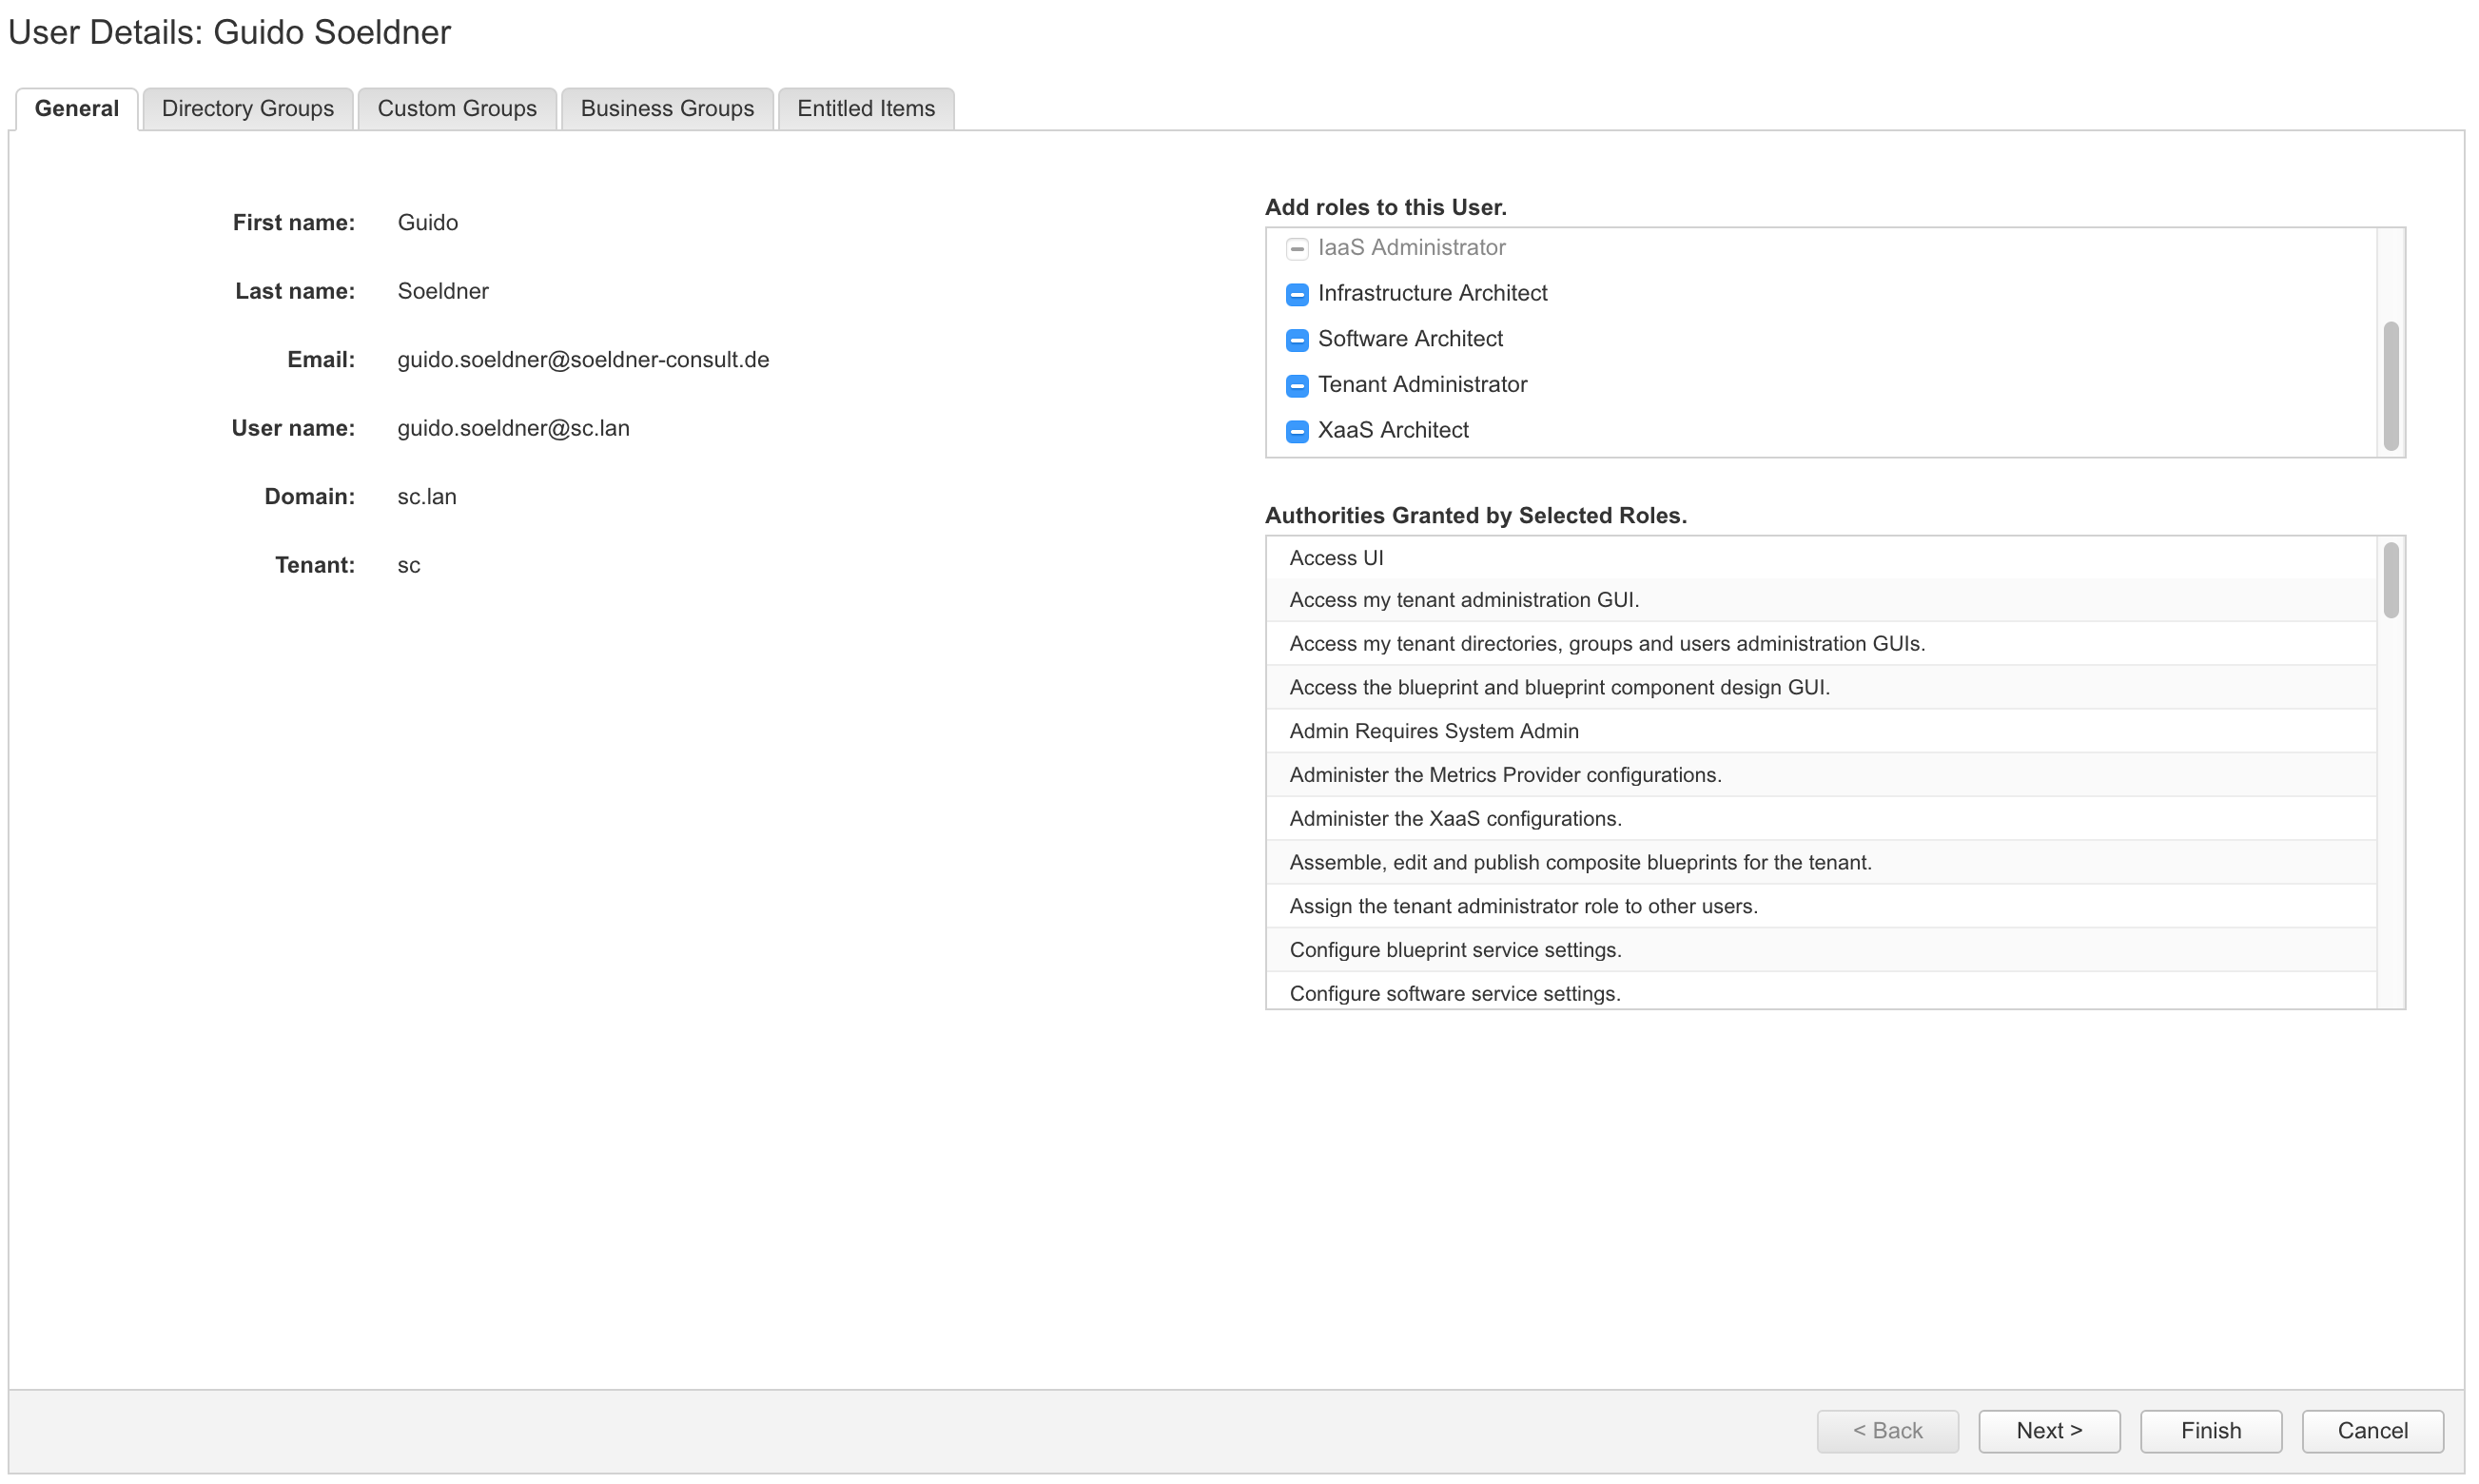
Fig 1: Role assignment
Once you have logged into vRealize Automation again, you should be able to see the Advanced Services menu.
22.2.2 Endpoint configuration
Although we have already created endpoints for vRealize Orchestrator, we must configure further endpoints for the Advanced Service Designer. The configuration takes place within the Administration > vRO Configuration > Server Configuration menu.
Within the Server Configuration menu, you can choose to either use the default Orchestrator server or switch to an external one. If you configure an external Orchestrator server, please provide the following input (see Fig 2):
- Name of the server (assigned by you)
- Description (optionally)
- Host: the machine where vRealize Orchestrator is installed
- Port: Usually 8281
- Authentication: Basic (by default unless you configure Orchestrator externally – we have covered Orchestrator Single Sign-On authentication in chapter 20)
- User name
- Password

Fig 2: XaaS Orchestrator server configuration
22.2.3 Configure the Orchestrator plug-ins for the ASD
The next step is to configure the endpoints for the ASD. ASD provides endpoints for the following plug-ins:
- Active Directory
- HTTP-REST
- PowerShell
- SOAP
- vCenter Server
In the following we will show how to configure these endpoints.
Configuration of the Active Directory plug-in
You have to configure the Active Directory endpoint, if you plan to use Active Directory within any of your XaaS workflows. Setting up this plug-in, involves working through the following steps:
- Navigate to the Administration > vRO Configuration > Endpoints
- Click on the [New]
- From the Plug-in dropdown list, choose Active Directory and click Next to continue.
- Assign a Name for the connection.
- Optionally enter a
- Click Next.
- The connection information can be provided on the Details menu (see Fig 3). Provide the following input:
- Type in the DNS name or IP address of the domain controller within the Active Directory host IP/URL
- Provide the Port number (please consider that the LDAP connection has to be secured, so you cannot use port 389 – instead 636 is used for the communication).
- Within the Root textbox, provide the LDAP base for your connection (e.g. dc=sc, dc=lan).
- For the useSSL dropdown list, select Yes.
- Define the Default Domain (e.g. @sc.lan).
- Within the User name for shared session, provide a user name with appropriate permissions to Active Directory.
- Provide the Password for shared session.
- Click Finish to save your changes.

Fig 3: Configuring the Active Directory plug-in
Once you have finished the configuration, you can switch over to Orchestrator and check if the configuration has been set up successfully. In Orchestrator, switch to the Run-mode and change to the System > vRealize Automation > XaaS > Endpoint Configuration > Microsoft > Active Directory > Configuration folder. You should see a green workflow token next to the Configure Active Directory server workflow.
22.2.4 Configuration of the vCenter Server endpoint
If you want to use vCenter server from within your XaaS workflows, you must configure the vCenter Server plug-in, too:
- Navigate to the Administration > Advanced Services > Endpoints
- Click on the New-icon.
- From the Plug-in dropdown list, choose vCenter Server and click Next to continue.
- Assign a Name for the connection.
- Optionally enter a
- Click
- The connection information can be provided on the Details menu. Provide the following input:
- IP or host name of the vCenter Server instance to add
- Port of the vCenter Server instance (port 443).
- Location of the SDK that you use to connect to the vCenter Server instance (usually “/sdk”)
- Click on Next.
- On the Set the connection properties tab, enter the following information:
- The HTTP port of the vCenter server instance (applicable for vCenter plugin version 5.5.2 or earlier)
- User name of the user that Orchestrator will use to connect to the vCenter Server instance.
- Password of the user that Orchestrator will use to connect to the vCenter Server instance.
- Click Finish to finish the configuration.
22.3 Working with the Advanced Service Designer
Once you have finished configuration of the ASD, you are ready to create your own service blueprints and publish them into the service catalog.
Working with the ASD means creating and configuring custom resources, service blueprints, resource mappings and resource actions.
Custom resources can be described as the result of an ASD workflow. For example, if you trigger a workflow to create a new user account, you first have to define a ‘User’ custom resource, which holds the output of this workflow. The Orchestrator workflow is triggered from the service blueprint. If there is any action performed on a user, for example you want to deactivate that user, you need to define a day-2 operation by setting up a resource action.
If you already have some alternative IaaS deploying mechanism, for example via PowerShell scripts, you can trigger these scripts from within Orchestrator. It is important to note, however, that if you want to trigger such a deployment from vRealize Automation, you first have to map the provisioned resource to a data type in vRealize Automation. This can be done by means of resource mappings. vRealize Automation already has a set of predefined mappings (see Fig 4). These encompass the following resources:
- vCloud Director virtual machine
- vCenter virtual machine

Fig 4: Resource mappings
In the following, we will demonstrate the process of integrating a simple vRealize Orchestrator workflow into ASD, and then publish it to the self-service catalog as a XaaS service.
22.3.1 Create custom resources
Perform the following steps to create a custom resource:
- Within the Design > XaaS menu, go to Custom Resources.
- Click the [New]
- On the Resource type tab, provide a value for the Orchestrator Type. As we want to keep things simple, we just type in AD:User for an Active Directory user account (see Fig 5) .
- Enter a Name for the Custom Resource (e.g. Active Directory User).
- Optionally, provide a Description.
- Optionally, specify a Version (e.g. 1.0.0) for the custom resource.
- Click on Next.
- On the Details Form tab you can specify how the Custom Resource will be shown in the self-service portal. We will discuss the Form Designer later in detail, so just click Finish to finish the wizard.
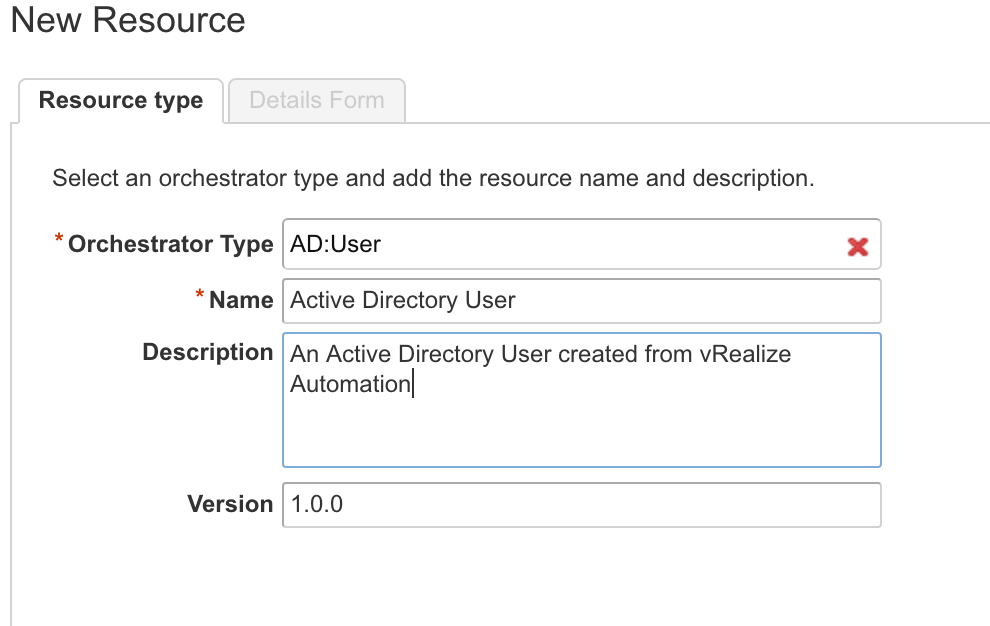
Fig 5: Creating a custom resource
22.3.2 Create a service blueprint
Now, we can continue with creating a XaaS Blueprint. Perform the following steps:
- Within the Design > XaaS menu, go to XaaS Blueprints.
- Click the [New]
- On the Workflow tab, expand the Orchestrator folder and navigate to Library > Microsoft > Active Directory > User.
- Select the Create a user with a password in an organizational unit and click Next to continue (see Fig 6).
- On the Details page, review the settings for the Name, Description and Version and click Next to continue.
- Once again, the next page shows the Form Designer. The current graphical user interface for the dialog directly comes from Orchestrator, but you are free to customize the user interface. You can change the user control of each input parameter, as well as adding additional controls (the input entered will be saved as part of the request). To change a user control, hover over the element and click on the pencil (see Fig 7). Review and modify the following user controls:
- Choose OU: Choose an Organization Unit
- ouContainer: OU-Container
- accountName: Name
- password: Password
- confirmPassword: Confirm Password
- domain Name: Domain Name
- display Name: Display Name
- changePasswordAtNextLogon: Change Password at next Logon.
- Now move the fields a little bit:
- Move the Confirm Password field to the same row as the Password user control.
- Move the Display Name to the same row as the Name.
- Add an additional Integer field to the request form and place it appropriately. Name the field ‘cost center’ and use costCenter as an ID.
- Click Next to continue.
- On the Provisioned Resource tab, map the outcome of your workflow to the custom resource created previously. Click Finish to finish the wizard.
- The last step is to Publish the service catalog.

Fig 6: Selecting an Orchestrator workflow
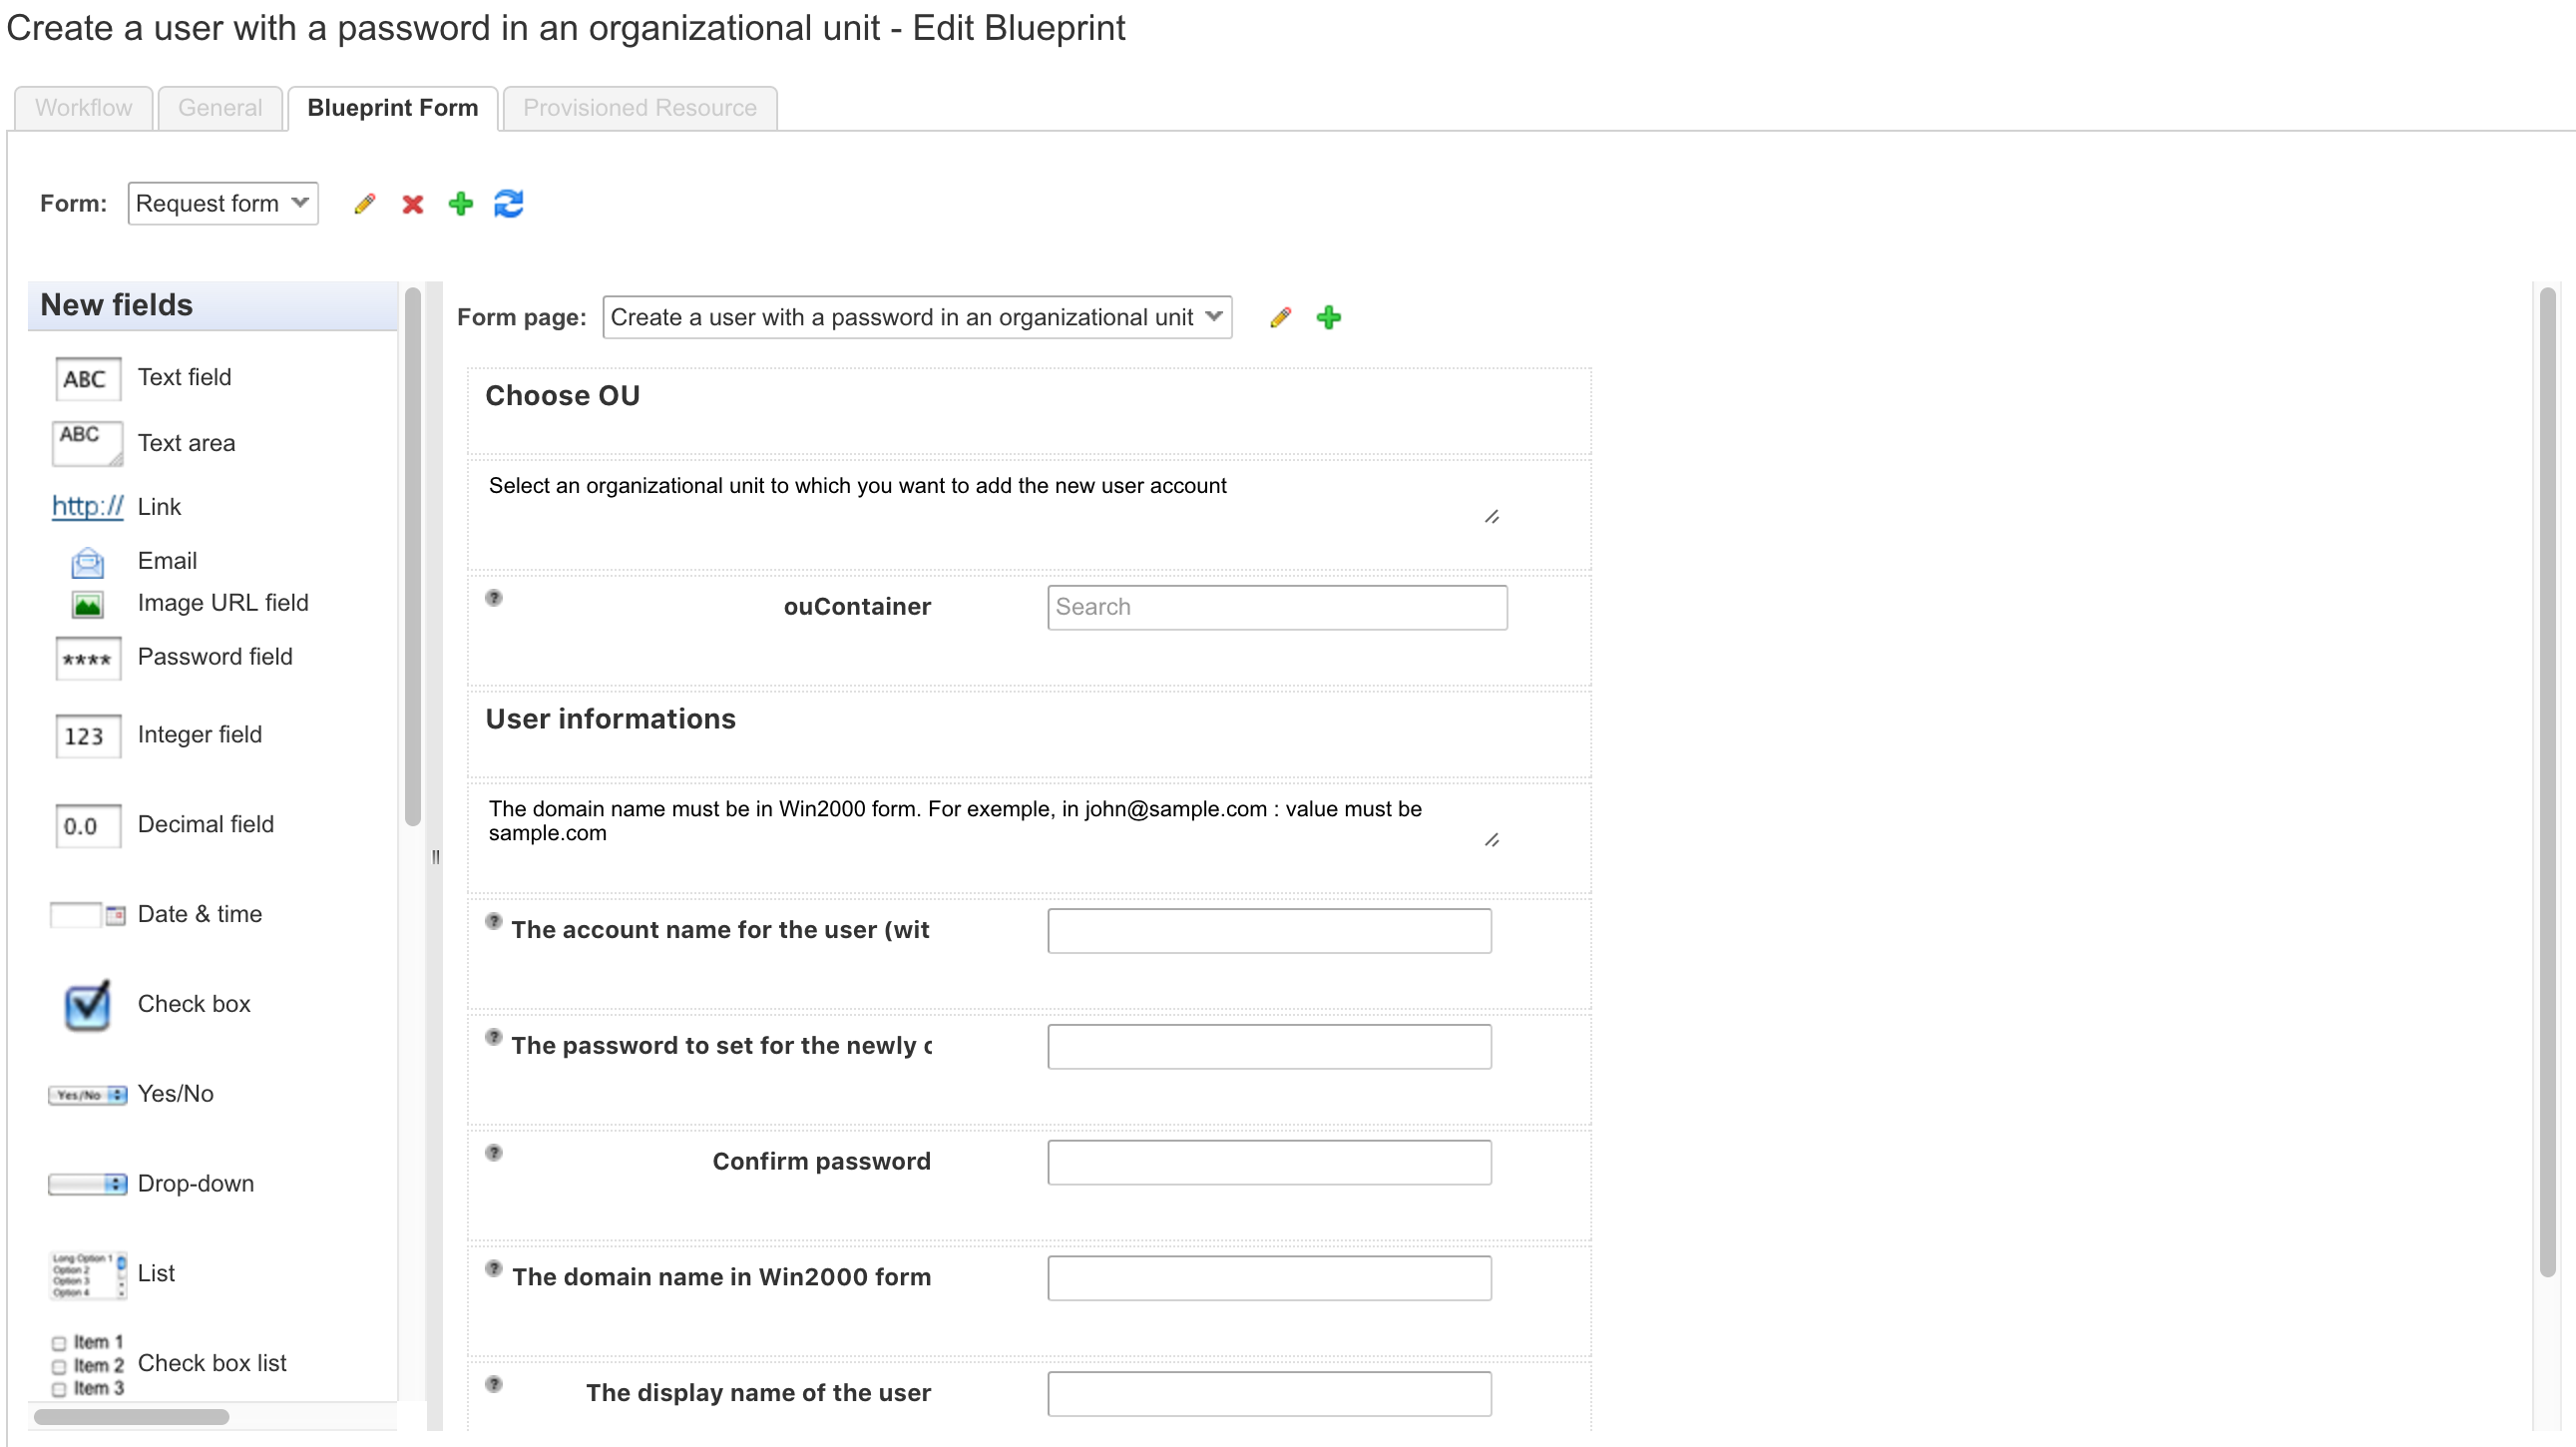
Fig 7: Using the Form Designer
The remaining steps should be well understood by now. After publishing a blueprint, there is still a need to assign the appropriate permissions and choose how it should be displayed within the service catalog. As we have already described the necessary steps in previous chapters, we will skip this here.
22.3.3 Define resource actions
As described earlier, resource actions help us to provide day-2 operations on provisioned resources. A possible day-2 operation for an Active Directory would be to deactivate or delete an account. We will demonstrate this in the following:
- Within the Design > XaaS menu, go to Resource Actions.
- Click the [New]
- On the Workflow tab, expand the Orchestrator folder and navigate to Library > Microsoft > Active Directory > User.
- Select the Destroy a User workflow (see Fig 8).
- Click on Next.
- Review the value for the Resource type and Input parameter dropdown list on the Input Resources
- Click on Next.
- On the Details page, review or modify the following settings:
- Name
- Description
- Hide catalog request information page
- Version
- Type: Disposal or Provisioning (choose Disposal, as we want to destroy a user)
- Target criteria: Always available or Available based on conditions
- Click on Next.
- On the next tab, you can customize the user interface and add additional user controls to the Action Form. As we don’t want to modify anything in our scenario, click the Add button to save your changes.
- Click OK on the warning dialog.
- Publish your resource action.

Fig 8: Selecting a workflow for a resource action
Once again, after publishing your resource action, you must ensure that your users have the right entitlements to invoke this action.
After you have finished the whole configuration, users can finally create new Active Directory users and delete them. Provisioned Active Directory users can be found on the Items > Active Directory page. You can click on a user object and trigger the resource action.
22.4 Input validation
When creating the user interface for any kind of software, a certain amount of work has to be spent on usability and input validation. This applies to vRealize Automation as well. If there is any wrong input, the workflow should not be started – instead, users should be prompted to correct their input before being able to trigger a workflow. We already covered the Service Designer and showed you how to modify and add user controls. At this point, we want to show how these user controls can be configured to validate the input.
22.4.1 Default fields
The first step in designing a user interface is always to choose the appropriate type for the user controls. vRealize Automation already ships with a large set of user control types:
- Text field: One-line
- Text area: multi-line
- Password field: Input is encrypted
- Integer field: If needed, a minimum and a maximum value can be defined, users will see a slider then
- Decimal field
- Date & Time
- Checkbox
- Yes/No: Dropdown field
- Dropdown
- List
- Checkbox list
- Radio button group
- Search with auto completion
- Tree
- Link
- Email field
- Image URL field
- Dual list
- Tree
- Map
22.4.2 Constraints
Constraints are used to limit input values. The following constraints are supported within the ASD:
- Required: This constraint indicates if a value is required or optional. The constraint can be configured as follows:
- Constant: The required setting is always applied.
- Field: There is dependability on another field. The value is only required if another checkbox is activated.
- Conditional: An expression is evaluated to decide if the value is needed or not.
- Read-Only
- Value: Shows a value. The following options are available:
- Constant
- Field: The value is based on another field
- Conditional: An expression is used
- Visible
- Minimum length: For text input
- Maximum length: For text input
- Minimum value
- Maximum value
- Increment: Defines an increment – used for example on a slider
- Minimum Count: Configures how many elements of a control have to be minimally selected
- Maximum Count: Configures how many element of a control have to be maximally selected
22.4.3 Input validation with Orchestrator
The Advanced Service Designer already provides a set of constraints, which can be applied to forms. However, you should also consider validating input to Orchestrator workflows. This has two advantages:
- If you have a custom workflow, it could be called from endpoints other than the ASD. Therefore, it is certainly good practice to validate input within Orchestrator, as it is the only way to ensure that a validation is performed.
- Orchestrator has more powerful ways of performing validation. This includes regular expressions.
Writing regex expressions can be quite hard. Fortunately, in most cases, we do not have to formulate expressions ourselves, but can find an example to modify to our needs. Once you have written your regex expression, it is – of course – also very important to test it before using it. Fortunately, there are websites like www.regexr.com available for that.
22.5 Advanced Service Designer use cases
After having run through the basics of ASD, it would now be quite useful to demonstrate some more use cases:
22.5.1 Deploy a machine from ASD
So far, we have learnt how to provision machines based on IaaS blueprints. This is of course fine, however, we have seen that modifying the user interface for requesting machines can be quite tedious:
- First of all, classical blueprints only offer a limited set of user controls.
- Configuration of constraints and validations is painstaking.
- User controls can work together (as we have shown), but once again the configuration is quite difficult.
- Last but not least, there is no such thing as a dynamic user control. This means, for example, that values in a dropdown list can only be defined statically. It would be more useful if these values could be generated at runtime, for example by doing a look up against a database.
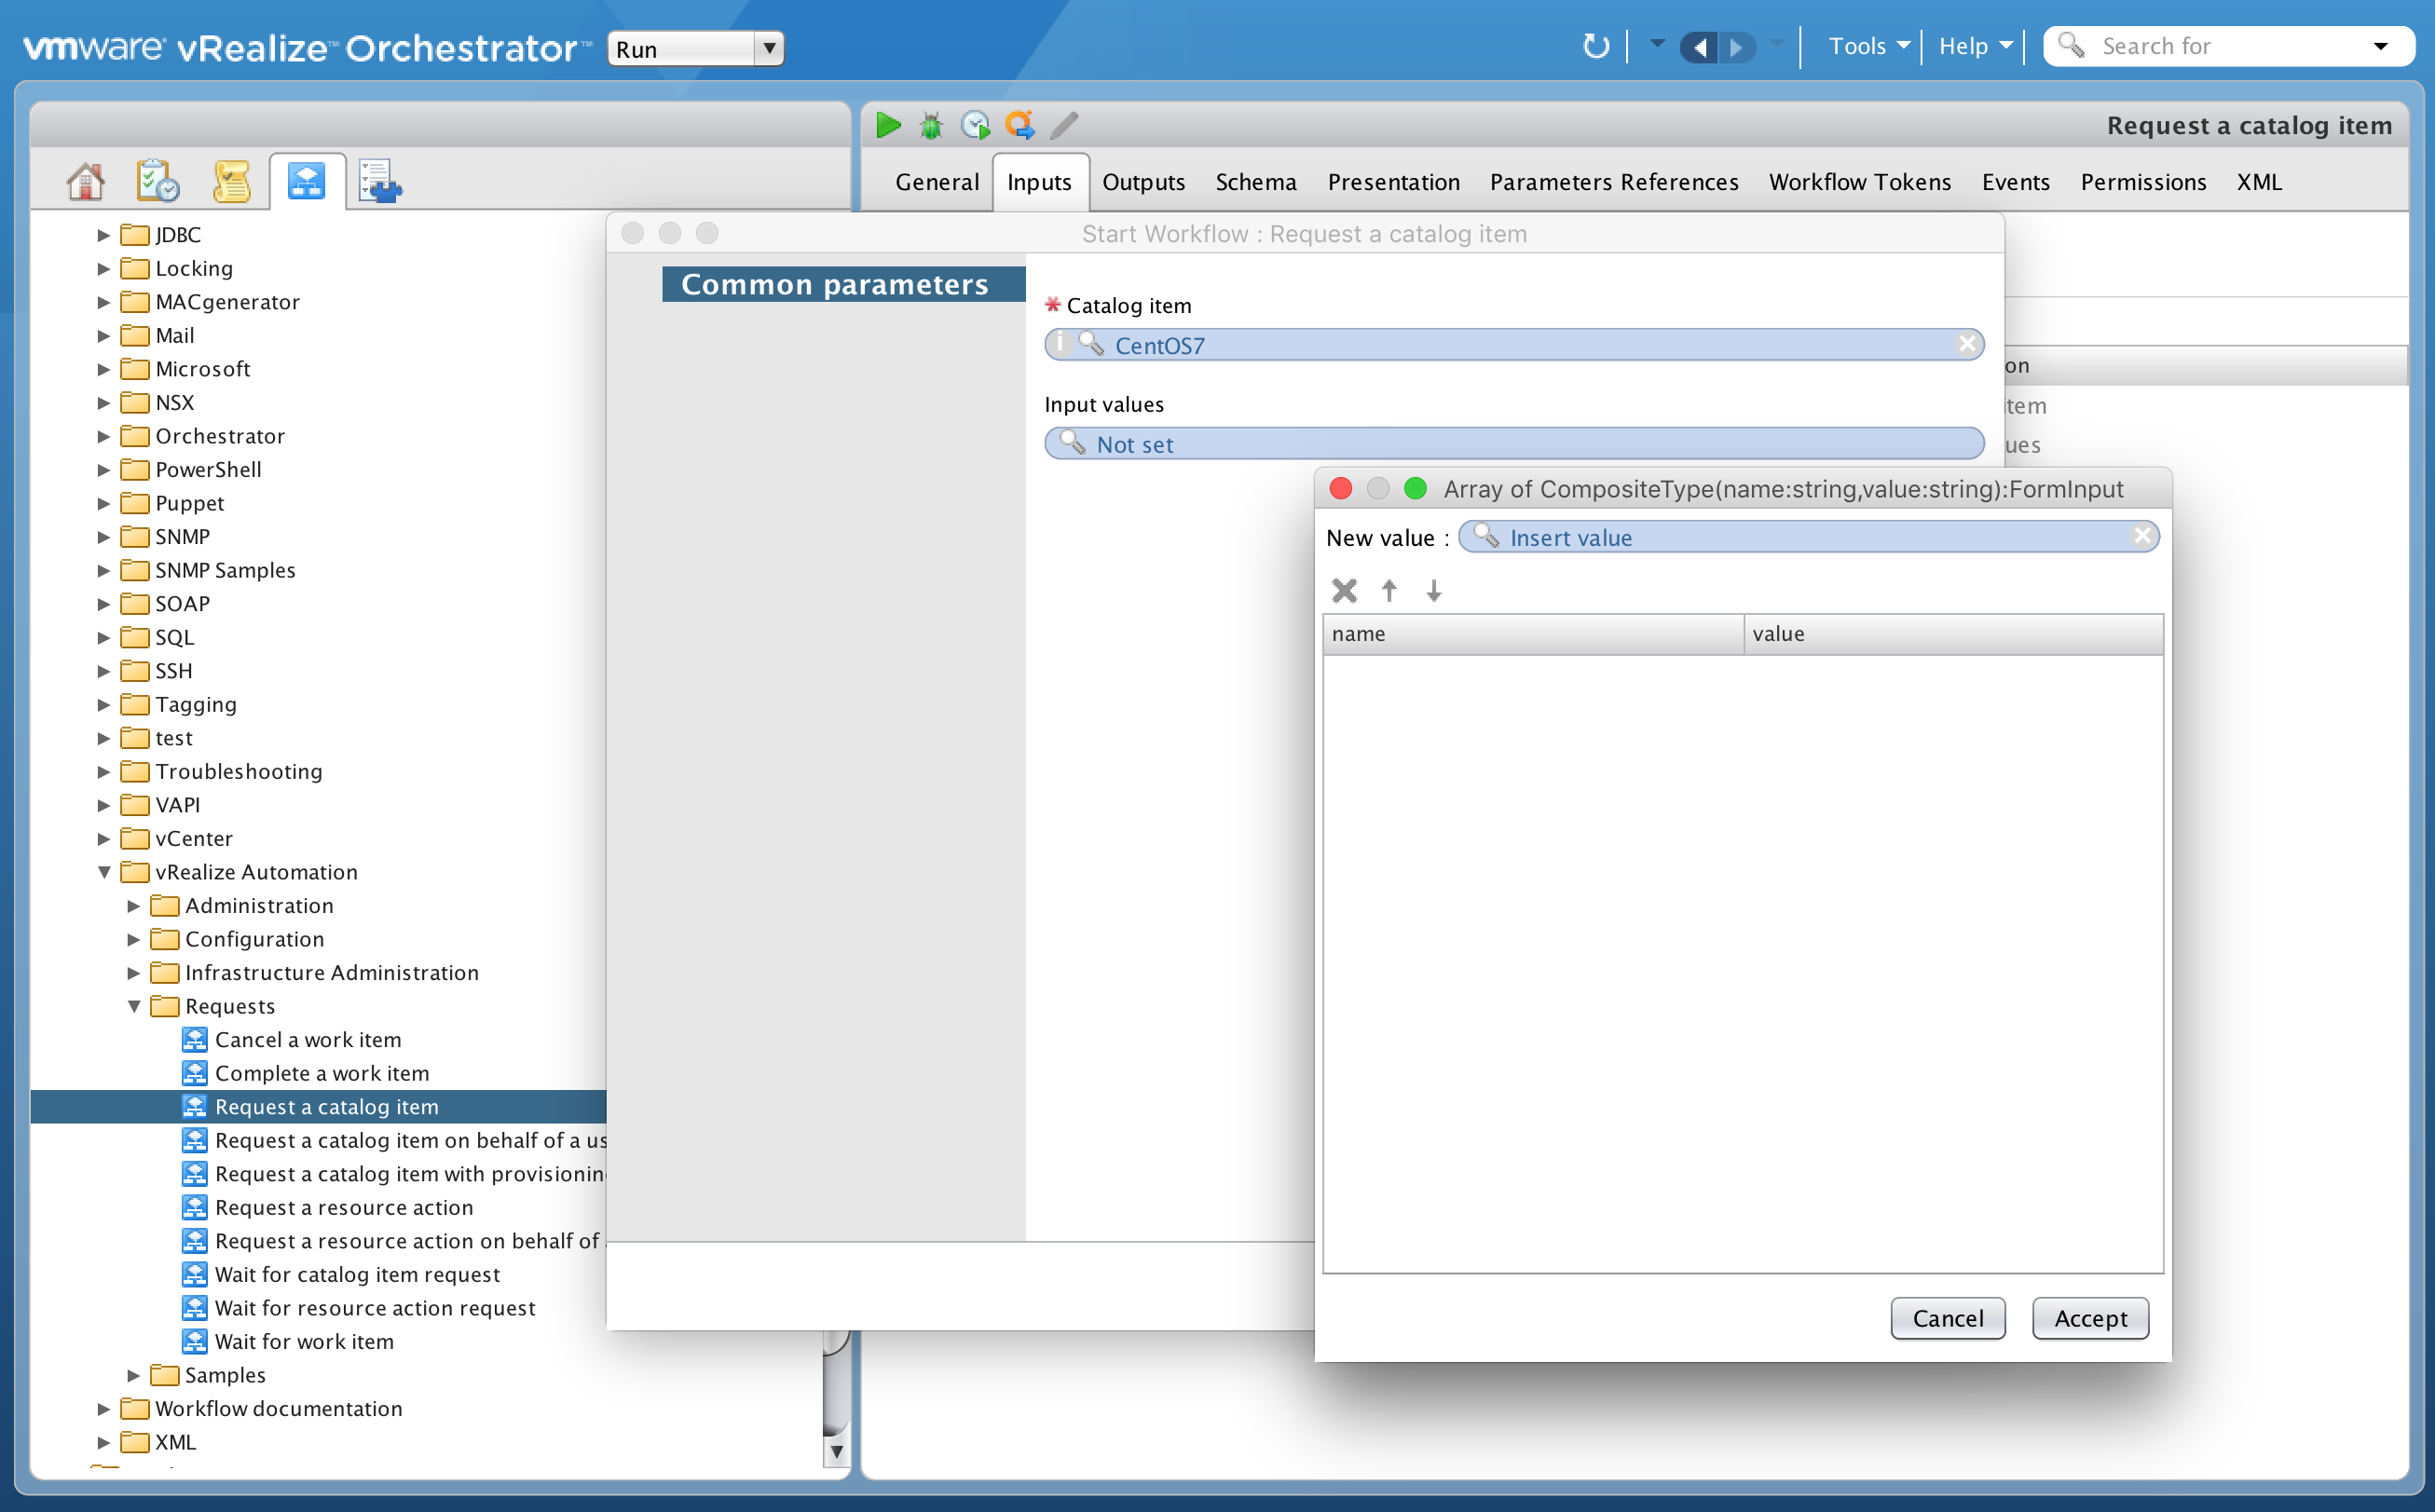
Fig 9: Request a catalog item from Orchestrator
In conclusion, we can state that there are plenty of reasons to use the ASD for deploying machines. From a technically point of view, there is a workflow called Request a catalog item, which is located in the Library > vRealize Automation > Requests folder within Orchestrator.
Running the workflow shows us that there are two input parameters:
- The Catalog item parameter lets you choose any item from the catalog, i.e. an IaaS blueprint in our scenario.
- The Input Value field accepts a list of composite generic key-value pairs (see Fig 9).
However, there is also additional configuration work to be done, in both Orchestrator and vRealize Automation before we can begin with the implementation:
- Firstly, we have to ensure that the service account for the vRealize Automation plug-in within Orchestrator is a member of the support group within the business group related to the blueprint. This guarantees that we have all the permissions to run the workflow appropriately.
- Secondly, the service account must be entitled to the basic blueprints (and XaaS services if you want to call them instead of a blueprint).
The input parameters are fairly difficult to handle. This is due to the generic nature of the composite key/value list and that all inputs are of type “string”. However, the workflow helps in the following scenarios:
- Requesting a catalog item on behalf of a user.
- Requesting a resource action.
- Requesting a resource action on behalf of a user.
Before the Request a catalog item workflow can be called, it is important to know the list of expected input parameters for a blueprint. Another important issue is the syntax of input parameter naming within workflows: They must always start with the prefix “provider-“. For example, if there is a parameter “username”, to follow the syntax correctly, the input parameter must be named “provider-username”. For a typical blueprint, we need the following input parameters:
- blueprintId (string)
- provisioningGroupId (string)
- Shim.VirtualMachine.NumberOfInstances (integer)
- Shim.VirtualMachine.TotalStorageSize (decimal)
- LeaseDays (integer)
- CPU.Count (integer)
- Memory.Size (integer)
- Disk0.Size (decimal)
- Disk0.IsClone (boolean)
The first step within the implementation should be to copy the ‘Request a catalog item’ workflow for safety reasons. Once the workflow has been copied, run through the following steps:
- Replace the “compositeTypeToProperties” action call with a custom script (see Fig 10).
- Hover over the custom script and click on the pencil to edit the custom script.
- Define the following input variables for the script:
- blueprintId (string)
- provisioningGroupId (string)
- numberOfInstances (vCO number)
- totalStorageSize (vCO number)
- leaseDays (vCO number)
- cpuCount (vCO number)
- memorySize (vCO number)
- disk0Size (vCO number)
- disk0IsClone (boolean)
- Add the properties’ attributes as an output parameter to the custom script.
- Type the following scripting code to the custom script:
properties = new Properties();

properties.put(“provider-blueprintId”, blueprintId);

properties.put(“provider-provisioningGroupId”, provisioningGroupId);

properties.put(“provider-Cafe.Shim.VirtualMachine.NumberOfInstances”,  new vCACCAFEIntegerLiteral(numberOfInstances).getValue());

properties.put(“provider-Cafe.Shim.VirtualMachine.TotalStorageSize”, new vCACCAFEIntegerLiteral(totalStorageSize).getValue());

properties.put(“provider-VirtualMachine.LeaseDays”, new vCACCAFEIntegerLiteral(leaseDays).getValue());

properties.put(“provider-VirtualMachine.CPU.Count”, new vCACCAFEIntegerLiteral(cpuCount).getValue());

properties.put(“provider-VirtualMachine.Memory.Size”, new vCACCAFEIntegerLiteral(memorySize).getValue());

properties.put(“provider-VirtualMachine.Disk0.Size”, new vCACCAFEIntegerLiteral(disk0size).getValue());

properties.put(“provider-VirtualMachine.Disk0.IsClone”, disk0isClone ? “true” : “false”);
- Validate and save the workflow.
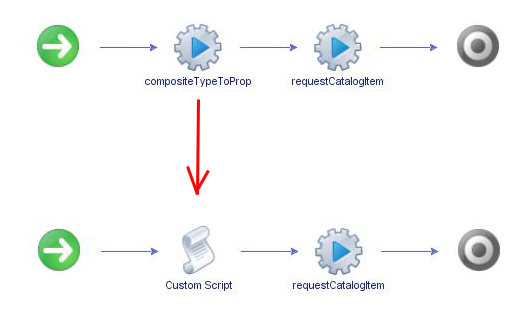
Fig 10: Customizing the ‚Request a catalog item“ workflow
The next step is to create an appropriate service blueprint within the Advanced Services, and call your workflow from it. Please note that we are not working with custom resources in this scenario, as custom resources do not have leases or costs associated with them. Nevertheless, the deployed resource will appear within the provisioned items in the self-service catalog, as technically it was deployed by means of an IaaS blueprint.
As a summary we can state that the main product deficiency with vRealize Automation when deploying machines was the request form designer and its complicated setup of dynamic form fields. By using the ASD as a frontend, for the IaaS blueprint, we can circumvent both these problems.
22.5.2 Storage automation and XaaS
So far in this chapter we have covered the creation of workflows, XaaS blueprints and publishing them as a service into the self-service catalog. We have shown this from a rather technical point-of-view. Now we want to shift the focus to some conceptual issues – especially regarding storage automation.
When building up a Software-Defined Data Center, storage is of course an important issue. So far, we have demonstrated that automation technologies are a fundamental prerequisite for building your ‘Software-Defined Datacenter’. In recent years, there has been great progress in the area of ‘compute resource’ and ‘network’ automation. The same cannot be said about storage. There has been a lack of management flexibility and capable automation frameworks. This has prevented the storage infrastructure from delivering operational values and efficiencies.
VMware wants to close this gap with its software-defined storage technologies and its policy-based management framework (SPBM).
22.5.2.1 Challenges in Storage Automation
One of the principle problems of traditional data centers, is that they are often operated with many silos, which have little or no interaction with each other. Such silos are often characterized by static service classes, rigid provisioning, a lack of granular control and frequent data migrations. Another issue are frequently specialized and expensive hardware requirements. Depending on the device, there is usually no commodity hardware and therefore there is low utilization or overprovisioning taking place.
22.5.2.2 Storage automation – the way to go
Last but not least, the daily operation processes are quite complex and often involve different roles from different teams. In a VMware environment, this could be an App admin, a VMware administrator and a Storage admin. Unfortunately, deployment processes, with many people involved, tend to be time consuming. Usually they have a lack of automation, with slow reactions to requests.
Consumers do not want to worry about the underlying storage technologies and processes. They would just like to have an automated solution, which meets the following capabilities:
- The provision of storage that matches the application requirements.
- Reduce cost of operation.
- Reduce time to provision storage.
- Fast implementation of changes.
- Granular or selective control how to provision storage.
- Have a self-service portal to deploy their own resources.
When it comes to the implementation of such storage automation, administrators can start by leveraging some of the vSphere platform features, capabilities, and products:
- vRealize Automation
- vRealize Orchestrator
- Storage Policy-Based Management (SBPM)
- VMware Aware Storage APIs (VASA)
- vSphere Tags
VMware offers an Orchestrator plug-in for Storage Policy based Management,[1] as well. This tool provides a policy driven storage consumption model definition, i.e. the ability to consume all vSphere storage through software defined policies and the automated deployments based on service level agreements.
There are also other vendors, who provide some kind of support for storage automation and Orchestrator. Amongst others, there are; NetApp, Hitachi, EMC, IBM and Solidfire. These tools usually provide several built-in workflows and actions, which can be used by an administrator, for higher level workflows that automate storage tasks. For example, this could be the ability to provision; storage datastores or LUNs, NFS datastores, backup SAN datastores or indeed restore storage based VM snapshots.
22.6 Summary
This chapter introduced the ‘Advanced Service Designer’ and XaaS blueprints. After giving examples of where the ASD can be used, we showed how to configure the ASD. This involved some endpoint (amongst others the endpoint for vSphere) and Active Directory configuration. Once the configuration was finished, we explained the basics of custom resources, service blueprints, custom actions and resource mappings.
One of the strengths of the ASD is its ability to build dynamic request forms. When creating such forms, input validation is very important. This could be done within the ASD or, alternatively, Orchestrator as well.
With that knowledge in mind, we implemented several use cases. First, we showed how to provision and withdraw an Active Directory resource.
The second use case, demonstrated how to call an IaaS blueprint from ASD (a good alternative to the standard approach, when dynamic input fields are needed).
Finally, we introduced storage automation and its challenges. We also looked at the technical means, with which it is possible to achieve such automation.
[1] https://solutionexchange.vmware.com/store/products/vrealize-automation-vcloud-automation-center-and-storage-policy-based-management-spbm-framework-integration#.VTKqtrr2Sc8
Recent Comments