
After having shown how to deploy and configure the Orchestrator appliance, we will show how to use the Orchestrator. vRealize Automation 7 introduced various enhancements for integrating vRealize Automation and Orchestrator – the Event Broker is notably the most important one. Hence, large parts of the chapter cover the new Event Broker, followed by a set of Orchestrator use cases for showing how Orchestrator workflows can be implemented. In detail, this chapter will discuss the following topics:
- What is the Event Broker and what features are provided?
- The vRealize machine lifecycle.
- Working with the Event Broker.
21.1 Introducing the Event Broker
As discussed, vRealize Automation already provides a huge set of built-in functionalities. However, like any other software solution, vRealize Automation cannot anticipate all possible use cases and integrate with all possible multi-vendor tools that companies are using.
In vRealize Automation 7, VMware introduced enhanced Lifecycle Extensibility through the use of the Event Broker. Basically, the Event Broker offers a graphical user interface (that is integrated within the vRealize Automation user interface, see Fig 1) and provides the following features:
- The whole IaaS machine life cycle is covered.
- There is a simple admin user interface.
- Approval policies with access to external systems can be implement
- Notification can be configured and implemented with the help of the Event Broker.
One of its main benefits is its simplicity. Administrators can simply subscribe to an event using the user interface and specify conditions for a specific workflow that is to be triggered. In addition to the huge library of existing workflows and partner provided plug-ins, Orchestrator really helps to build a multi-vendor cloud platform.
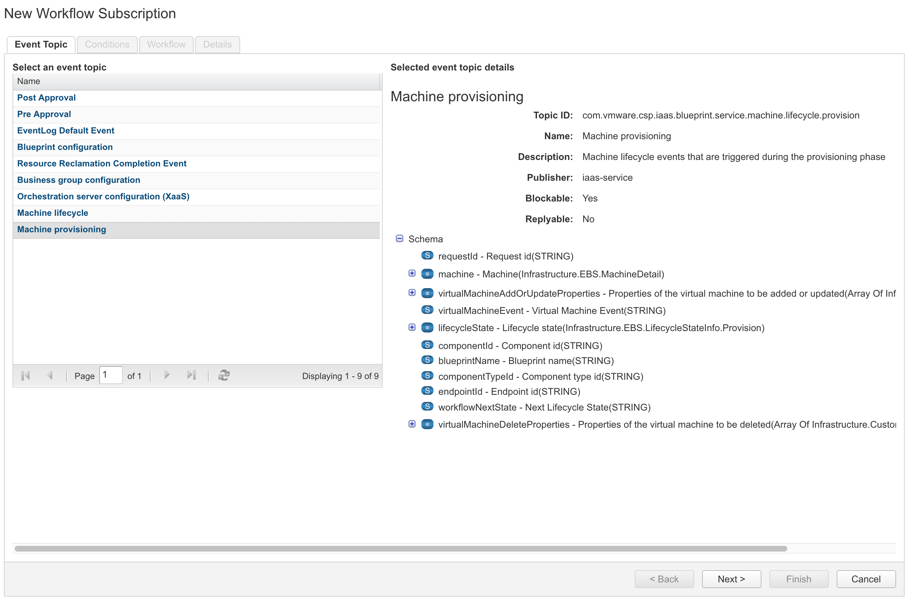
Fig 1: Event broker user interface
21.2 The vRealize Automation machine lifecycle
Machine lifecycle customizations in vRealize Automation 6
vRealize Automation always came along with an integrated lifecycle management that used a special master workflow. This master workflow defined several states every request was going through and where extensibility could be applied. In particular, the following workflow states were offered:
- Machine Requested
- Building Machine
- Machine Provisioned
- Managed Machine
- Machine Expired
- Machine Destroyed
These workflow states could be used to perform any customizations during a machine’s lifecycle. For example, the Machine Building event is triggered before a virtual machine is built and can be used to perform things such as changing a hostname, configuring network settings or placing a virtual machine in the right Active Directory organizational unit (OU). The Machine Provisioned lifecycle state is entered as soon as the underlying hypervisor or cloud provider has finished the provisioning of the machine. Once again, there are many use cases for customization. Typically, companies use this workflow stage to trigger scripts within the provisioned virtual machines, register the machine with a Puppet or Chef or call a Configuration Management Database (CMDB). In order to trigger such Orchestrator workflows during the machine lifecycle, programmers had to run a special Orchestrator workflow that assigned a state change workflow to a blueprint.
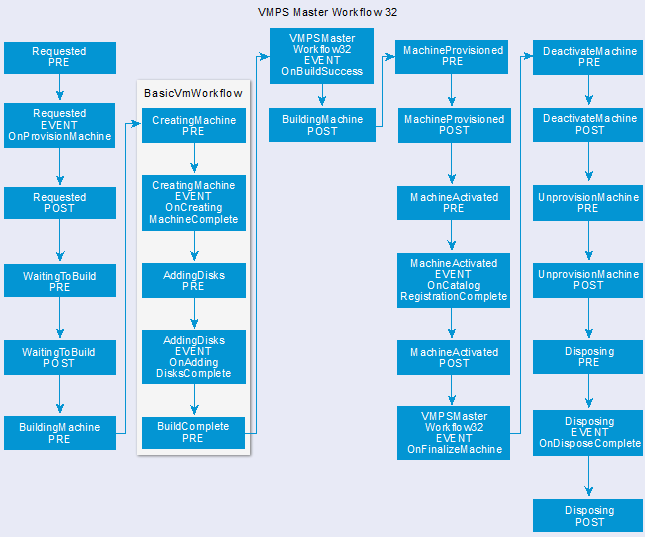
Fig 2: vRealize Automation 7 master workflow
In practice, this vRealize Automation 6 approach can still be used with vRealize Automation 7. Consequently, if you are migrating from version 6, you basically can keep your workflows untouched in large parts and they will still be working.. However, as with any legacy code, there will come a point in time where you workflows have to be changed to work correctly. In any case, when developing new workflows, you should therefore use the new Event Broker for integrating workflows and vRealize Automation.
vRealize Automation 7 machine lifecycle
In vRealize Automation 7, programmatic access to the machine lifecycle has been greatly enhanced. The most important workflow is the VMPS master workflow, which embeds all the different provisioning workflows (remember, we covered them in chapter 9). Fig 2 depicts parts of the master workflow and specially highlights the BasicVmWorkflow (which is used to create an empty virtual machine container object).
In particular, the workflow goes through four different stages:
- Request (which includes approvals)
- Provision (supporting different provisioning types such as create, clone, kickstart, or WIM)
- Manage (actions such as power on, power off, or snapshots are included)
- Destroy (everything related to deactivating, deprovisioning, and disposing machines)
Depending on the machine type, there are different lifecycle stages during provisioning that can be addressed. In order to achieve that, the Event Broker acts as a message broker that includes events, event topics, subscriptions and messages.
Let’s discuss these concepts in order to gain a better understanding of the Event Broker internals.
The Event Broker in detail
Event Broker components
The following Event Broker concepts are noteworthy:
- Event Topics describe a set of events with the same logical intent and the same structure. For example, the VMPSMasterWorkflow defines two Machine lifecycles and the Machine Provisioned event topics (other event topics include Post Approval, Pre Approval, Event Log Default Event, Blueprint configuration, Resource Reclamation Completion Event, Business group configuration and Orchestration server configuration (XaaS)).
- An event triggers a change in the workflow stage. For example, the Basic VM workflow exposes the following events: OnAddingDisksComplete, OnAddingDisksTimeout, OnCreatingMachineComplete or OnCreatingMachineTimeout.
- If you want to be notified about events and become a subscriber, you will have to go to the Event Broker user interface (see Fig 1) and create a subscription.
- On the other side, there are various components within vRealize Automation that act as provider and hence register event topics in the Event Broker service.
- A component that is publishing events to the Event Broker service is called producer.
- Once a producer has published an event, subscribers receive messages about the event. Each message has a payload that represents the event data.
The architecture of the Event Broker including the publisher and the subscriber is shown in Fig 3.
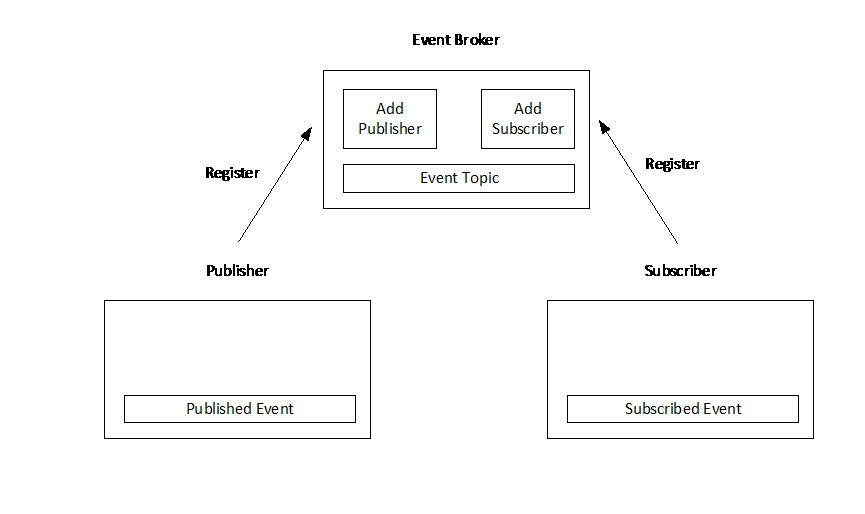
Fig 3: Event Broker architecture
The vRealize Automation Event Broker provides a Publish/Subscribe messaging model. Within a Publish/Subscribe messaging model, the sending client (producer) sends messages to the event broker, which in turn stores them in a destination called topic. The messages registered in a topic are delivered to one or multiple subscribers that applied to that topic for delivery.
Fig 4 shows such a flow of messages at runtime. The messages are sent from the publisher and registered in the topic. In the figure, subscriber 1 and subscriber 2 are registered in topic 1, and subscriber 3 is registered in topic 2. At this time, the messages in topic 1 are delivered to subscriber 1 as well as subscriber 2, and the message in topic 2 is delivered to subscriber 3.
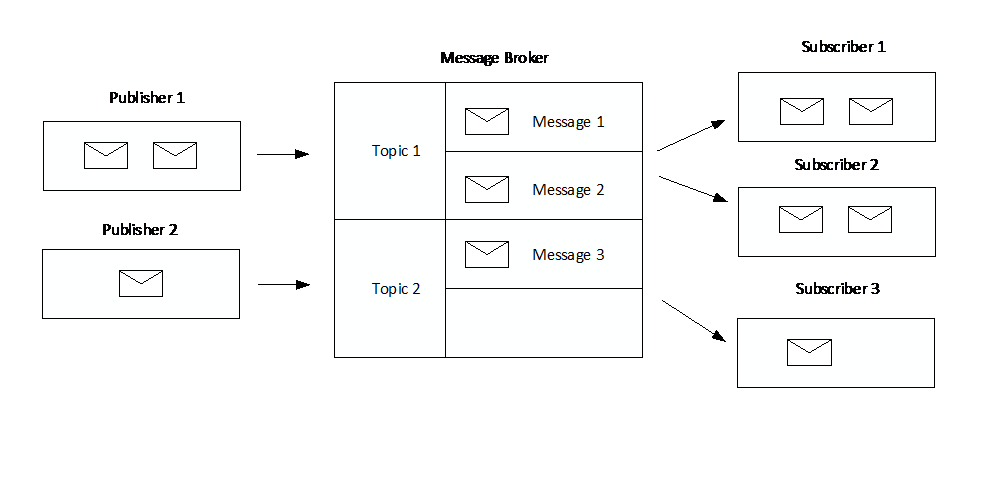
Fig 4: Event broker flow of messages
Blockable and replyable event topics
Any messaging system (and the Event Broker is a messaging system) provides different message channels with various semantics. The Event Broker uses topics to distribute events and allow a loose coupling between producer and consumer. However, event topics can have different semantics for interacting. Basically, two flavors for delivering messages exist:
- Asynchronous delivery
- Synchronous delivery
Asynchronous (or also non-blockable) event topics only allow to create non-blocking subscriptions. Basically, this means that any workflow that runs after a certain event will not block the master workflow itself. Hence, it is quite clear that non-blockable event topics – due to their asynchronous nature – do not allow to change the behavior of the master workflow itself, as the master workflow already has moved forward. Nevertheless, there are plenty of use cases for asynchronous workflows like event logging or publishing configuration changes. In addition, it is quite noteworthy that you cannot rely on a particular order in which subscriptions are triggered or Orchestrator workflows are run.
On the other side, if an event topic is synchronous or blockable, the master workflow cannot continue until the subscribers’ workflows have been run. vRealize Automation uses blockable event topics for machine lifecycle events that are triggered during the provisioning phase, for machine lifecycle events (day 2 operations such as Power On/Off, Reboot, Shutdown, or Expired) or for resource reclamation completion events. Blockable event topics make perfect sense if there is something to be finished until the master workflow to be done. Most obviously, this is the case for the machine lifecycle events. For example, if you are implementing an Orchestrator workflow for the Machine Building phase that prepares some input and performs some configuration for the later provisioning, it is clear that the master workflow has to wait until the Orchestrator workflow has finished working.
Last but not least, there are replyable event topics. Replyable event topics allow services that have been registered with the event broker to accept a reply from the subscriber. Examples for replyable event topics are the post-approval (approvals sought after a request has been fulfilled) or the pre-approval event topics.
21.3 Working with subscriptions
After having described the theory behind the Event Broker, we now can shift our focus to working with subscriptions, i.e. how to configure the Event Broker to run an Orchestrator workflow. We will first discuss the configuration within the vRealize Automation user interface and then show how to create our own Orchestrator workflow.
Creating a subscription
In order to create a subscription, we have to navigate to the Administration > Events > Subscriptions page and click on the [+New] button. Basically, there are four steps within the wizard:
- First, the appropriate event topic has to be selected.
- The next step defines the conditions under which an Orchestrator workflow should be run.
- The third dialog page lets us choose the appropriate workflows.
- On the last screen, we specify additional details and finish the con
In addition, we have to configure the blueprint in order to pass the appropriate information to the Orchestrator workflows.
Selecting the event topic
The first page of the wizard (see ) allows us to select the event topic. We will show how to configure a Machine provisioning subscription, so choose the appropriate entry from the list box on the left-hand side of the user interface. The selected event topic details on the right-hand side of the screen are quite noteworthy as well (see ): Whenever a subscriber is triggered, he receives a message with a payload that includes context information about the current deployment as well as the machine to be deployed. Later on in the chapter, we will show how to use this context information, but for now just remember that we can look up the payload’s message structure at this place within the graphical user interface.
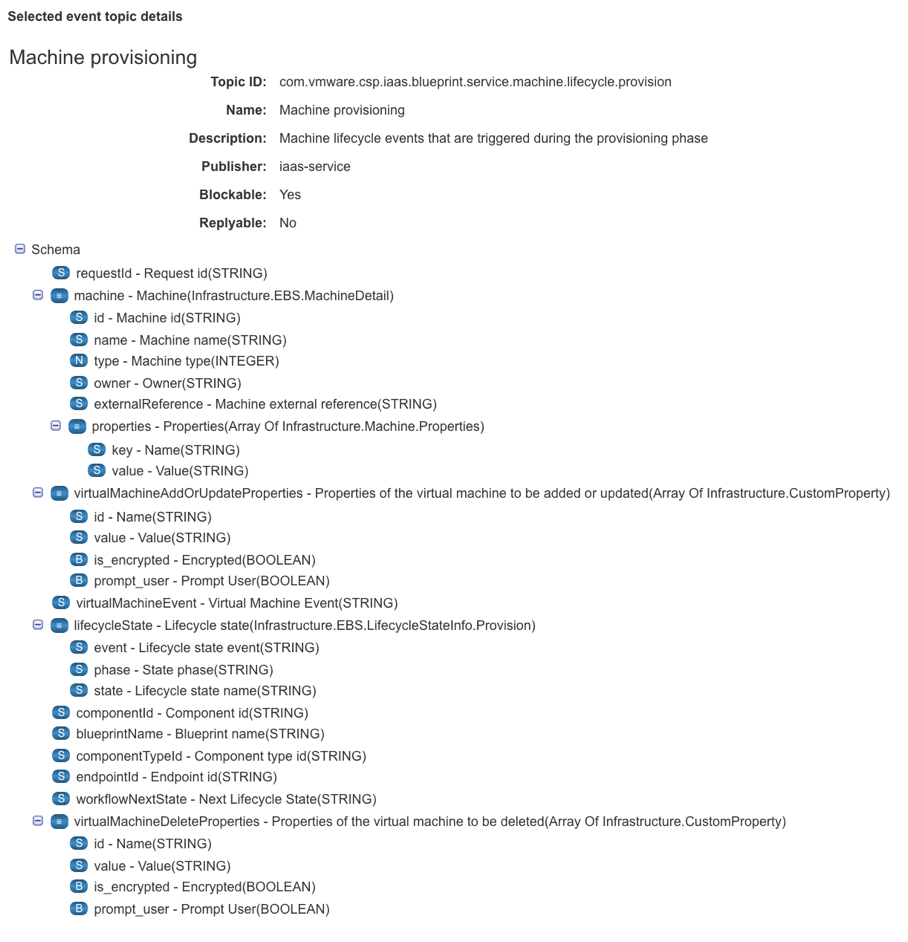
Fig 5: Event topic details
Specifying conditions
The next dialog page lets us specify whether the workflow should run for all events or is based on conditions. When selecting a condition, you have plenty of choice, for example:
- You can run the workflow depending on information such as the description, event, source or target information, a timestamp or a user name.
- If you want to run a workflow only for a specific blueprint, component or endpoint you can expand the Data section and choose the appropriate item.
- To select a specific lifecycle stage, expand the Data > Lifecycle state node and select Lifecycle state name. Then add the appropriate lifecycle state.
- You can also reference machine properties like the id, name or type. When referencing the Machine external reference value, you can even resolve the vSphere virtual machine.
Please note that Fig 5 shows most of the fields that can be referenced within the conditions section.
Many lifecycle scenarios require to run a workflow after the provisioning of a virtual machine, so in the following we will show this example. Perform the following steps:
- Select Run based on conditions.
- Choose All of the following from the Clause drop-down menu.
- Now, click within the Clause
- Select Data > Lifecycle State > Lifecycle state name from the drop-down menu.
- Next, from the new drop-down list in the middle of the row, choose Equals.
- Select the Constant checkbox from the right drop-down menu, and click within the nested drop-down list.
- Select MachineProvisioned from the drop-down menu.
- Next, click Add expression.
- This time we choose the state phase, so select the Data > Lifecycle state > State phase node, select Equals from the drop-down menu in the middle, choose the Constant checkbox and finally select POST from the right drop-down menu.
- Right now, we have a subscription running for every blueprint that is going to be deployed. If we want to narrow our subscriptions to certain workflows, we need to add another expression. Consequently, repeat step 9, but choose Data > Blueprint name from the Clause drop-down menu, select Contains in the middle drop-down list and provide your blueprint name in the Constant textbox accordingly.
- Once all conditions have been configured, click Next (see 6).
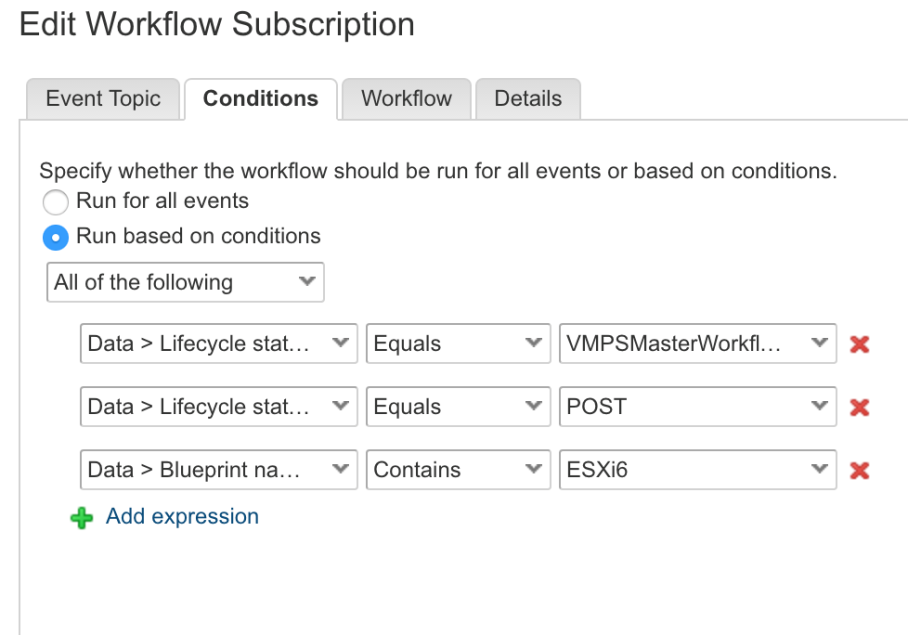
Fig 6: Specifying workflow subscription conditions
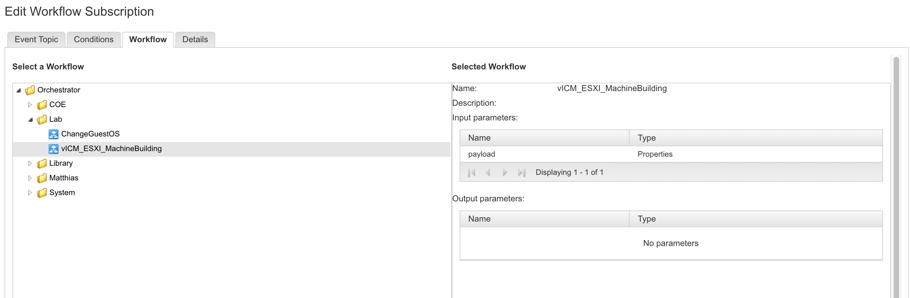
Fig 7: Choosing a workflow for a subscription
Choosing the appropriate workflow
The next step within the wizard simply asks you to select the workflow to be run (see Fig 7). From the Select a Workflow user control, expand the Orchestrator folder, navigate to the folder where your workflow is stored, select the workflow and click Next (if you don’t have a workflow to be run yet, don’t worry, we will show how to implement one in the remainder of the chapter).
Configuring subscription details
The last step is easy. Provide a Name for the subscription, review the settings for Priority and Timeout (min), optionally enter a Description and decide if you want to have a blocking or non-blocking behavior (see Fig 8).
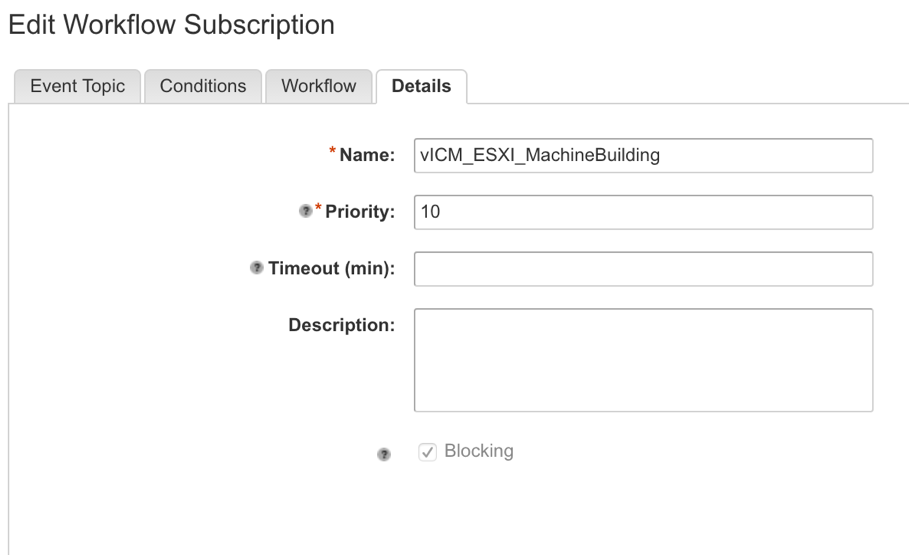
Fig 8: Workflow subscription details
Adding extensibility custom properties
In most cases – when you are implementing an Orchestrator workflow to be run during a machine lifecycle, you need context information about the virtual machine itself. Among others, such context information encompasses the name of the virtual machine or its custom properties (see ) to see the data that can be passed to the workflow. Unfortunately, the virtual machine custom properties are not included in the event payload unless they are specified as an extensibility custom property for the life cycle state.
If we want to pass the context information, one additional step has to be done: You have to configure a custom property in vRealize Automation. The syntax of the custom property is as follows: Extensibility.Lifecycle.Properties.{workflowName}.{stateName}.
For example, if you want to add all custom properties for the MachineBuilding workflow when you are provisioning a vSphere virtual machine, add the following custom property: Extensibility.Lifecycle.Properties.VMPSMasterWorkflow32.BuildingMachine.
In addition, we have to provide a value for the custom property. In most cases, you will just configure to pass all the custom properties, including the hidden ones, so typing “*, __*” is sufficient. You can use a comma as a deliver to specify different patterns. For example, “__*, Virtual*” would specify all hidden properties and also the ones beginning with Virtual.
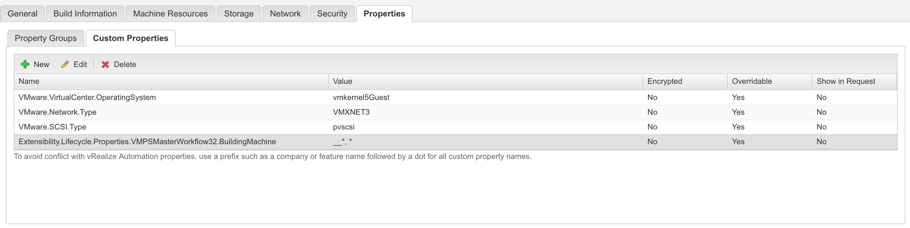
Fig 9: Enabling extensibility custom properties
Fig 9 shows how to add this custom property in a blueprint,
21.4 Implementing extensibility workflows with Orchestrator
Once we have understood how to configure the event broker, it is now time to implement some basic Orchestrator workflows. In the following we will cover the following scenarios:
- Extract the custom properties passed by vRealize Automation and resolve the vSphere virtual machine.
- Run a script on a machine after installation.
- Integrate Puppet.
- Write a workflow for providing an instance type drop-down list on a blueprint request page.
Use Case 1: Extract custom properties and resolve the vSphere machine
In fact, many lifecycle workflows will begin quite similar: Extract the custom properties passed by the Event Broker and resolve the vSphere virtual machine to perform some additional actions. Let’s discuss the steps necessary to implement that:
- Open vRealize Orchestrator and log in using your credentials.
- Switch to the Run mode and change to the Workflows
- Create a new folder by right-clicking on the Library folder and selecting Add folder…
- Provide a Name for the folder where you will place your own workflows.
- Right-click on the folder and select New workflow.
- Provide a Name for the workflow.
- On the General tab, in the Attributes pane, at the bottom of the page, click the [A+] button to add an attribute.
- Name the attribute vcCM or provide any other convenient name.
- Within the Type column, click on string.
- In the dialog box, filter for VirtualMachine.
- Select VC:VirtualMachine and click on Accept (see Fig 10).
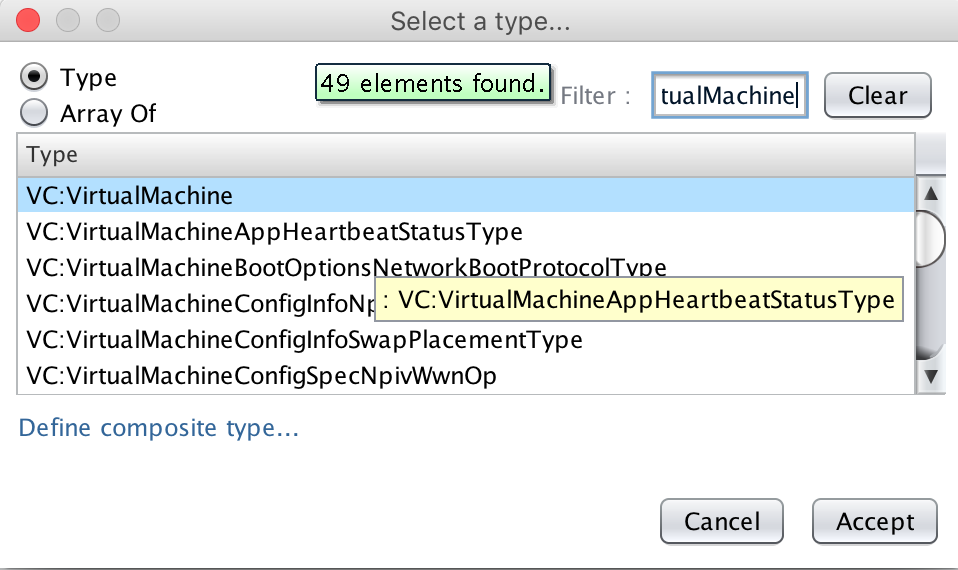
Fig 10: Selecting the type for an attribute
- Next, move on to the Inputs tab in order to add an input parameter. This will allow our workflow to receive the custom properties from vRealize Automation.
- Click on the Add Parameter button, name the input paramter payload and choose Properties as type (see Fig 11).
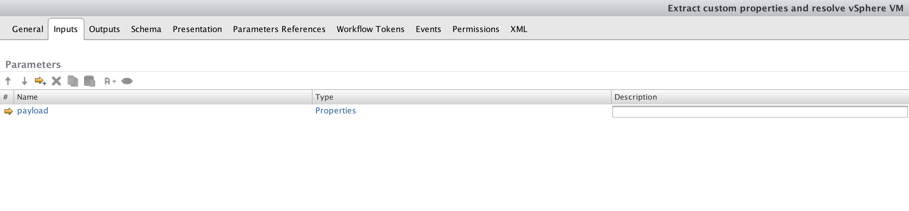
Fig 11: Adding an input parameter to receive custom properties
- Next, go to the Schema tab.
- From the toolbox, on the left-hand side of the screen, drag the Scriptable task and drop it on the main pane on the arc between the start and the end node. The result should look similar to the one in Fig 12.
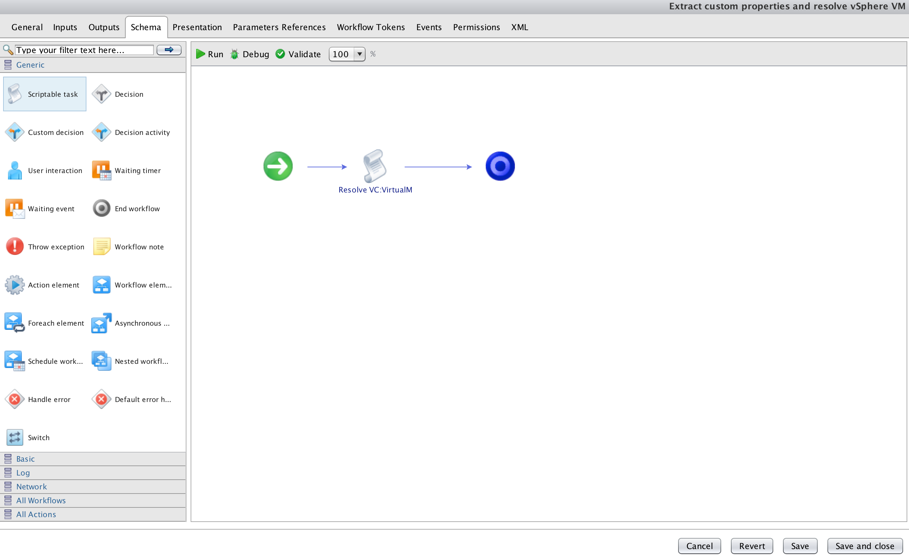
Fig 12: Adding a Scriptable task
- The next step is to write some JavaScript code to extract the required information from the custom properties in order to resolve the vSphere virtual machine. Hover over the Scriptable task and click on the pencil (see Fig 13).
- With the modal dialog open, on the Info tab, provide a Name for the Scriptable task.
- Next switch to the In tab and click on the Bind workflow parameter/ attribute
- From the Choose dialog box, select the checkbox within the payload row and click Select.
- Now move on to the Out tab and click on the Bind workflow parameter/attribute
- Within the Choose dialog box, select the attribute with the VC:VirtualMachine datatype and click Select.
- Now to go the Scripting tab and insert the following code block:
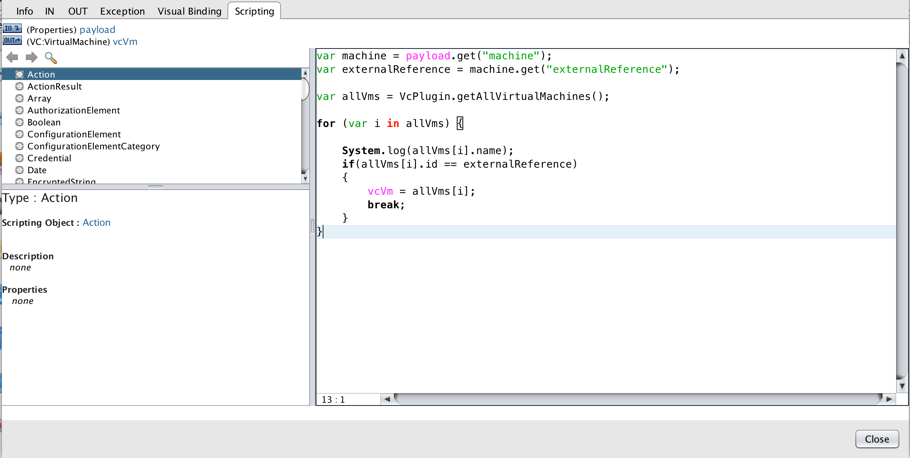
Fig 13: Extracting custom properties in JavaScript
var machine = payload.get("machine");

var externalReference = machine.get("externalReference");


var allVms = VcPlugin.getAllVirtualMachines();


for (var i in allVms) {


System.log(allVms[i].name);

if(allVms[i].id == externalReference)

{

vcVm = allVms[i];

break;

}

}
- Click Close and Save.
Use Case 2: Use Puppet for additional configuration
So far, we have seen how to deploy and manage virtual machines with vRealize Automation and Orchestrator. However, if you are looking for further automation, you could use the configuration management tool Puppet from Puppet Labs. All machines managed by Puppet need an agent installed and if an automated installation of the agent is desired, the Orchestrator (vRO) Puppet plug-in comes in handy. Besides being able to register new virtual machines with Puppet, the plug-in can also be used to sign and clean a node certificate as well as to do a node classification using Hiera or a manifest file.
The plug-in itself can be downloaded at the VMware solution exchange[1]. Like any other plug-in, it must be uploaded from the Orchestrator Control Center. Once this has been done, a couple of workflows are added in Orchestrator (see Fig 14).

Fig 14: The puppet plug-in
When starting the Orchestrator client, some additional workflows can be found within the „Library“ folder under „Puppet“. However, before using the automatic agent installation, the Puppet Master needs to be registered. There are some prerequisites to be fulfilled:
- Verify that Puppet Enterprise 3.7.0, Puppet Enterprise 3.3, Puppet Open Source 3.7.1, or Puppet Open Source 3.6.2 is installed.
- Verify that you can connect to the Puppet Master using SSH from the Orchestrator server.
- Verify that the SSH daemon on the Puppet Master allows multiple sessions. The SSH daemon parameter to support multiple sessions on the Puppet Master is in the configuration file /etc/ssh/sshd_config. The session parameter must be set to MaxSession=10.
Now we can perform the configuration of the plug-in:
- Start the Orchestrator Java client and log in with your credentials.
- Change to the Run mode and navigate to the Library > Puppet > Configuration
- Right-click the Add a Puppet Master workflow and select Start workflow….
- Provide the following input for the workflow and click Submit:
- Puppet Master Name: How the name should appear in vRealize Orchestrator.
- IP Address
- Port: 22
- User name
- Password
- Once the configuration has been finished, you can verify it by calling Validate a Puppet Master If a completed token appears as well, everything has been configured properly.
Finally, you can use the workflows to install Puppet agents to our machines. There are two possibilities: “Install Linux Agent with SSH” and “Install Windows Agent with PowerShell” in the Node Management folder. For the Linux Agent we obviously need SSH, that shouldn’t be a problem, and for the Windows Agent PowerShell, which doesn’t exist in Windows servers below 2008. So, to use the workflows with Windows Server 2003, you have to install PowerShell first.
Additionally, PowerShell does not allow remote access by default, so it is required to activate it on the servers by “Enable-PSRemoting” and if the server is not in the same domain as the client (vRealize Operations), you need to install a certificate on every server and register it with PowerShell:
New-WSManInstance -ResourceURI winrm/config/Listener -SelectorSet @{Transport=’HTTPS'; Address=”IP:x.x.x.x”} -ValueSet @{Hostname=”x.y.org”; CertificateThumbprint=”XXXXXXX”}
Now, you can start the install workflow and if it succeeds, the Puppet agent is installed as a service/daemon, but is not running. Next step would be the configuration of the manifests in the Puppet Master and then you will be able to start the “Configure Windows Agent with PowerShell”/”Configure Linux Agent with SSH” workflows, which can be found in the Library > Puppet > Node Management folder. Now the Puppet agents are running and are able to communicate with the Puppet Master.
Use Case 3: Using the guest manager plug-in to run a script on a machine after deployment
In fact, this is a scenario which happens quite often – especially when the cloning mechanism is used to provision a machine. Cloning along with guest customization is a powerful mechanism to quickly deploy and integrate a new machine into an existing environment. Nevertheless, cloning alone is not a silver-bullet. Fine-grained adaptation and the installation of some “advanced” software is something that cannot be done with cloning in every scenario. However, it is quite handy to run a script after the cloning process. We have already shown that such a thing can be implemented using the vRealize Automation guest agent. However, using the guest agent is not feasible from time to time. The guest agent needs a SSL connection to the IaaS host in order to fetch the instruction for the command to be executed. This can be quite difficult or impossible if your deployed machine should not be within the same network as your vRealize Automation infrastructure. Furthermore, it needs the guest agent installed on the machine. Besides using the guest agent, we have also described how to use vRealize Automation software components to run scripts after provisioning. While using those software components is quite handy, they have one big disadvantage – they require the Enterprise license. Fortunately, there is a cost-free alternative to those software components: The Orchestrator Guest Script Manager. That’s reason enough to show how to use this package.
Basically, the plug-in can be downloaded from the VMware community page[2] and offers the following features:
First, it takes care about the script management. This means that you can add, edit or delete a script configuration. A script configuration encompasses the following items:
- Script type (bash, batch, PowerShell): Each type involves a different way of starting the script and getting the output.
- Script content: The script itself. May contain parameters that will be replaced right before running the script.
- Timeout: The time after which the script execution is
- Script interactivity: In case the script opens a window that requires user interaction.
- Script working directory: Where the script will run. Where the optional file will be copied.
- File to copy: A file to be copied in addition to the script. For example, a response file needed for the script.
Each script configuration is stored as a resource element in the Orchestrator database. This means:
- Updating a script does not require updating a workflow.
- The scripts are in a much safer location compared to the file system.
- If you run an Orchestrator cluster, the scripts are available for every Orchestrator nodes.
- That you can export / import the script configurations in a package.
In order to trigger a script, there is a workflow called “Run script in guest”, which performs the following:
- Search replace specified strings in the additional file, copy it to the guest (optional).
- Search replace specified strings in the script, run it in the guest.
- Get output code and output result, display these (including special characters supported by ANSI thanks to the included cmdAnsi.exe), suspend the workflow if script fails.
After having introduced the basic capabilities of the guest script manager plug-in, we will show how to use the plug-in to add a user to the local administrator group on a Windows machine.
Setting up the Guest script manager
Before we can begin with the implementation, we have to import the guest script manager plug-in first. This can be easily done from the Orchestrator Client by switching to the Administer mode and by clicking on the Import Package… button in the main pane of the window.
Creating a script configuration
Once this has been accomplished, we can continue with setting up a script configuration. This can be done as follows:
- Within the Orchestrator client, change to the Run mode and then change to the Workflows
- Navigate to the Library > Guest Script Manager > Script Management folder and run the Add script configuration
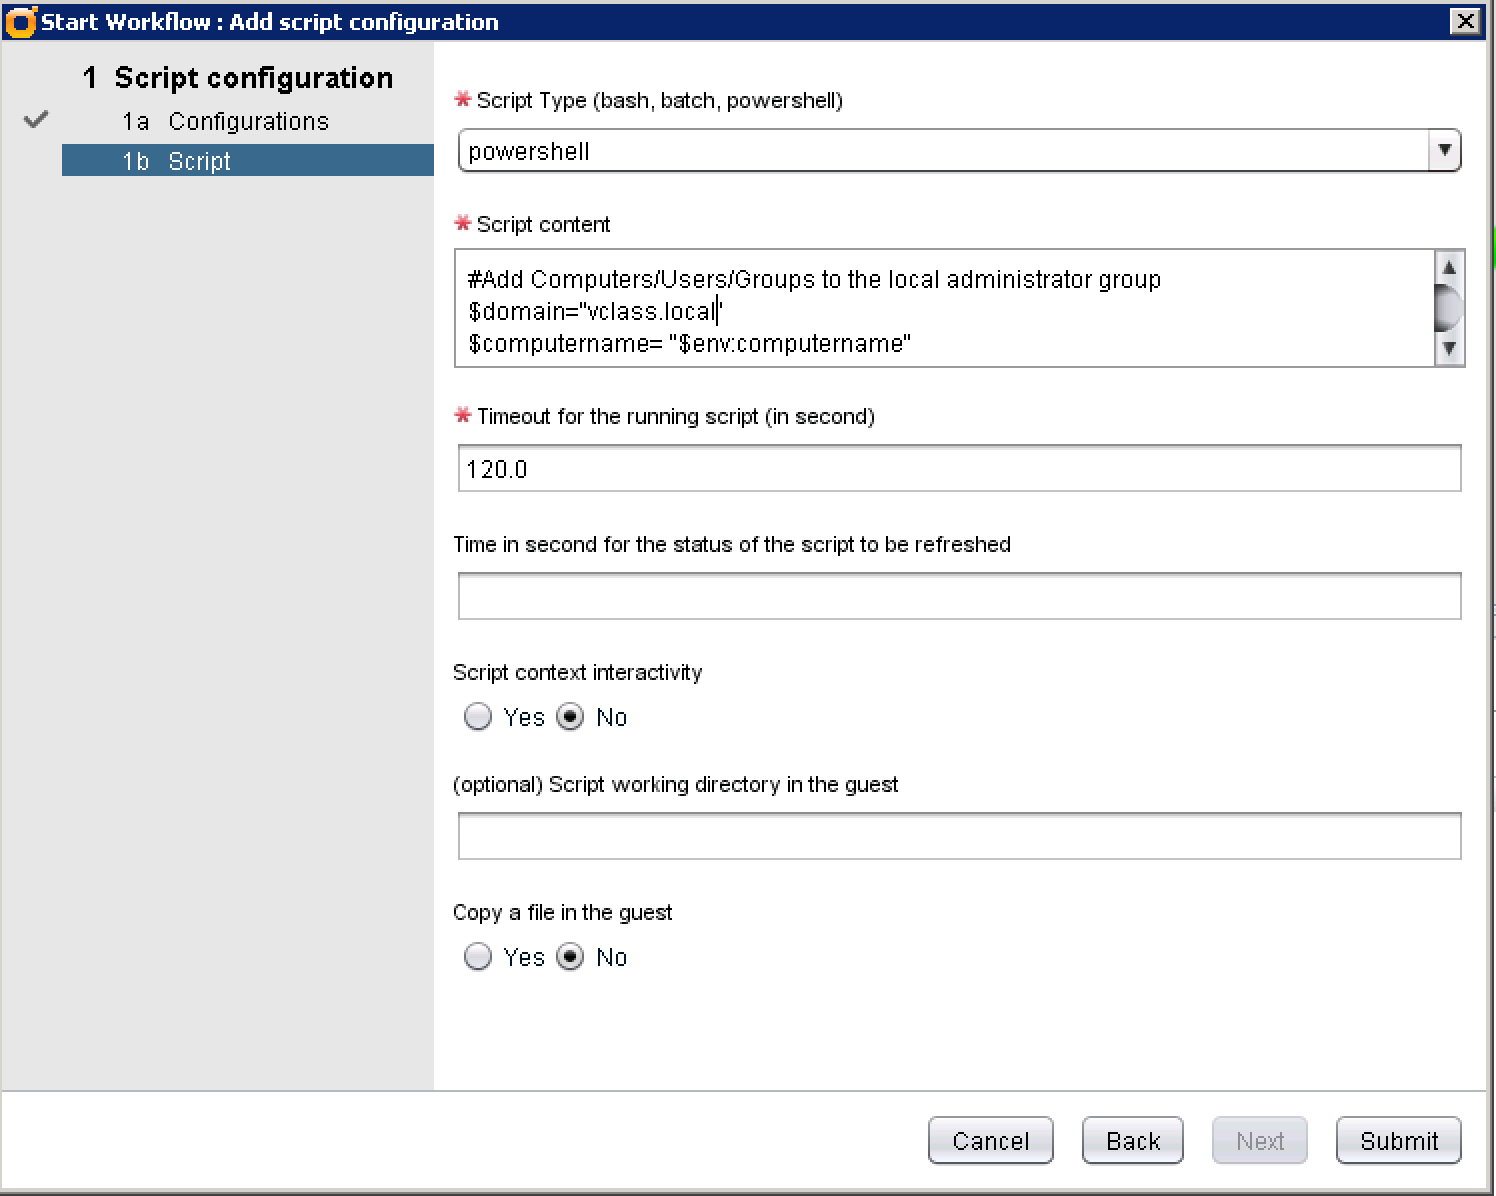
- On the first dialog box, provide a Configuration name and click Next.
- On the second dialog screen, choose powershell as Script Type.
- Copy the appropriate PowerShell script within the script content text area. A sample script to add a user could look like the following:
#Add Computers/Users/Groups to the local administrator group

$domain="vclass.local"

$computername= "$env:computername"

$group = [ADSI]("WinNT://"+$env:COMPUTERNAME+"/administrators, group")


function AddToGroup($number)

{

$group.add("WinNT://"+$domain+"/"+$number )

}


$isAdded = "true";

Try{

AddToGroup $1

}


Catch {

echo $_.Exception.Message

$message = $Error[0].Exception.InnerException.Message

$message


if ($message -like "*name is already a member*"){

continue

}

else {

$isAdded = "false"

}

}

if ($isAdded -eq "false") {

throw "A critical Error occured adding AD-Admin Groups"

}
- Provide a timeout to specify how long the script will be running.
- Since this script does not require user interactivity, a specific working directory, or an additional file we can skip the next inputs.
- Click Submit to trigger the workflow.
Running the script
Basically running the script from Orchestrator is quite easy. The guest script manager package provides a workflow called “Run script in guest”, that can be triggered once a virtual machine has been successfully provisioned. However, if you take a closer look at our PowerShell script, you will see that the guest script manager can use variables within its script configuration that can be replaced with real values when the workflow is actually run. This can be done as follows:
- Open the workflow from where you want to trigger the execution of a script.
- On the General tab, add an attribute of type Properties to store the variables to be replaced in the script.
- Next, change to the Schema tab and drag and drop a Scriptable Task from the Toolbox to the main pane.
- Edit the Scriptable Task, rename it accordingly, and bind the created property attribute as an output parameter.
- Change to IN tab and bind the user which should become a member of the Local Administrator group as an IN parameter (make sure that you have the appropriate logic in your workflow to grab the user name).
- Now it’s time for implementing the script logic. Change to the Scripting tab and paste the following code (adapt it according to your needs):
if (replacedVariables == null) replacedVariables = new Array();

var p = new Properties();

p.put("stringToReplace", "$1");

p.put("replacingString", username);

replacedVariables.push(p);
- Next, drag a workflow element from the toolbox and place it next to the Scriptable Task in the workflow. Choose the Run script in VM guest from the guest script manager package.
- When setting up the workflow, provide the following input:
- The vSphere virtual machine (we have learnt how to resolve the virtual machine in use case 1).
- A user name to be used to connect to the virtual machine.
- The corresponding password.
- The script configuration resource as previously created.
- The variables that should be replaced in the script.
- Click Save and Close.
21.5 Using the Orchestrator REST API to initiate a workflow
From time to time, it is necessary not only to call external systems from Orchestrator, but also to be able to trigger an Orchestrator workflow from an external system. This can be done quite easily by using the Orchestrator REST API.
The REST API documentation can be found at https://<vro-server.domain.name>:8281/vco/api/docs/index.html (see Fig 15).

Fig 15: vRealize Orchestrator REST API
Workflow invocation
When using the REST API, please consider that every request to an Orchestrator REST API must be authorized by an authenticated user.
Depending on whether you configure Orchestrator with LDAP, vCenter Single Sign-On or oauth2.0, the authentication scheme for the Orchestrator REST API is different. For most enterprises, LDAP authentication is preferred and it is quite easy to work with.
From a technical point of view, the Basic HTTP authentication scheme allows you to authenticate against Orchestrator or a third-party system by including an Authorization header in every HTTP request. You provide a base64 encoded user name and password in the Authorization header.
In order to invoke a workflow, the workflow ID is needed. The list of workflows and their corresponding IDs can be retrieved via the Swagger UI (on the API website).
To see the lists of workflows, perform a GET on the /api/workflows URI. This can be done from the Swagger UI and is shown in Fig. The workflow can be found after having expanded the workflow-service node.
Once the workflow ID has been retrieved from the response, Swagger UI can be used to figure out how to invoke a workflow via the REST API.
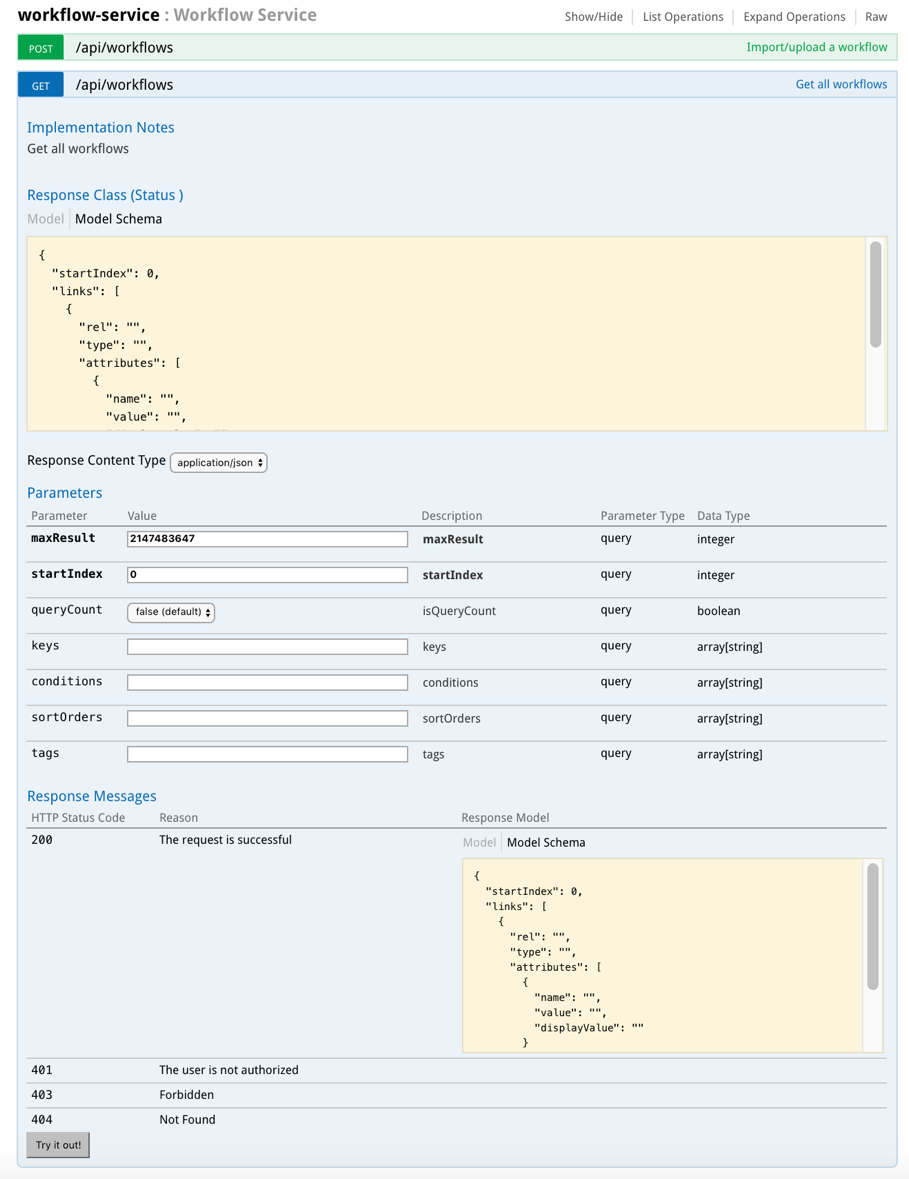
Fig 16: Using the Workflow-Service in the Swagger UI
Besides finding out the workflow IDs, the Swagger UI, and WHAT? the Workflow Service in particular provides a set of additional functions for workflow executions:
- Get all executions
- Start workflow execution
- Delete workflow run
- Get workflow execution
- Answer user interation
- Get workflow run logs
- Get workflow execution state
- Cancel workflow run
Apparently, the most important one is to start a workflow execution. To start a workflow execution, a POST to /api/workflows/{workflowID}/executions is needed.
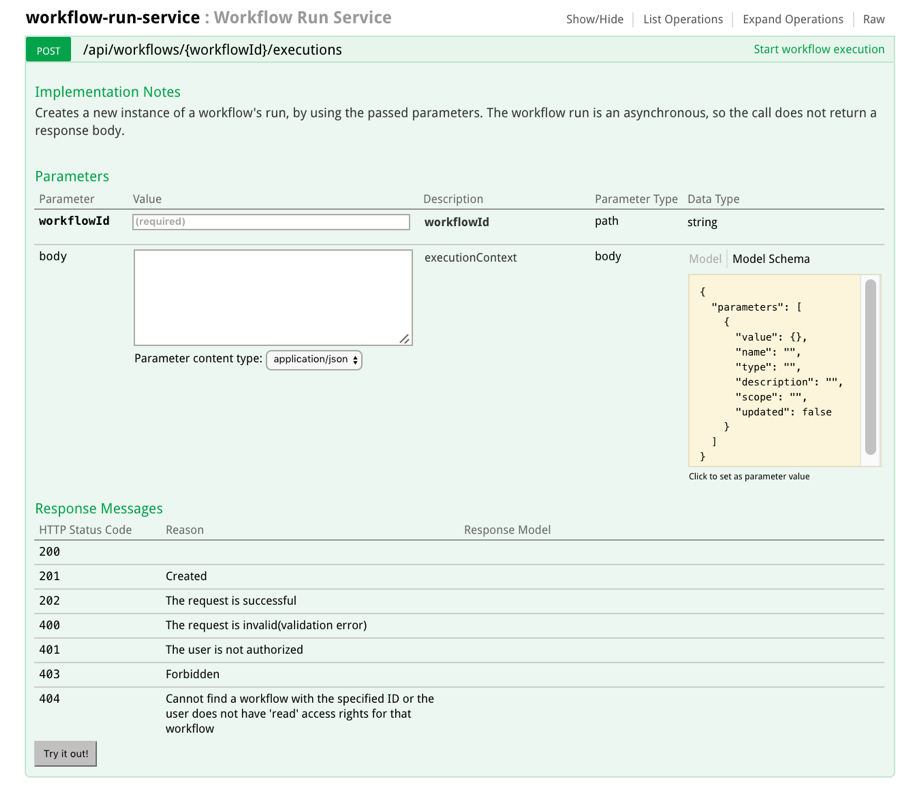
Fig 17: Triggering of a workflow execution via REST
Depending on the workflow to be executed, a list of parameters has to be passed to Orchestrator. Parameters are sent within the Request Body based on the following model schema (example is in JSON; XML would be valid as well):
{

"parameters": [

{

"value": {},

"name": "",

"type": "",

"description": "",

"scope": "",

"updated": false

}

]

}
21.6 Additional plug-ins and workflows
As already mentioned, vRealize Orchestrator already provides a lot of plug-ins. However, as there are many different customizations possible, at some point in time you will certainly get to the situation, where there is no workflow available. Basically, you can write your own code in vRealize Orchestrator using JavaScript as shown in the last use case, however, don’t forget that vRealize Orchestrator is mainly an Orchestration engine, so that most of the time it is certainly better just to run an existing script or to invoke an endpoint. For example, if you have some work on a Windows machine to be done, just use the PowerShell plug-in to run a script for that. Linux scripts can easily be invoked by means of the SSH plug-in. If there is no script that can be invoked, you can still use the SOAP or the REST plug-in.
21.7 Summary
This chapter introduced how to use Orchestrator together with vRealize Automation. We learnt that there is bidirectional communication between them. Orchestrator can automate vRealize Orchestrator and vRealize Automation can use Orchestrator to call a workflow. We introduced the most important workflows from the vRealize Automation plug-in and showed how to implement a set of use cases.
[1] https://solutionexchange.vmware.com/store/products/vrealize-orchestrator-vro-puppet-plugin
[2] https://communities.vmware.com/docs/DOC-25474
Recent Comments