
We have already introduced vRealize Orchestrator – a process automation tool capable of automating processes against a wide range of exter-nal systems. Due to its open architecture and integration into vRealize Automation, it can be used to manage the vRealize Automation cloud infrastructure.
This chapter will cover the followings issues:
- Give a brief introduction to vRealize Orchestrator and its benefits.
- Show how to configure and integrate vRealize Orchestrator into a vRealize Automation infrastructure.
20.1 Introduction to vRealize Orchestrator
vRealize Orchestrator is a great tool for automating your environment and orchestrate business processes. This makes IT operations faster and less error-prone. While workflows can also be implemented using tradi-tional programming techniques, Orchestrator facilitates the development of workflows due to its integrated development environment and other built-in features. When creating new workflows, you certainly don’t want to implement everything from scratch – instead, you want to increase reuse. Orchestrator enables workflows to be exported and imported through packages. Also, as workflows from time to time tend to run a long time, a lot of techniques have to be used in traditional workflow programming to increase resilience. Orchestrator however, provides a built-in workflow engine that takes care about a lot of issues and offers multiple ways to run workflows.
As there are already over 500 ready-to-use actions and workflows available, in many cases there is no need to write your own code. How-ever, if you want to implement your own code, Orchestrator uses JavaS-cript as a programming language, which is quite easy to learn and in widespread use.
vRealize Orchestrator can help in many scenarios:
- The lifecycle of infrastructure services can be customized. For exam-ple, you can register a virtual machine within a configuration data-base after provisioning or assigning a custom hostname.
- vRealize Orchestrator can also be used, if you implement your own action and attach it to a blueprint.
- Of course, you can use vRealize Orchestrator to manage and auto-mate your own vRealize infrastructure.
- vRealize Orchestrator is also a great tool for third-party vendors. If they want to integrate their solution into vRealize Automation, they can develop their own workflows, which can be in turn published to the Service Catalog using the Advanced Service Designer. We will cover the Advanced Service Designer in the next chapter. Such pub-lished services are also described as Anything-as-a-Service (XaaS) blueprints.
- Of course, you can also create your own custom services and inte-grate them with your infrastructure. Once again, there are many reasons and use cases for that. For example, you could request a LUN or perform some Active Directory tasks via the Service Catalog.
20.2 vRealize Orchestrator configuration
Because vRealize Orchestrator is an important piece within vRealize Automation, it is already shipped as part of the vRealize Automation appliance. While you can use the built-in server for testing and smaller deployments, it is nevertheless recommended to deploy a stand-alone Orchestrator appliance.
20.2.1 Deploying and configuring the vRealize Orchestrator appliance
Basically, the vRealize Orchestrator 7 appliance installation procedure does not differ from the Automation appliance, so we will not cover this part here (you can find a step-by-step guide in chapter 4).
Once the appliance is deployed, we have to perform the following tasks:
- Install the vRealize Automation plugin
- Manage authentication
- Configure the vRealize Orchestrator endpoint in vRealize Automation
- Configure the plug-ins in vRealize Orchestrator
20.2.2 Installing the vRealize Automaiton plug-in
With that knowledge in mind, we can start the configuration. If you are using the internal Orchestrator instance within vRealize Automation, the first thing to do is to check if it is running – and if not – to start it. This can be done as described in the following:
- SSH to your Orchestrator (or vRealize Automation) instance using “root” as a username.
- Type in the command service vco-configurator start.
- Open the page vRealize Orchestrator server page (https://<vRO.domain.name>:8281/vco) in a supported browser.
- On the lower area of the screen, click the vCenter Orchestrator Control Center link. Alternatively, you can directly go to the URL: https://<vRO.domain.name>:8283/vco-controlcenter.
- Log in with username “root” and your provided password (Fig. 20.1 shows the Control Center).
- Next, click on Manage Plug-Ins (if you are using the embedded Orchestrator, you can skip the following steps).
- In the Install section, click on Browse… and upload the vRealize Automation plug-in (you can download the plug-in from the My VMware page). You can click Install to start the installation.
- Follow the instructions to complete the installation.
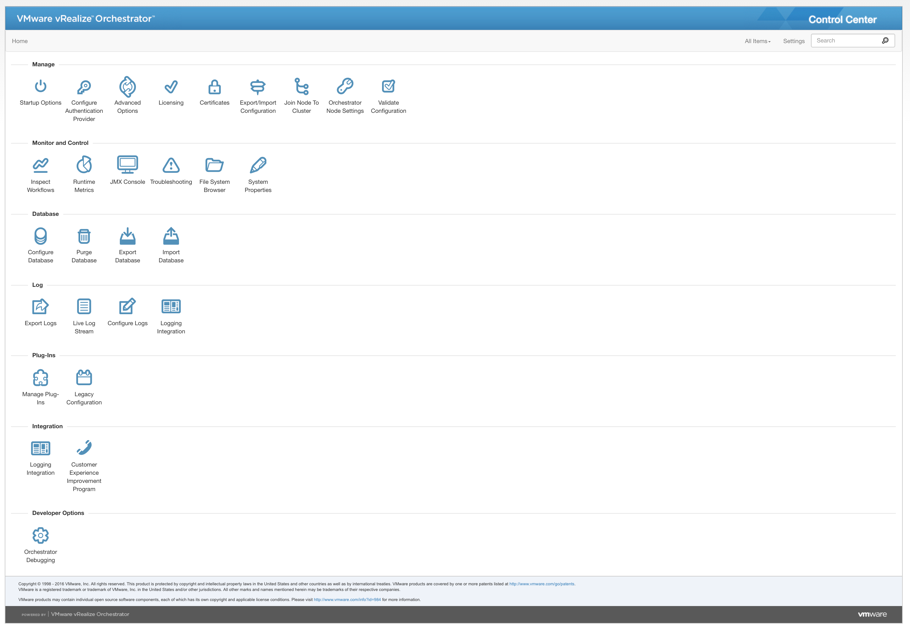
Fig. 20.1 vRealize Orchestrator Control Center
20.2.3 Managing authentication
vRealize Orchestrator supports the following authentication types:
- LDAP: Active Directory, OpenLDAP and ApacheDS is supported
- vRealize Automation (the preferred option)
- vSphere authentication (using the Platform Service Controller)
Please be aware of the fact that both the vRealize Automation appliance and vSphere provide a vsphere.local domain on their own, however, they are not identical, so they cannot be combined. The preferred option is to use the vRealize Automation provider, because only this approach will allow you to add the external Orchestrator appliance using SSO authen-tication (if you are using vSphere authentication, you will have to config-ure Basic authentication in vRealize Automation in order to connect to vRealize Orchestrator).
This is particular interesting if you want to request catalog items via Orchestrator. In such cases SSO authentication is needed so that the created vRO objects can match with the ones requested from vRealize Automation. However, this is not the case when using basic authentica-tion, because the newly created vRO objects do not belong to the user who originally requested them.
With that knowledge in mind, we can right now begin with the con-figuration. In the following, we will show how to setup vRealize Automa-tion authentication (the PSC authentication can be setup accordingly):
- On the Home screen, click Configure Authentication Provider.
- From the Authentication Mode dropdown list, select vRealize Automation.
- Review the Host Address and URL settings and click Connect.
- Next, within the Identiy Service, provide the following input and click Register:
A User name with administrative permissions in vRealize Automation.
The Password.
Review the Configure licenses option.
Provide the name of the Default tenant. - In the last step, provide a value for the Admin group (see Fig. 20.3). If you have configured the vRealize Automation authentication provider, you choose either a custom group defined in vRealize Automation or a group from an underlying identity source (e.g. an Active Directory Group).
- Click Save Changes.
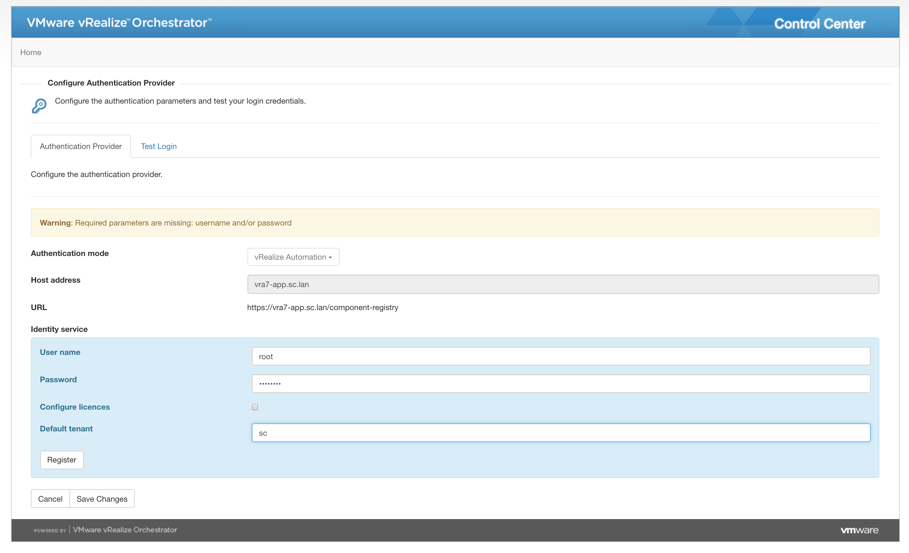
Fig. 20.2 Configuring the Authentication Provider
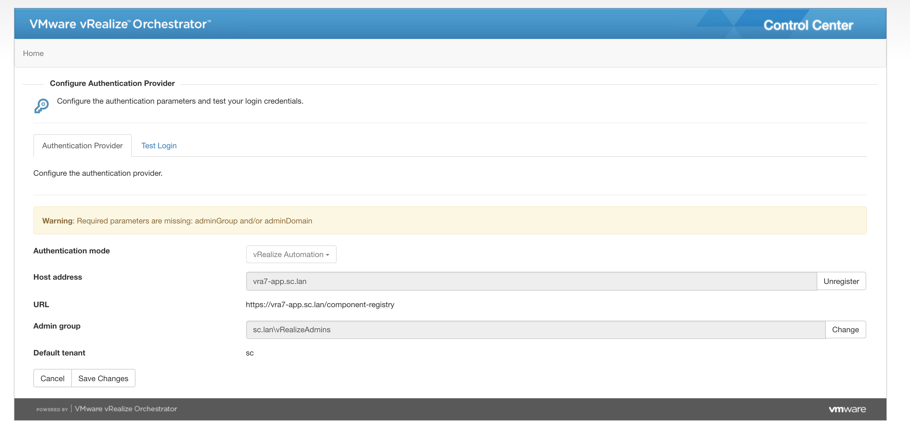
Fig. 20.3: Settup up an admin group
Once you have changed the authentication settings and you already have an Orchestrator endpoint configured in vRealize Automation, please don’t forget to update your credentials accordingly. Members of the Admin group now have access to the Control Center as well the permissions to log in from the Java Orchestrator client.
20.2.4 Configuring the Orchestrator entpoint in vRealize Automation
Setting up the endpoint for Orchestrator in vRealize Automation is quite easy and can be done as follows:
- Log in into the vRealize Automation self-service portal having IaaS administrator privileges.
- Change to the Infrastructure > Endpoints > Endpoints page.
- Choose [+ New] > Orchestration > vRealize Orchestrator. The configuration page for the endpoint opens (see Fig. 20.4).
- Assign a Name for the endpoint.
- Optionally, you can type in a Description.
- You need to type in the Address of the Orchestrator instance (the syntax is https://<vro.domain.name>:8281/vco).
- Next, you have to type in your Credentials. Click on Credentials. By default, the orchestrator instance has the username administrator@vsphere.local (the password was set during the configuration of the SSO appliance), however, change it accordingly if you changed the authentication mechanism as described before.
- Every endpoint needs a priority (in case there is more than one orchestrator instance available, the one with the higher priority is taken – otherwise a round-robin algorithm is used). Click on the [+ New] button in the Custom Properties section, name the property VMware.VCenterOrchestrator.Priority and assign 1 as a value.
- Save the property by clicking on the Save icon.
- Click the OK button to save the endpoint.
If you have different Orchestrator instances, you can also override the default orchestrator instance on a blueprint level. This can help if you have any special resource-intensive workflows that should run on a dedicated instance. If you want to configure that, you need to add the VMware.VCenter.Orchestrator.EndpointName property and assign the name of the endpoint.
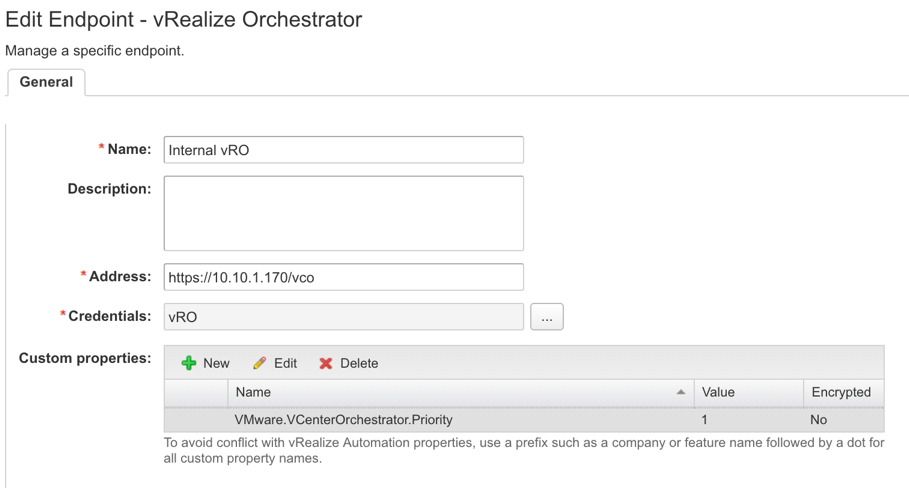
Fig. 20.4 Configure an Orchestrator endpoint in vRealize Automation
20.2.5 Configuring the plug-ins in vRealize Orchestrator
The next step is to configure the plug-ins appropriately. In the following, we will show how to configure the following plug-ins:
- vCenter plug-in
- vRealize Automation plug-in
- Active Directory plug-in
- PowerShell plug-in
In addition, we have already shown in chapter 13 how to configure the NSX plug-in.
20.2.5.1 Configuration of the vCenter plug-in
Perform the following actions to configure the vCenter plug-in within the vRealize Orchestrator client:
- Start the Orchestrator Java client.
- Log in as a user having the appropriate permissions to use the Orchestrator client.
- At the upper area of the screen, within the dropdown list near the VMware vCenter Orchestrator label, select Run.
- In the workflow library, navigate to Library > vCenter > Configuration.
- Right-click Add a vCenter host instance and select Start Workflow.
- A dialog opens and prompts for the following input:
- IP or host name from the vCenter Server.
- The HTTPS port is 443.
- Enter “/sdk” within the Location of the SDK input box.
- Select Yes for Will you orchestrate this instance.
- With the Ignore Certificate Warnings checkbox, select Yes.
- Click Next to move to the next dialog page and provide the following input (see Fig. 20.5).
- For Use shared Session select Yes.
- In the User name for Orchestrator to connect to vCenter Server field, enter administrator@vsphere.local.
- Provide the Password of the user.
- Enter the Domain name.
- Click Submit to start the workflow. If the workflow completes successfully, a completed workflow token will appear within the workflow execution history (expand the workflow to see the history).

Fig. 20.5 Adding a vCenter Server Instance
20.2.5.2 Configuration of the vRealize Automation plug-in
Now, let’s continue with the configuration of the vRealize Automation plug-in. This involves two steps:
- Add a vRealize Automation endpoint.
- Add an IaaS host endpoint.
Perform the following steps to add an vRealize Automation endpoint (however, consider that this connection is tenant-specific and each ten-ant should have its own endpoint):
- In the workflow library, navigate to Library > vRealize Automation > Configuration.
- Run the Add a vRA host workflow (see Fig. 20.6).
- Provide a Host Name to store the connection (with the tenant name included).
- Provide the URL of the vRealize Automation appliance in the Host URL textbox.
- Click Yes for Automatically install SSL certificates.
- Click Next.
- Keep Shared Session as Session Mode.
- Provide the Tenant name.
- Provide the credentials for a user with tenant administrator privileges in the Authentication username and Authentication password text fields.
- Click Submit.
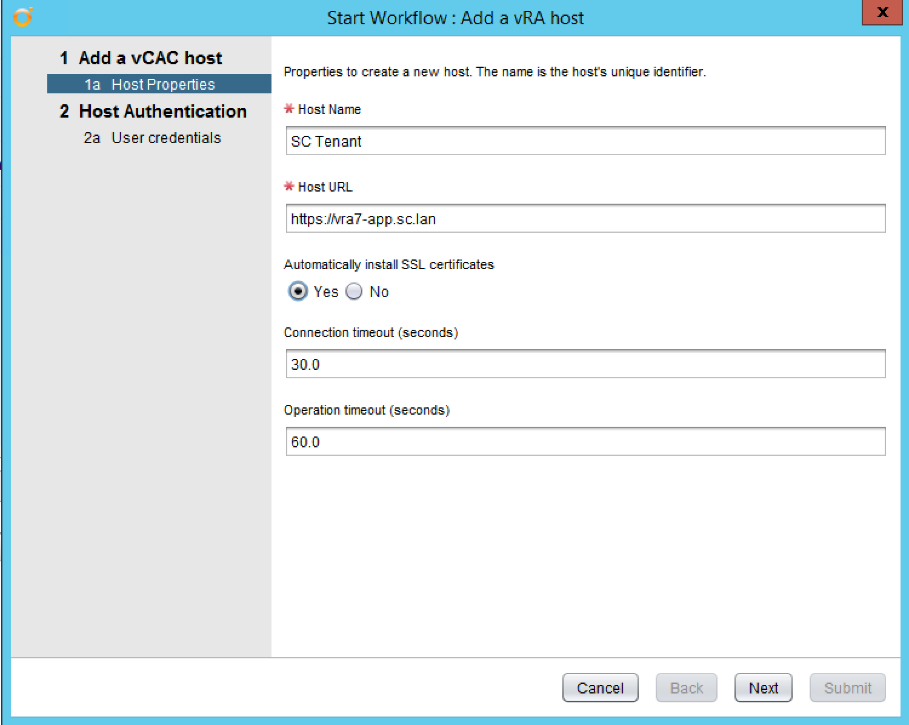
Fig. 20.6 Adding a vRA host
Next, we can add the IaaS endpoint:
- In the workflow library, navigate to Library > vRealize Automation > Configuration.
- Run the Add the IaaS host of a vRA host workflow.
- Under vCAC Host, click the Not Set link. Within the Select (vCACCafe:VCACHost) dialog box, expand vRealize Automation and select your vRA host. Finally, click on Select.
- Click Next to move to the next dialog page (see Fig. 20.7).
- Provide your IaaS server as Host Name.
- Enter the Host URL.
- Leave the default settings for the Connection timeout.
- Leave the default settings for the Operation timeout and click on Next.
- Review the Proxy settings.
- Click Next to move forward to the next input dialog. Use Shared session for the Session Mode.
- Enter an Authentication user name (use the system administrator of your IaaS server configuration).
- Provide the Authentication password.
- Click Next for the next configuration screen.
- For the Workstation for NTLM authentication, leave the default settings. For the Domain for NTLM authentication, enter your domain (for example “sc”).
- Click Submit to start the workflow.

Fig. 20.7: Add the Iaas host of a RA host
Once again you can change to the Administer mode and expand the vRealize Automation Infrastructure node to control if your configuration is working.
20.2.5.3 Configuration of the Active Directory plug-in
The next plug-in to be configured is the Microsoft Active Directory plug-in.
- In the workflow library, navigate to Library > Microsoft > Active Directory > Configuration.
- Right-click Add an Active Directory server and select Start Workflow. The workflow dialog opens (see Fig. 20.8).
- Provide the IP or host name of a domain controller for the Host textbox.
- If you are using unencrypted LDAP for communication, use the default port 389. For secure LDAP, use port 636.
- Review the Use SSL settings.
- Optionally, provide a Default domain.
- Click Next.
- On the Authentication dialog box, set the Use a shared session checkbox to Yes.
- Provide the User name and the Password for the shared session.
- Click Submit.
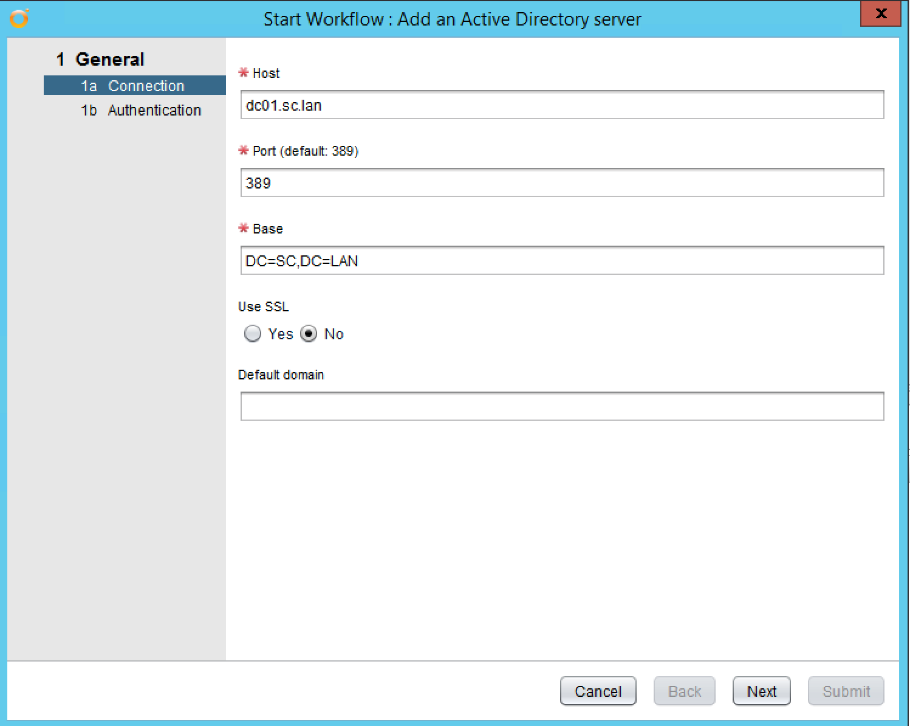
Fig. 20.8 Add an Active Directory Server
20.2.5.4 Configuring the PowerShell-plugin
Quite often, companies already have automated a lot of tasks using Microsoft PowerShell. PowerShell provides powerful means to automate all kinds of Windows-related processes, hence, it is certainly also a good idea to configure the plug-in in Orchestrator.
However, before being able to configure the plug-in, Windows Pow-erShell must be configured to accept remote connections. Perform the following steps on a Windows machine (please consider – depending on your Windows environment, the configuration steps may be slightly different:
- Open the command prompt and run the winrm command to allow basic authentication (winrm is a SOAP-based protocol that allows to perform remote PowerShell commands):
winrm set winrm/config/service/auth @{Basic=“true“} - To ease communication, we can switch to unencrypted communication (encrypted communication requires an exchange of certificates):
winrm set winrm/config/service @{AllowUnencrypted=“true“} - Close the command prompt.
- Next, open Windows PowerShell and issue the following command (please consider – you only should do that for POC environments, productions environments should use valid certificates):
set-executionpolicy bypass
- Enter Y and close the PowerShell window.
Next, we can configure the PowerShell plug-in in Orchestrator:
- In the workflow library, navigate to Library > PowerShell > Configuration.
- Run the workflow Add a PowerShell host.
- Provide a Name for the PowerShell host.
- Enter the Host or the IP address of the PowerShell host.
- Enter the port (usually 5985 for unencrypted traffic).
- Click Next (see Fig. 20.9).
- For the PowerShell remote host type, keep WinRM.
- Depending on your environment, choose the Transport Protocol (we used HTTP).
- Choose the appropriate Authentication (if you followed the instructions, choose Basic).
- Click Next.
- On the last dialog, select Shared Session as Session mode and provide the appropriate User name and Password.
- Click Submit to start the workflow.
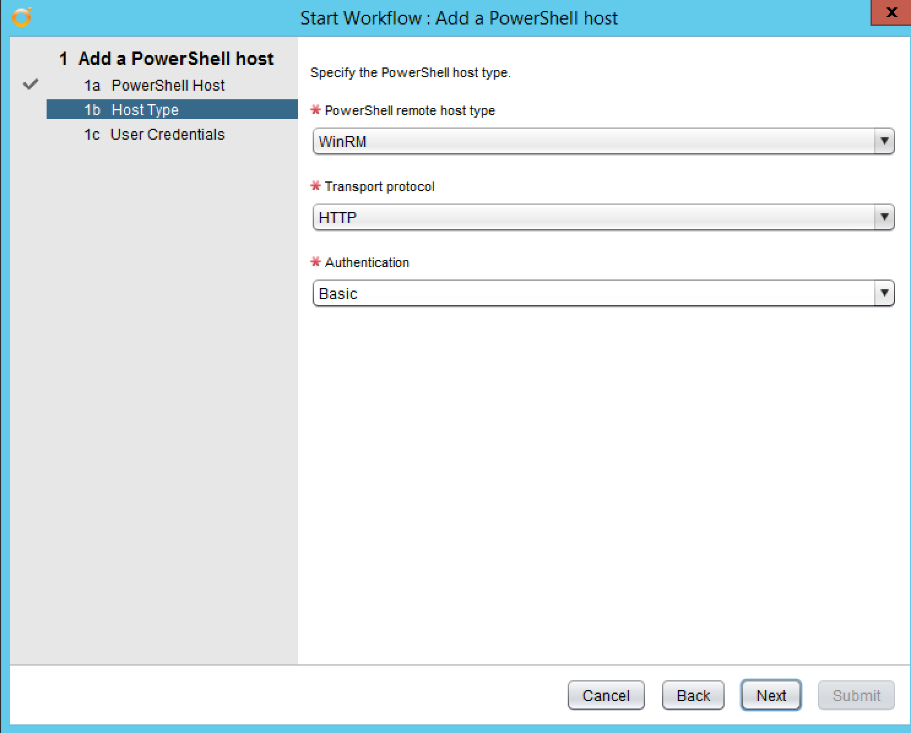
Fig. 20.9: Adding a PowerShell host
20.3 Summary
This chapter introduced how to configure and use Orchestrator together with vRealize Automation. We learnt that there is a bidirectional com-munication between them. Orchestrator can automate vRealize Automation and vRealize Automation can use Orchestrator to call a workflow
Recent Comments