
vRealize Automation uses a set of built-in workflows to provision machines. We have already discussed these workflows in the blueprint chapters. We also outlined that these provisioning workflows can be customized with the help of custom properties. Custom properties are a powerful concept within vRealize Automation. Many use cases and functionalities can be implemented by working with them. That’s reason enough to provide an in-depth overview of custom properties and (related to them) build profiles. Furthermore, we will demonstrate some common use cases, where custom properties really can help to implement powerful functionalities.
16.1 Custom properties basics
Before digging into the details, we first want to briefly sketch out how customization happens in vRealize Automation. Customization can be carried out at different levels (see Fig. 1):
- By using custom properties and build profiles, you can perform simple customizations in a machine’s lifecycle. This addresses the user interface for requesting a machine, and at all stages of the lifecycle (requesting, provisioning, managing, and retiring). Custom properties can easily be defined via the graphical user interface.
- If vRealize Automation should customize the virtual machine itself, software components can be used. Software components are reusable across different blueprints and can be implemented independently from blueprints.
- If the requirements become more complex and there is some kind of logic required (and especially communication to external tools is needed), there are different tools available to help you in vRealize Automation: The vRealize Automation Orchestrator, vRealize Automation Designer and the Advanced Service Designer.
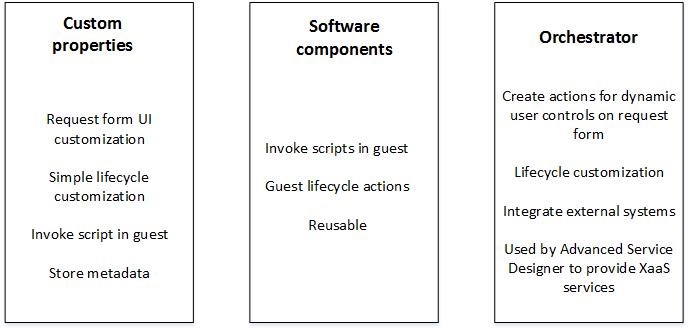
Fig. 1: Extensibility options
This chapter only addresses custom properties and build profiles. The other tools will be described later in this book.
16.1.1 Machine lifecycle
As mentioned, every machine has a lifecycle within vRealize Automation. The most important stages are depicted in Fig. 2. As customizations can apply to each one of these stages, it makes sense to discuss them in the following:

Fig. 2: Machine lifecycle
Request phase
During the request phase, users provide all kinds of input required for provisioning. We have already demonstrated how to request a machine from the service catalog. However, using custom properties, you can ask for additional input from the end user and employ it during the provisioning. For example:
- Override the hostname of a machine.
- Decide at which location a machine should get deployed.
- Define a cost center.
- Configure to which network a machine should be connected.
- Place a machine within a specified storage.
- Assign a script to be invoked at the end of the provisioning.
Approval phase
Once a request has been submitted, the provisioning enters the approval phase (if an approval policy has been assigned to a blueprint). Approvers see all the requested machine’s details (including all hardware resources, lease time and costs). Approvers can also modify certain settings as well as custom properties.
Provisioning phase
This is the phase in which the machine is being built. vRealize Automation supports different ways of building a machine, e.g. cloning, WIM provisioning, Linux Kickstart and many more. The provisioning process can be customized as well. The customization settings are provided via custom properties. These can be defined statically for each machine build or entered during the machine request.
Post-approval phase
Approvers are able to inspect a machine and review its settings before it becomes available to the requester.
Manage phase
Machines spend the majority of their time in the manage phase. End users can perform actions as defined in the blueprint. There are plenty of possible use case scenarios for customization. However, custom properties are usually not powerful enough to implement those. Instead, usually vRealize Automation Orchestrator is used. Some of the most common use cases are described as follows:
- Day-2 actions can be implemented and associated with a blueprint or an existing machine. For example, additional software such as a virus scanner can be installed.
- Workflows can also run as background jobs. For example, there could be an Orchestrator workflow, which backs up the machine every night.
- Changes to machines can also happen because of configuration changes. For example, a machine could be moved to another data store because of low capacity.
Retire phase
The final stage is the retirement phase. At the end of the lifecycle, all resources will be released. As already mentioned, there is also a distinction between expiring and deleting. Once a machine gets fully destroyed, plenty of work can be done. For example, releasing IP addresses or unregistering the machine or service within a Configuration Management Database (CMDB).
16.2 Custom properties in detail
We have already introduced custom properties when we talked about blueprints. However, custom properties represent a very important concept within vRealize Automation. That’s reason enough to dig further into the details of custom properties. There are of course many use cases for using these custom properties (we will address some of them later in the chapter in more detail):
- Choosing a network at request time.
- Choosing a storage location for provisioning.
- Defining a vCenter virtual folder, where the VM object should be placed.
- Configuring administrator access for the machine owner, in the VM.
- Configuring antivirus software.
- Consolidating blueprints.
- Defining a port group, to which a machine should be connected.
- Definition of snapshot policies.
- Activating monitoring.
- Active directory cleanup, after removing a VM.
Essentially, custom properties can be viewed as tags. There are a lot of predefined custom properties, but you can also create your own ones. Once created, they can be applied to objects such as blueprints, build profiles and so on. Custom properties are exclusive to the IaaS components of vRealize Automation. When you create your own custom properties, you are free to name whatever you want it to be named. However, descriptive names, including namespaces (the dot “.” acts as a separator) are recommended. If you create your own custom property and attach it to any object (for example a blueprint), nothing will happen as custom properties act as a kind of metadata. However, the vRealize Automation standard built-in workflows are aware of the predefined custom properties They have some inbuilt logic, which is then run upon detection of a custom property. Consequently, if you create your own custom properties, you need a ‘handler’ to run some kind of logic. Usually, vCenter Orchestrator is used to implement such logic within a workflow.
16.2.1 Order of custom properties
We have already shown you how to add custom properties to a blueprint. However, you might also have noticed that these custom properties can be configured in other levels of vRealize Automation. In fact, you can define the very same custom property at different levels. There is an order to which these properties are evaluated (the first one has the highest priority):
- Runtime
- Endpoint
- Reservation
- Compute Resource
- Business Group
- Blueprint
- Property Group
The idea of defining the same custom property at different levels is that you can configure some kind of standard behavior and then override it if required. Nevertheless, you should be careful with this. When a custom property is applied to a blueprint, there is no tool to find out at which level it has been applied. In fact, if you forget about a custom property somewhere, the provisioning and the other workflows might not work the way you envisioned.
16.2.2 Custom properties categories
vRealize Automation has a lot of predefined custom properties (you can find the complete list in the Custom Property reference documentation) Internally, vRealize Automation treats custom properties differently – depending on the category:
16.2.2.1 Read-only custom properties
Read-only custom properties are assigned by vRealize Automation and cannot be changed. These properties are usually set for values that must be fixed for the whole lifecycle. The following list enumerates some of the read-only properties:
- Admin.UUID (specifies the UUID of the machine)
- Admin.AgentID (specifies the UUID of the guest agent)
- Admin.Name (specifies the generated machine name)
16.2.2.2 Internal custom properties
The next category of custom properties is only used internally to help store the metadata of virtual machines – these properties do not affect the state of a machine. An example internal custom property would be a machine approver. Other internal properties are enumerated in the following:
- Admin.Owner (user name of the machine owner)
- Admin.Description (description of the machine)
- Admin.AdministratorEmail (the manager’s email addresses or its Active Directory account)
- Admin.ConnectionAddress (RPD connection address of the machine)
- Admin.NameCompletion (Specifies the domain name to include in the fully qualified domain name of the machine that the RDP files generate for the Connect Using RDP option)
16.2.2.3 External custom properties
External custom properties store information relating to a virtual machine. Once these properties have been set, they will not change. If a virtual machine changes, these properties will not be updated. This means that vRealize Automation retains some old information regarding machines within its database. These settings take effect, even if you change a machine, without applying them to a custom property. The following list depicts some examples for external custom properties:
- Hostname
- Admin.ClusterName
- Admin.ForceHost
- Admin.ThinProvision
- Admin.AddOwnerToAdmins
- Admin.AllowLogin
- Storage.Name
- Memory.Reservation
- VirtualCenter.Folder
- VirtualCenter.OperatingSystem
16.2.2.4 Updated custom properties
The last category is quite similar to the external custom properties category. However, the difference here is that the updated custom properties automatically reflect changes caused by machine modification. Depending on the custom property, such behavior is quite important. Consider a scenario, where an end user requests a low-end machine from the service catalog. Due to limited capacity, the machine is quite cheap. However, if the user has appropriate vCenter permissions, he could theoretically log in to the vSphere Client and increase the machine resources. In this case, it is important that vRealize Automation can detect such hardware modifications. If not, it would be possible for users to continue paying the original low price, as indicated in the service catalog, instead of a higher, correctly adjusted price.
Based on that scenario, we can conclude that basic hardware settings must also be applied to custom properties. These properties are called updated custom properties. Other examples for this category are:
- Admin.Hostname
- Admin.TotalDiskUsage
- Memory.Size
- CPU.Count
16.2.3 Configuration of custom properties
Defining custom properties is pretty straightforward. Fig. 3 depicts the configuration of a custom property at blueprint level. The following parameters can be defined for a custom property:
- The Name of the custom property.
- The Value of the custom property.
- If the custom property should be Encrypted.
- If the custom property should it be Overridable.
- If the custom property should be seen in the request Form (Show in Request).
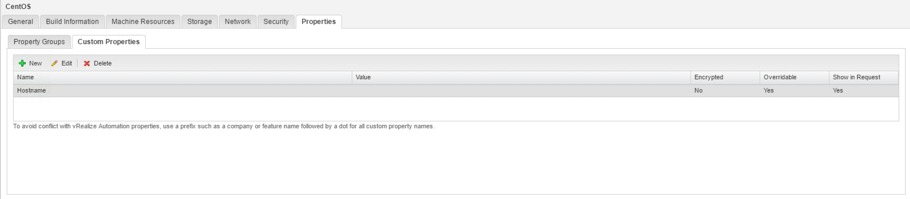
Fig. 3: Configuration of custom properties
Fig. 4 shows how vRealize Automation adds an additional input field, on the request page, when the Show in Request option has been set.
Please also note that the definition of a custom property is always case sensitive. If there is any typing error, the custom property will not be working.
16.3 Property groups
In most cases, assigning a custom property is not sufficient – instead, a set of custom properties must be applied to a blueprint. If there are many blueprints, there will be a lot of work to do for the assignment. However, in such
Fig. 4: Custom property on a request form
cases using build profiles is a viable alternative to applying many single custom properties. A property group helps to group custom properties and allows reusing them.
16.3.1 Creating property groups
If you want to perform additional customization, it is quite handy to be able to create your own build profiles.
Configuring your own property groups helps you to increase the manageability of your vRealize Automation solution. Custom properties can be centrally grouped in property groups and store global variables such as Active Directory domain information, scripts to be executed, or any cleanup logic for de-provisioning.
Furthermore, build profiles can also help you to get a grip on ‘blueprint sprawl’. Many organizations tend to create many different blueprints with only minor differences (e.g. hardware equipment, services running, etc.). Better practice would be to use a generic blueprint and then utilize build profiles to adjust it to the requestor’s requirements. Later in this chapter, we will demonstrate just how to achieve such a behavior using build profiles. Right now, we will take a look at how to create such property groups in the first place:
- Log in into vRealize Automation as a fabric administrator.
- Navigate to the Administration > Property Dictionary > Property Groups page (see Fig. 5).
- Click the [+ New]
- Assign a Name for the property group.
- Assign an ID.
- Configure the Visibility of the property group.
- Optionally define a description.
- Add the custom properties to the build profile. Click the New Property A new row is added to the Properties table.
- Enter the Name of the custom property, within the first column.
- Define a Value for the custom property.
- Check the Encrypted checkbox if needed.
- If the requestor has to provide an input for the custom property, check the Show in Request
- Save the row by clicking the OK-button.
- Add additional custom properties as needed.
- Save the build profile by clicking OK.
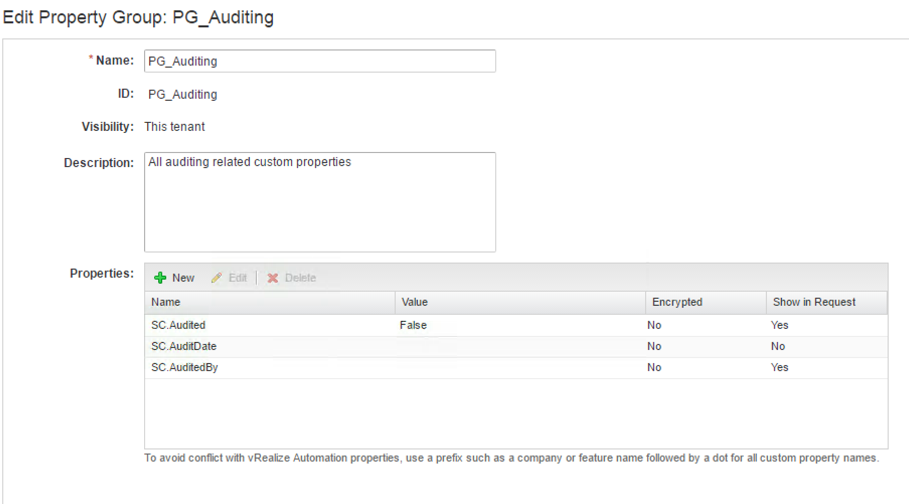
Fig. 5: Configuring property groups
16.4 Property dictionary
As you will have already seen, there are many predefined custom properties in vRealize Automation. You can of course create your own custom properties as well. In any case, if the value assigned to a custom property is not valid, there will be most likely an error in any workflow that evaluates these custom properties later on. Consequently, it is crucial to test your custom properties before using them in production. However, things become more complex when prompting your users for some input. If the input is not valid, any running workflow will of course also fail. In order to circumvent such failures, we need a way to predefine valid inputs, before a request can be submitted.
The property dictionary can help us with these issues. It offers the following functionality:
- You can define data validations to ensure input is entered in the right format. For example, you can validate the data type of an input, e.g. if you want to have an integer, a text or a date. Entering input that does not meet the right format is then prohibited.
- Additionally, you can define constraints. Constraints help to validate the content of an input. There are different types of constraints: You can configure a minimum or maximum value, intervals, value sets for dropdown lists, or regular expressions for text input.
The property dictionary supports the following data types:
- String
- Boolean
- Datetime
- Decimal
- Integer
- SecureString
- String
Depending on the data type, different option for constraints are displayed. For example, for numbers (integer and decimal) input, there is a Minimum, Maximum and Increment option. For datetime, there is a beginning date and an end date. For Boolean values, administrators can configure a checkbox or Yes/No dropdown list. However, the data type with the most options is the string data type. Having a string data type allows you to configure an additional display advice with the following options:
- Hyperlink
- Textarea
- Textbox
- Dropdown list
The most interesting one here is certainly the dropdown list. Administrators can configure a list of predefined values or use Orchestrator to load the dropdown list input from a workflow. You can even build dependent dropdown lists, where the value list depends on the selected item on another dropdown list. Having the possibility to setup a flexible request form based on dynamic input lists is a powerful feature, so reason enough to cover this in detail on the next pages.
16.4.1 Using the property dictionary
Bearing this knowledge in mind, let’s see how to use the property dictionary.
16.4.1.1 Creating a property definition for a string data type
Perform the following steps to create a new property definition for a string data type with a predefined list of values:
- Log in into vRealize Automation as a fabric administrator.
- Change to the Administration > Property Dictionary > Property Definitions
- Click the [+ New] The Create Property Definition dialog box opens.
- Assign a Name for the property definition.
- Define a Label.
- In the Visibility section, configure if the property definition is restricted to the current tenant or available for all tenants.
- Optionally, enter a Description.
- You can define an Order Index as well. An order index configures the ordering of the user input on the request form. A lower order index means that an user control is displayed first.
- If the input should be required, set the required dropdown list to Yes.
- If you want the users to be able to enter custom value, activate the Enable custom values
- Within the Predefined value table, click the [+ New] button and add pairs of input. The Name will be displayed in the dropdown list, and the Value is used internally.
- Click OK to save the property definition.
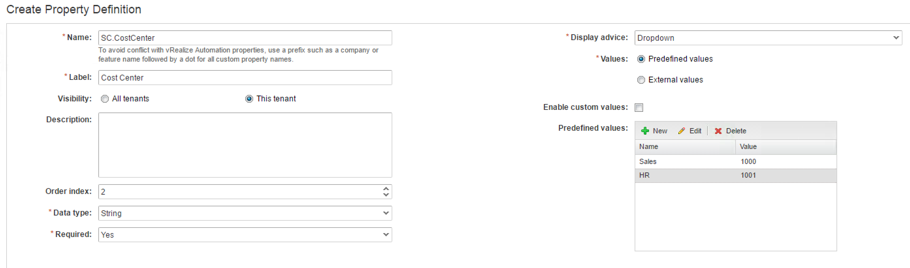
Fig. 6: Setting up a property definition for a string with predefined values
Once the property definition has been created, it must be added to the blueprint to appear on the request form (see Fig. 6 and Fig. 7).
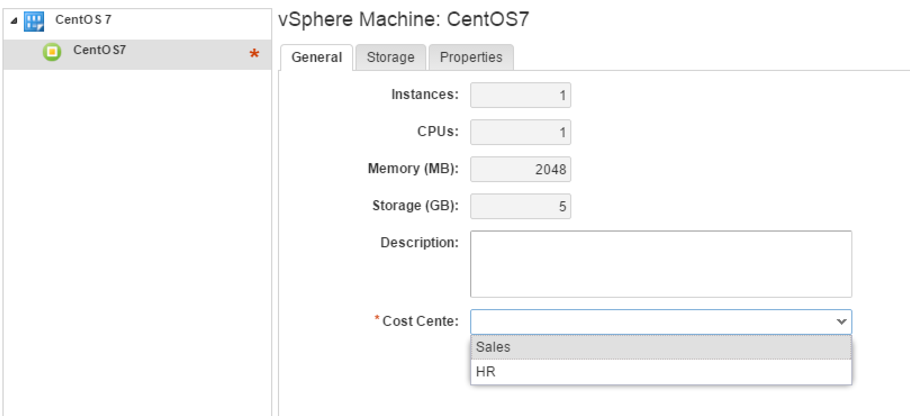
Fig. 7: Request form with a property definition added
16.4.1.2 Creating a string property definition with a dynamic input list
From time to time, it is not possible to define all dropdown lists beforehand. In that case, you can configure vRealize Automation to load the input values from an Orchestrator action. Whilst we cover Orchestrator in a later chapter, we will nevertheless show how to implement a basic action and configure vRealize Automation to load data from the action accordingly.
Implement an Orchestrator action
The first step is to create an Orchestrator action. Fig. 8 shows a simple action with no input parameter and a string array as return type.
Once the action has been implemented, we can go back to the property dictionary and bind a property definition to the Orchestrator element:
- On the property definition ensure that String is selected as Data type and Dropdown is chosen for Display Advice.
- Click the Change button and select the appropriate Orchestrator action.
- Click OK to close the Select Script Action
- Select OK.

Fig. 8: Simple Orchestrator action for a dynamic input list
16.4.1.3 Setting up dependent user controls
With vRealize Automation 7 it is possible to build request forms with dynamic dropdown lists that are dependent on each other as well.
Imagine the following Amazon AWS-like scenario: A user first selects a VPC in a dropdown list and can then choose amongst the available subnets from another dropdown list.

Fig. 9: Simple Orchestrator action for a dependent dynamic list
Fig. 9 shows the appropriate Orchestrator action. In contrast to the action shown before, there is an input parameter which controls the output list of the action.
In order to setup the relationships between the two user controls, we have to configure the input parameter on the child user control, i.e. the Select subnets property definition:
- Within the Input parameters section, select the VPC parameter and check the Bind
- In the Value textbox, choose your VPC property definition(see Fig. 10).
- Next, ensure that both of the custom properties are added to the corresponding blueprint.
- Create a new request and check if the user controls are working correctly (see Fig. 11).
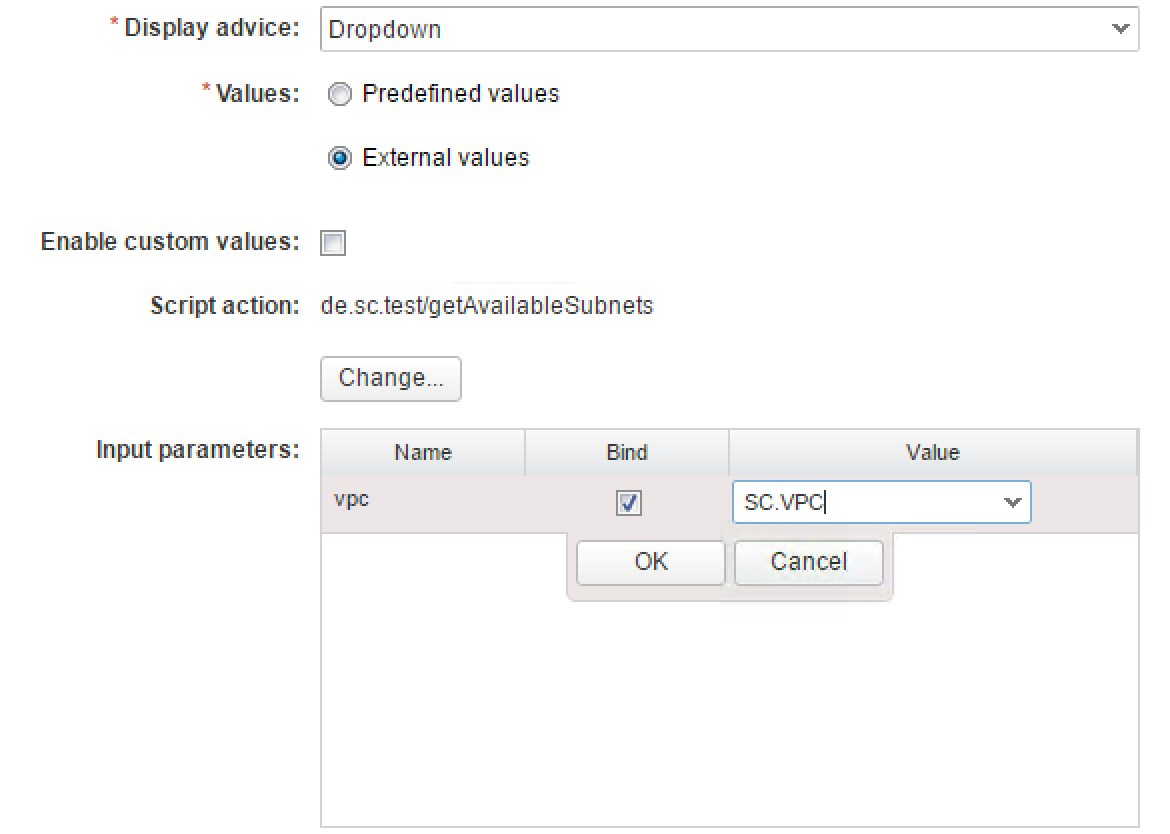
Fig. 10: Adding a relationship between dropdown list user controls
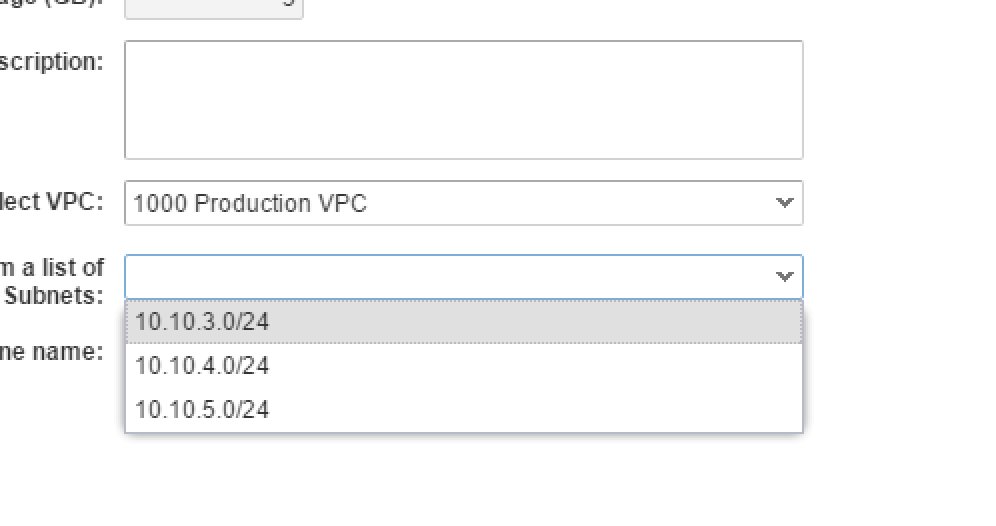
Fig. 11: A request form with two dependent dropdown lists
16.5 Using custom properties to invoke scripts
We have talked about blueprints and virtual machine templates in chapter 8 and 10. At this point, we have mentioned that the guest agent allows us to invoke any script in a virtual machine. This can be achieved by placing a script in the machine or on a network share, and then configuring custom properties to call the script. The following custom properties are required:
- Admin.GuestAgent: This custom property must be set to True and it activates the guest agent within the machine.
- Customize.WaitComplete: This property advises vRealize Automation to wait until guest agents have completed their work.
- Software0.ScriptPath: This custom property configures which script the guest agent should invoke. The script must reside on the machine or on a network share accessible from the machine. The full path must be provided (e.g. C:\Scripts\MyApplication.bat). It is possible to provide parameters to the script, too. The parameters can be either hard coded into the value or be referenced from other custom properties. When referencing other custom properties, the format must be as follows:
D:\Scripts\MyInstall.bat –param {MyCustom.Property.X}
- Software0.Name: The friendly name for the script to be invoked from the guest agent.
If there is more than one script to be invoked, additional custom properties (VirtualMachine.SoftwareX.ScriptPath and VirtualMachine.SoftwareX.Name) can be added to the blueprint. However, with each script the X variable must be incremented according to the order in which they are to be invoked.
16.6 Summary
This chapter introduced custom properties, property groups and the property dictionary. There are several reasons to use custom properties. Firstly, they help to change the behavior of the built-in workflows. Secondly, they allow you to change the user interface, when requesting an IaaS service from the service catalog. Internally, there are different kinds of custom properties: Internal, read-only, external and updated.
We also introduced property groups as a way of grouping custom properties and showed how to use the property dictionary within vRealize Automation.
Recent Comments