
Previously, installing new machines has been quite a tedious task. It was not uncommon for requesters of machines to wait several days before someone from IT was able to fulfill the request. Virtualization, automation and tools like vRealize Automation make it easy to provision new ma-chines. Provisioning of machines can now be realized in a couple of minutes or even just a few seconds by using techniques such as linked clones.
However, this ease of provisioning machines has also created some new drawbacks. It can lead to people requesting too many machines, without really considering the need. Thus, much more machines are created than actually required, with potentially lots of them being forgot-ten about (especially when there is no pricing implemented). This form of gluttony can prove costly in resource management.
vRealize Automation already has some “countermeasures” in place against such behavior. We already discussed how to configure lease times, with machines expiring automatically. Another measure available to you is the ability to charge for machine costs, thus making requesters more aware of the impact of doing so.
Nevertheless, a situation might still arise, due to a lack of resources, where it is not possible to provision any new machines. In that case, ma-chines need to be destroyed in order to make room for new machines. However, which machines can be safely destroyed? That question cannot be answered easily, as in most cases administrators do not have sufficient knowledge if the machine is still in use. Questions like ‘why was it provi-sioned’, ‘what is its function’ or ‘does it even interact with other ma-chines’ arise.
vRealize Automation can also help with this situation. As discussed, vRealize Automation regularly collects information from all virtual ma-chines including its runtime behavior. It can help to identify machines that are idle (in terms of CPU, memory, hard disk and network traffic). Once such machines have been located, we can ask the machine owners if the machines are still required. Depending on the outcome, resources can be released. This concept, along with a built-in workflow, is called reclama-tion in vRealize Automation.
This chapter will give you some insight into reclamations and how to start a reclamation workflow. If you also have vRealize Operations running in your environment, vRealize Automation can interact with it and can provide more detailed machine information.
15.1 Reclamation workflow overview
Fig. 1 depicts how the workflow works at a basic level. There are two different reasons to start a reclamation workflow:
- Reservations have reached the capacity limit, due to a limit of re-sources. Before provisioning new machines, old ones must be de-stroyed.
- Costs should be optimized.
The basic workflow can be described as follows:
- First, idle machines are identified. The administrator then sends a reclamation request to the machine owner and asks whether the ma-chine is still required or can be destroyed.
- If the machine owner states that the machine is still in use, the administrator can initiate a new reclamation request on another idle machine.
- If the machine owner approves the reclamation request, the machine lease will instantly expire. If there is an archive period set, the machine will only be switched off and will be deleted at a later time, as per policy. Otherwise, its resources will be released immediately.
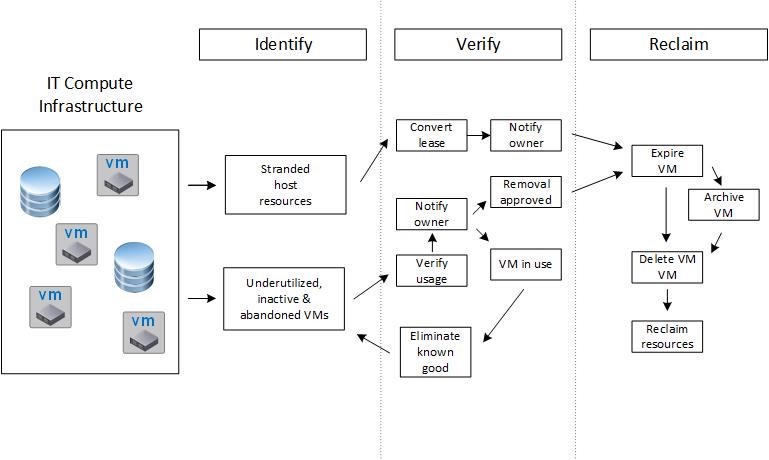
Fig. 1: Reclamation workflow
In order to get more insights into virtual machines, it is possible to inte-grate vRealize Operations. Once done, users are also able to display the current health status of a provisioned virtual machine. vRealize Opera-tions can also help by running idle resource scans to identify candidates for shut-down (see Fig. 2). vRealize Operations can even initiate a recla-mation workflow, once idle machines have been found.
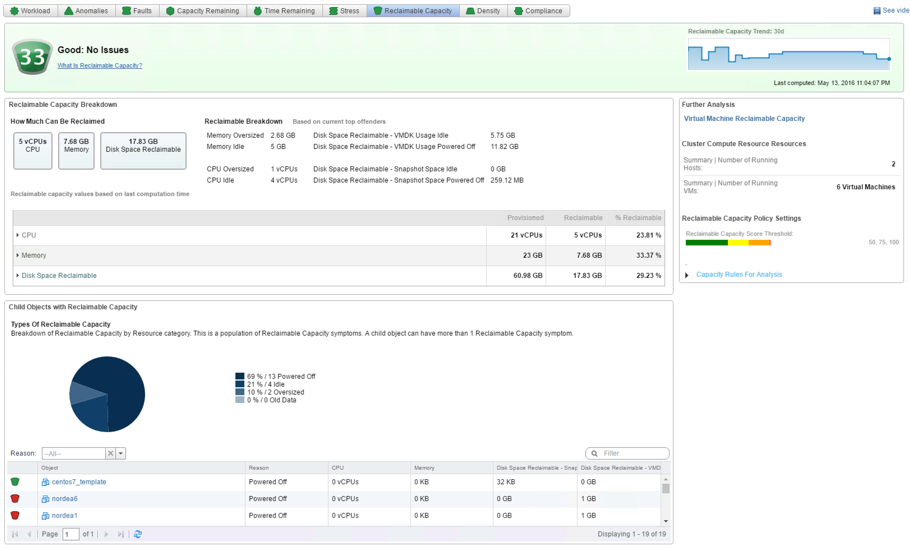
Fig 2: Reclaimable cluster capacity in vRealize Operations
It is worth mentioning that these techniques do not only apply to VMs, they can also be used for oversized and underutilized disk space.
vRealize Operation integration
Carry out the following steps to perform a vRealize Operations integra-tion:
- Navigate to the page Administration > Tenant Machines > Metrics Provider Configuration (see Fig. 3).
- Activate the vRealize Operations Manager endpoint checkbox.
- Provide the URL for the endpoint.
- Type in a Username and a Password for the vRealize Operations instance.
- Click on Test Connection, and if this succeeds click on Save.
Once you have configured the integration, end users will also be able to see the Health Status of a virtual machine via a badge, when they click on the machine details within the Items menu.
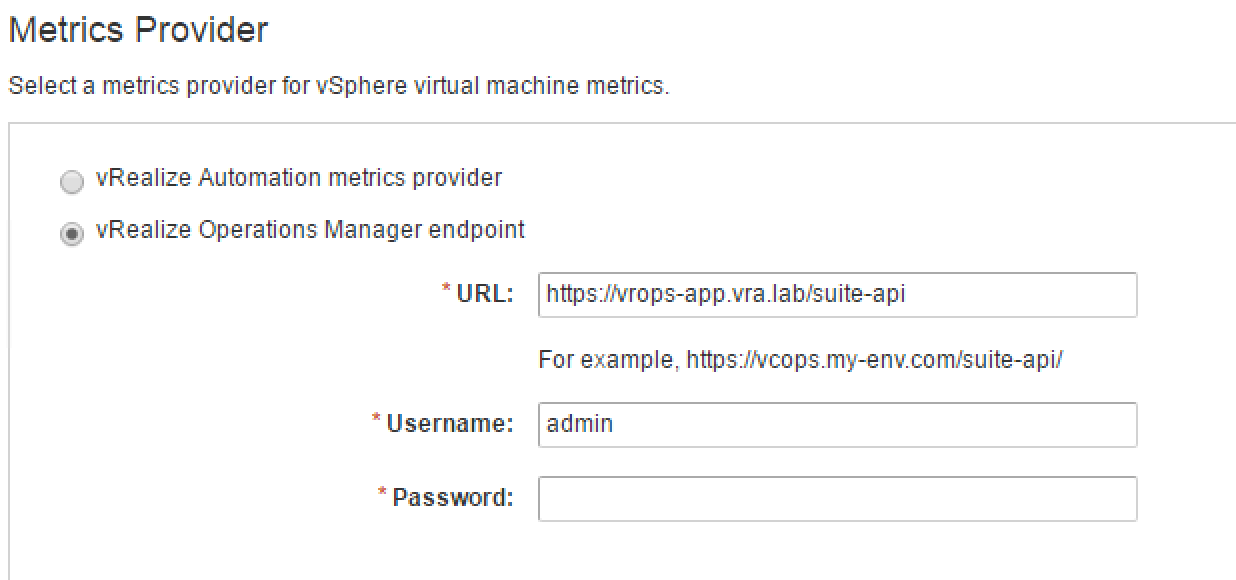
Fig. 3: Configure vRealize Operations integration
15.2 Identifying unused machines in vRealize Automation
If you need to identify unused machines, you must first have membership of the tenant administrator role. The process can then be started by navigating to the Administration > Tenant Machines > Reclamations page. This page displays all machines within the tenant. However, there is also an Advanced Search option for better identifying machines (see Fig. 4). There are quite a lot of search option:
- Virtual machine name
- Business group name
- Owner
- Platform type
- Power state
- Expiration date
- CPU usage
- Memory usage
- Disk usage
- Network usage
- Complex metric – this will use vRealize Operation for identifying virtual machines. Any VM that shows up on the vRealize Operations Idle VMs Report will show up in the list of VMs that can be reclaimed.

Fig. 4: Identifying underutilized machines
Once you have selected a machine for reclamation, you can start the reclamation process by clicking on the Reclaim Virtual Machine button (see Fig 4). Each submitted reclamation request asks the machine owner if the machine is still in use. Unfortunately, sometimes machine owners do not answer these requests. In this case, the lease period can automati-cally be decreased. You can also specify how many days vRealize Automa-tion should wait before doing this, in the Wait before forcing lease (days) input field. Do not forget to review and modify the New lease length (days) and Reason for request input fields.
You can find all reclamation requests, that are in process, within the Ad-ministration > Reclamation > Reclamation Requests page. There are different statuses possible for a request: Pending, Approved or Rejected.
- After you have submitted a request, the machine owner will be noti-fied of the request and is able to open it in his inbox (see Fig. 5). The ma-chine owner can answer the request directly, by choosing one of the following three options:
- They answer by clicking the Release for Reclamation button. This means, the machines are not needed anymore and hence expire immediately. If no archive period is defined, the underlying re-sources are instantly released.
- If the machine is still in use, the machine owner replies with Item in Use. The reclamation workflow finishes without releasing any re-sources.
- If the machine owner does not reply to the reclamation request within the defined period, the lease time will be adjusted in line with the reclamation request settings.
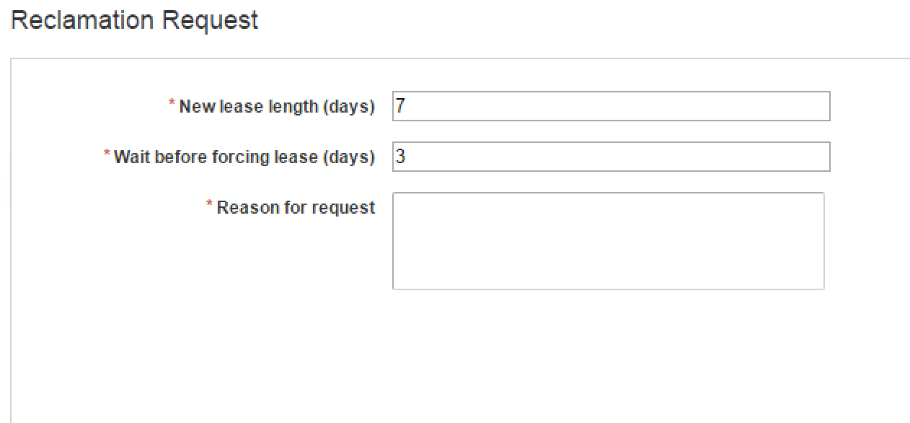
Fig 5: Reclamation request
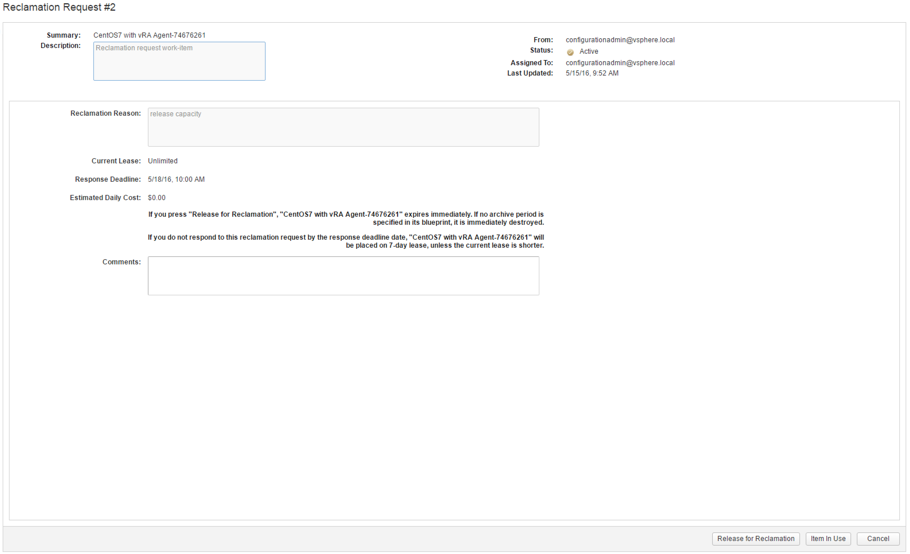
Fig. 6: Notification of a reclamation request
15.3 Capacity reports
As well as requiring the ability to release resources, it is crucial for admin-istrators to be able to proactively monitor the environment to identify capacity issues and costs savings. vRealize Automation offers a set of reports, which indicate capacity issues and potential cost savings. These reports can be shown on the home screen by adding appropriate port-lets. To add a portlet, work through the following steps:
- Navigate to the Home page.
- Click on the Pencil menu on the right hand side of the screen and choose Add Portlets.
- Select a portlet to be added to the home screen.
vRealize Automation offers the following reports for capacity and cost savings:
- IaaS Capacity by Usage by Group: Displays the number of machines owned by users in each business group and the total resources used by those machines.
- IaaS Capacity usage by Compute Resource: Displays the number of machines provisioned on each compute resource and the total re-sources used by those machines.
- IaaS Capacity Usage by Owner: Displays the number of machines for each owner and the total resources used by those machines.
- Business Groups Resource Allocation: Displays total allocations of resources for all business groups.
Once the portlets have been added to the home screen, tenant adminis-trators have the ability to monitor and review the reports online. They also have the possibility to download the report data as a CSV file (see Fig. 7).
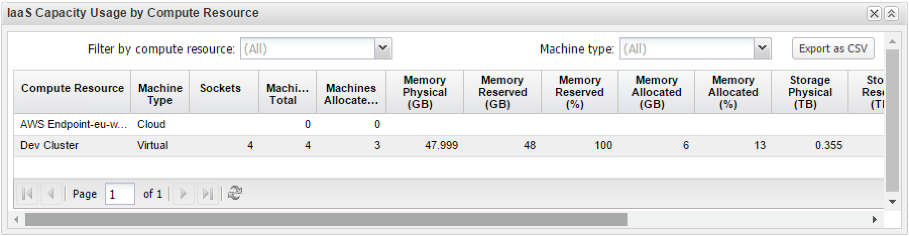
Fig. 7: IaaS capacity usage by compute resource portlet
Alternatively, you can review idle machine reports in vRealize Opera-tions by performing the following steps:
- Log in to vRealize Operations by navigating to https://<<vrops-host>>.<<domain>>/vcops-web-ent.
- Click Content in the navigation area on the left hand side.
- Choose Reports.
- Select one of the following reports:
- Idle VMs report.
- Powered Off VMs report.
- Oversized VMs report.
- Click the Run Template button in the Report Template header.
- Choose an object group to define the basis for the report and click OK.
- Click on Generated Reports.
- You can download the report as CSV or PDF.
15.4 Summary
This chapter demonstrated how deployed resources within vRealize Automation can be monitored. We went into depth with reclamations, which are an important tool in helping you reclaim resources (when your capacity is getting low or if you need to reduce costs). For this purpose, there are several different reports available in vRealize Automation. However, if you have vRealize Operations running, you can also configure an endpoint to have more detailed reports.
Recent Comments