
In the previous chapters, we have shown you how to create and configure blueprints. We also discussed how each blueprint must be published before it can be added to the service catalog. However, the service catalog also needs careful planning. Before the implementation begins, several considerations must be kept in mind:
- How to design the service catalog
- How to group the different catalog items to services?
- Who can access the services and catalog items?
- Which permissions are granted on the catalog items?
- Is there any approval process needed?
The following chapter addresses these issues and demonstrates how to build the service catalog. Before digging into the implementation itself, the most important points regarding the service catalog should be reviewed (see Fig. 1):
- The service catalog hosts services. So far we have only dealt with IaaS services, but XaaS services can also be published.
- You can navigate to the service catalog by clicking on the Catalog menu tab.
- A single published item (e.g. blueprint) is called catalog item.
- Catalog items (e.g. published blueprints) are grouped into services.
- Provisioned resources are accessible within the Items
- Users can perform actions on items. There is a set of predefined actions (e.g. turn on/off a machine, reset a machine, connect via remote desktop connection), but it is also possible to implement your own actions using Orchestrator and to associate it with an item or blueprint.
- Entitlements describe permissions on a service, catalog items or actions.
- Before being able to add a blueprint to the service catalog, it must have been
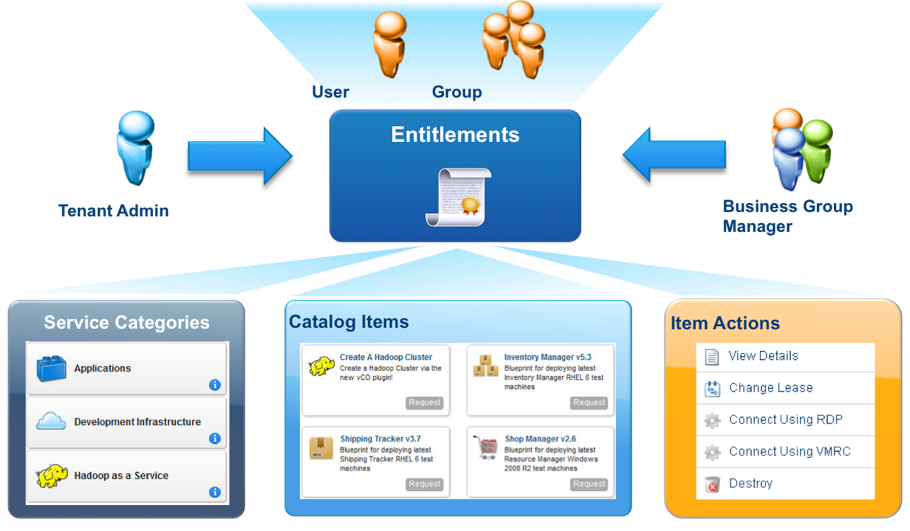
Fig. 1: Service Catalog overview
This chapter only focuses on setting up the service catalog, assigning permissions and using approval policies. Other topics like changing the user interface of a virtual machine request form or working with the XaaS Service Designer to build own request forms will be covered in the custom properties chapter respectively in the XaaS chapter.
14.1 Service Catalog design
The service catalog represents the core interface between a cloud provider and its consumers, hence it acts like an online shop for IT services. As a consequence, setting up a catalog should be done with care. There are many things to take into consideration:
- First of all, the catalog should be easy to use and provide services to the end users that are really needed.
- In addition, the service catalog should allow end users to have a granular pick as well as a fixed choice. In practice this means, while some companies only offer certain predefined instance types, other companies allow end users to order fine-grained virtual machines that fit to the requestors needs. In order to build such request forms, technical tools like the Service Designer or the use of custom properties is needed.
- The catalog should also support integrating service lifecycle processes such as registering a resource with an asset management system.
14.2 Configuring the Service Catalog
The most important steps to configure a service catalog are:
- Create services
- Manage catalog items
- Create entitlements and assign permissions
On the following pages, we will show how these tasks can be achieved.
14.2.1 Creating services
In order to create a new service within the catalog, the tenant administrator or the service architect role is required. If these conditions are met, we can perform the following tasks:
- Navigate to the Administration > Catalog Management > Services
- Click the [+ New] icon in the header of the Services The appropriate window opens (see Fig. 2).
- Assign a Name for the new service.
- Provide a Description for the service.
- Optionally, you can upload an icon for the service (the icon will be displayed within the service catalog).
- Set the Status to Active (an inactive status will prevent the service to appear in the service catalog).
- The Hours field is optional as well. It specifies the timeframe when support is available for the service.
- Specify the service owner in the Owner
- Define the Support Team for the service.
- If there is a downtime due to maintenance, you can specify a time interval in the Change Window
- Click on Add to save the service.
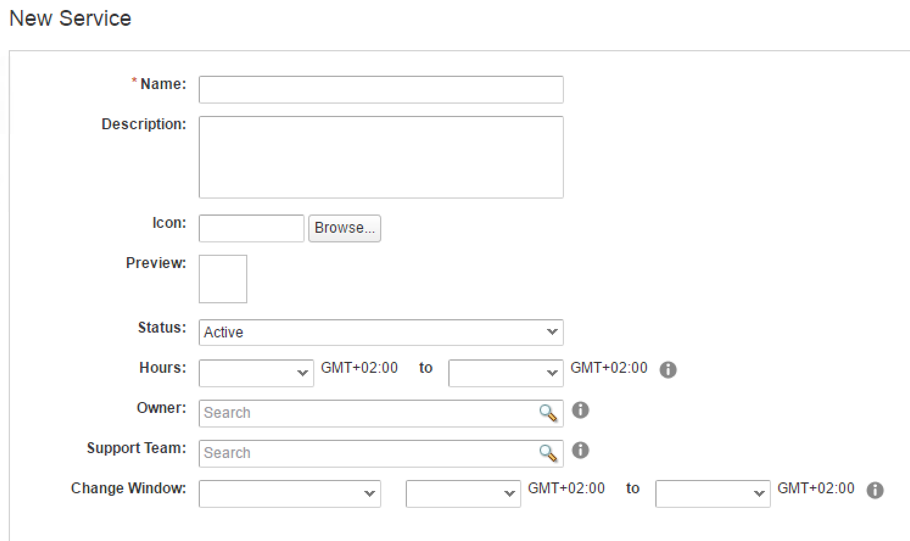
Fig. 2: Creating a service
14.2.2 Managing catalog items
Once a service has been created, it is possible to add catalog items to it – for that, a tenant administrator, catalog administrator or business group manager membership is required:
- Navigate to the Administration > Catalog Management > Services
- Select the service to which you want to add catalog items.
- Click the Manage Catalog Items
- Click on the [+] icon to add a catalog item.
- From the Select Catalog Items dialog box, choose the blueprints to be added and click OK.
- Click the Close
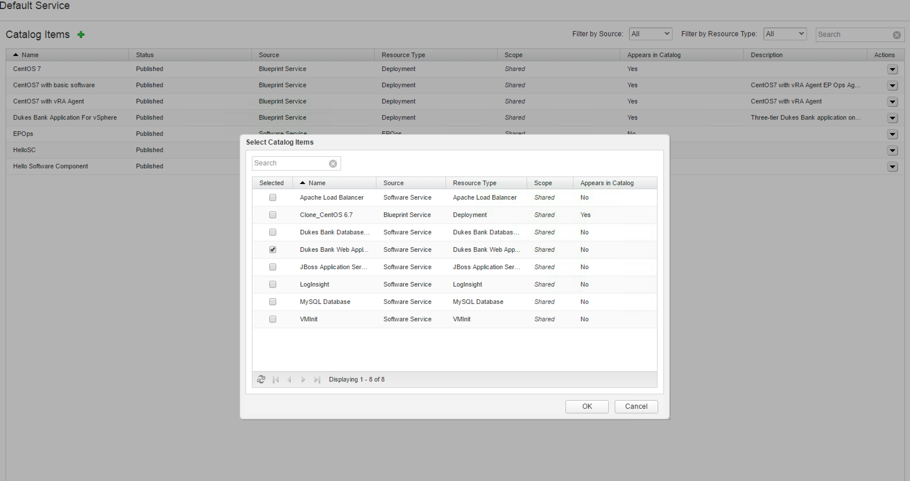
Fig. 3: Manage catalog items
14.2.3 Creating entitlements and assign permissions
The next step in the configuration procedure is to assign the appropriate permissions. vRealize Automation uses entitlements for assigning permissions on catalog items to users and groups. An entitlement saves the following information:
- Basic entitlement information (e.g. name, description)
- A business group
- The users and groups
- Status (Draft or Active)
- Expiration Date
- Entitled services
- Entitled catalog items
- Entitled actions
To create an entitlement, follow the steps as described here:
- Navigate to the Administration > Catalog Management > Entitlement
- Click the [+ New] icon to add a new entitlement.
- Assign a Name to the new service.
- Provide a Description of the service.
- Configure an Expiration Date for the entitlement.
- Set the Status to Active (an inactive status will prevent the entitlement to work)
- Choose a Business Group for the entitlement.
- Specify the Users & Groups to whom the permissions will be assigned.
- Click on Next to navigate to the Items & Approvals page (see Fig. 4).
- Within the first column in the Entitled Services area, click the [+] button to add a service.
- Check all the services, which will be added to the entitlement.
- Optionally, use the Apply this Policy to selected items dropdown list to choose an Approval Policy.
- Click OK.
- Within the second column in the Entitled Catalog items area, click the [+] button to add a catalog item.
- Check all the blueprints, which should be added to the entitlement.
- Optionally, use the Apply this Policy to selected items dropdown list to choose an approval policy.
- Click OK.
- Within the third column in the Entitled Actions area, click the [+] button to add a catalog item.
- Check all the Actions, which should be added to the entitlement.
- Click OK.
- Click Add to save and end your entitlement configuration.
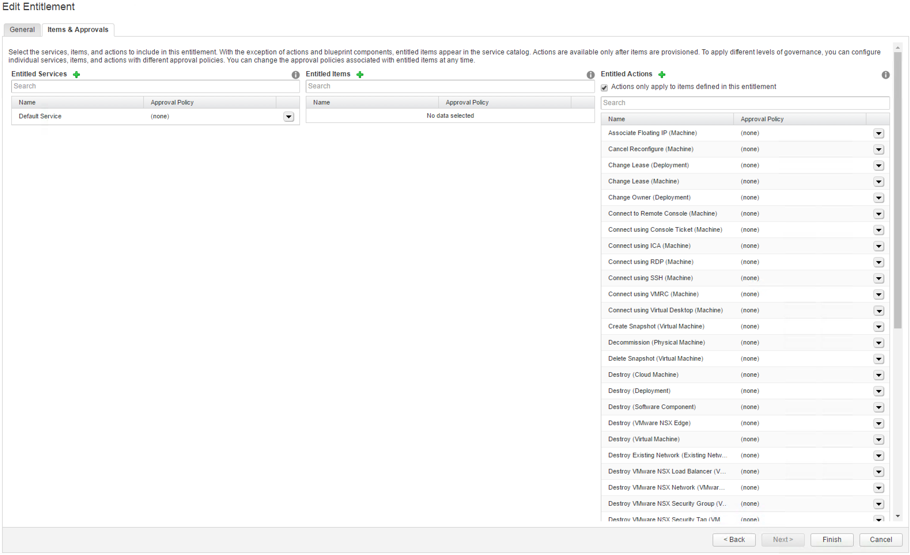
Fig. 4: Setting up an entitlement
In case there is more than one entitlement with associated approval policies, you should consider the activation orders. This can be achieved by completing the following:
- Navigate to the Administration > Catalog Management > Entitlements
- Click the Prioritize
- Rearrange the order of the entitlements.
- Click Update respectively Update & Close.
| Hint: Entitlement and business groups
Entitlements depend on business groups (that’s why you can only choose users from within the selected business group when creating an entitlement). So if you want to entitle different business groups for a shared blueprint, you should create an entitlement for each of these business groups. You can also consider creating different entitlements for a business group to assign different sets of permissions. |
14.3 Approval processes
Like many other services in a company, requesting a service from the service catalog needs some approval from time to time. vRealize Automation supports approval processes for the requesting of machines. Approval policies can have one or more levels of approval. Each level specifies one or more approvers and the condition that triggers the approval. Specifying conditions for approvals can be quite a powerful tool. For example, you can specify that machines with low costs can be provisioned without any approval. Whereas expensive machines would need manual approval in order to proceed with the provisioning.
When specifying approvers, specific users or groups can be selected. Alternatively, if approvers are not known beforehand, they could also be chosen dynamically from the request itself. When choosing a group for approval, it must also be configured whether to allow anyone from the group to approve or whether all members of the group must approve.
Fig. 5 shows a sample approval process with two stages. The first stage specifies technical approvers, in the second stage financial approvers are specified. Only if there is approval from an approval member at each stage, the provisioning can begin.
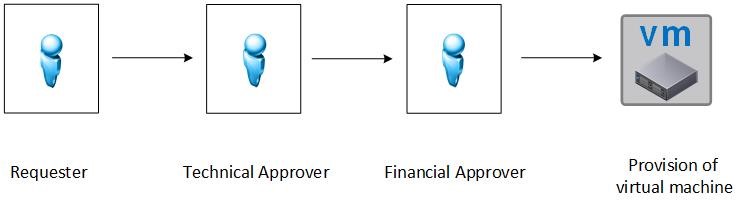
Fig. 5: Approval process
It is worth noting that the levels specified in an approval can be of different types:
- Pre-approval levels specify users and groups who have to approve a request before provisioning.
- Post-approval levels specify users and groups who have to approve a request after provisioning. While it may not be very common to specify post-approval levels, there might be relevant use cases from time to time (for example, if there is somebody who has to check that a machine is working correctly, or the machine has to meet certain constraints).
Setting up an approval policy requires a tenant administrator or approval administrator membership. The procedure itself involves three distinct steps:
- Specify the approval policy information.
- Create one or more approval level.
- Configure an approval form.
14.3.1 Specifying approval policy information
When creating an approval policy, the first step is to define the approval policy type, name, description and status. There are different kinds of approval policies:
- Approval policies for requests
- Approval policies for catalog items
- Approval policies for resource actions
Actually, there is not much difference between these approval policies – depending on the type of approval policy, different information is shown or can be requested from the approver on the approval form.
Perform the following steps to create an approval policy:
- Change to the Administration > Approval Policies
- Click the [+ New]
- Choose the appropriate approval policy type.
- Click OK.
- Provide a Name and optionally a Description for the approval policy.
- Set the Status to Active in order to be able to use it.
14.3.2 Creating one or more approval level
The next step involves setting up the different levels:
- On the Pre-Approval or Post-Approval page, click the [+]
- Provide a Name and optionally a Description.
- Select if the approval is based on a condition. You can choose between Always Required or Required based on conditions. If you select the latter, you can form up a clause of condition. These can be linked together by the following operators: ‘and’, ‘or’, ‘or not’.
- From the Who are the Approvers section, choose if you want to select Specific Users and Groups, Determine approvers from the request or Use event subscriptions (events are covered in the extensibiliity chapter).
- Select if Anyone can approve or All must approve.
- Click Add.
- Click Add
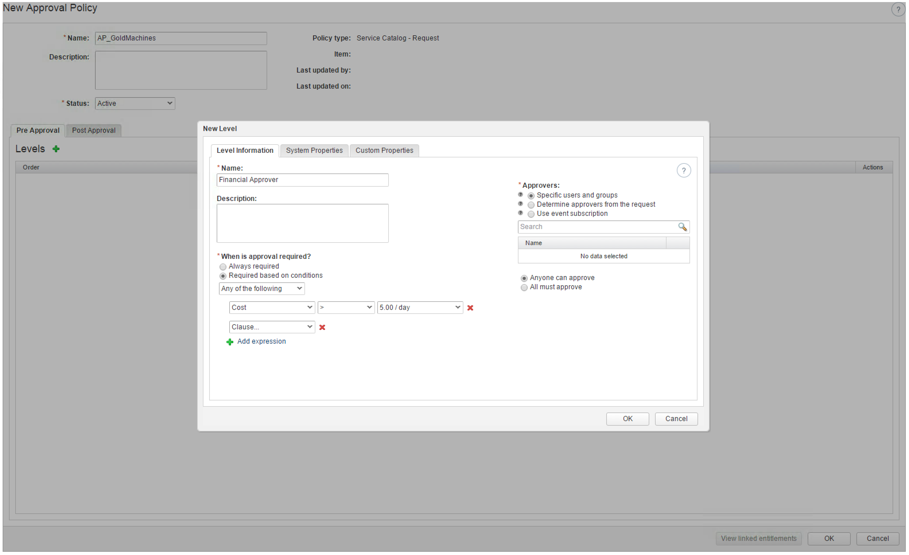
Fig. 6: Configure an approval level
14.3.3 Configuring an approval form
Depending on the kind of approval policy type you have selected, it is possible to configure the approval form. Approvers can change the values of system properties for machine resources settings such as CPU, lease, memory or custom properties. If any custom properties are changed, custom properties defined in the blueprint or at any other place will be overridden. Approval forms can be configured as follows:
- Depending if you want to configure a Pre-Approval or Post-Approval policy type, select the level which should be configured and change to the Approval Form tab (see Fig 7).
- Select the system properties to be configured during runtime.
- Add any custom properties which should be allowed to be configured during the pre-approval phase.
- Click Add.
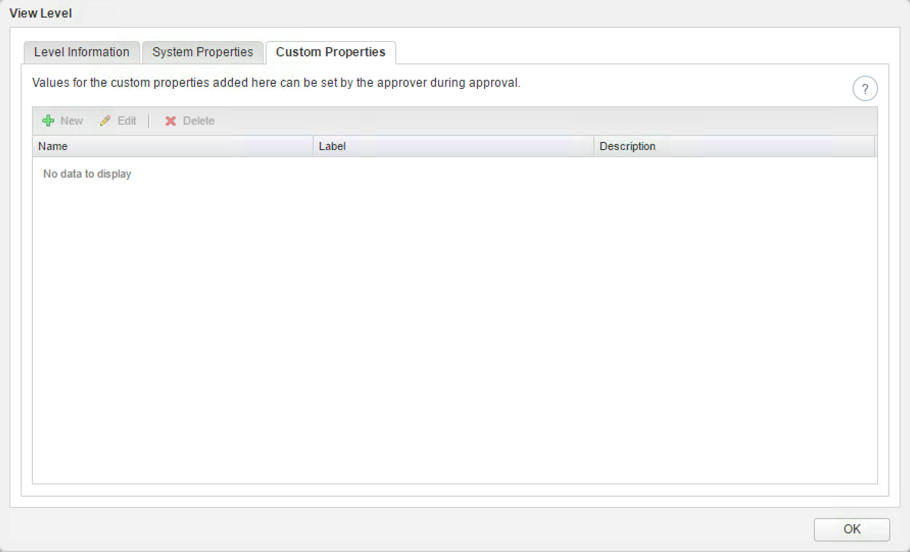
Fig. 7: Configure approval level settings
14.4 Using the service catalog
At this point in time, we can finally use the service catalog to request and provision new resources. When end users are logged into the service catalog, they usually see the following tabs within the user interface:
- Home screen – this page can host different widgets, which show the most important information to users. By default, only the My Inbox widget is shown. However, end users can customize the page and add additional widgets to the home screen.
- Catalog – the service catalog.
- Items – the resources that have been provisioned.
- Requests – all the requests that have been issued and are currently processed or have failed.
14.5 Configuring notifications
From time to time users have to interact with vRealize Automation, even when they do not want to provision new resources or use existing items. For example, when they are part of the approval process. In these cases, it is very useful to receive notifications via email. Before such notifications can be activated (on a per-user basis), they must be globally configured:
- Log in into vRealize Automation with a tenant administrator role membership.
- Navigate to the page Administration > Notification > Scenarios.
- Review the scenarios for which to send notifications (see Fig. 8).
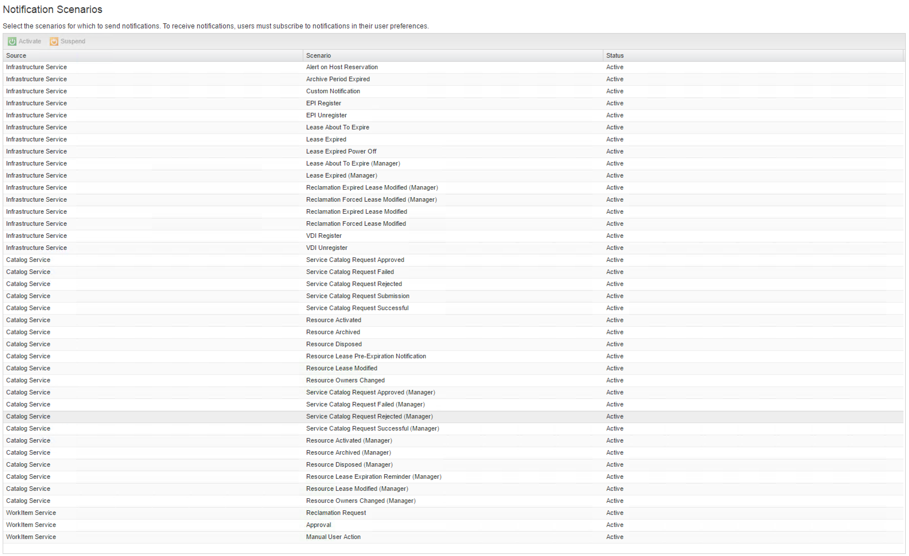
Fig. 8: Notification scenarios
Once this has been done, users can subscribe to notifications in their user preferences:
- Navigate to the Home
- On the upper right hand side, click the Preferences
- If you want to assign a delegate, type the name of the delegate in the Search box and click the Search
- Click Apply.
- In the Notifications area, select a language for the notifications.
- Activate a protocol (e.g. email)
- Click Apply.
- Click
14.6 Requesting resources
All the published services can be found within the catalog tab. To request a machine is a relatively easy process, users only have to click on the service they want to provision. Once a catalog item has been chosen, a new window opens (see Fig 9). Users can see the blueprint and all its machines and software components to be provisioned. It they click on a machine blueprint, they can see and modify the following data:
- How many deployments will be provisioned?
- The CPUs for the machine.
- The amount of Memory (MB).
- The storage size in GB.
- A Description.
- The Reason for Request.
In addition, there is also a Storage tab, which helps you to manage your disk drives. Custom properties can be seen and edited by clicking on the Properties tab.
If you have a software component deployed as part of your blueprint, you can see them in the Request screen as well.
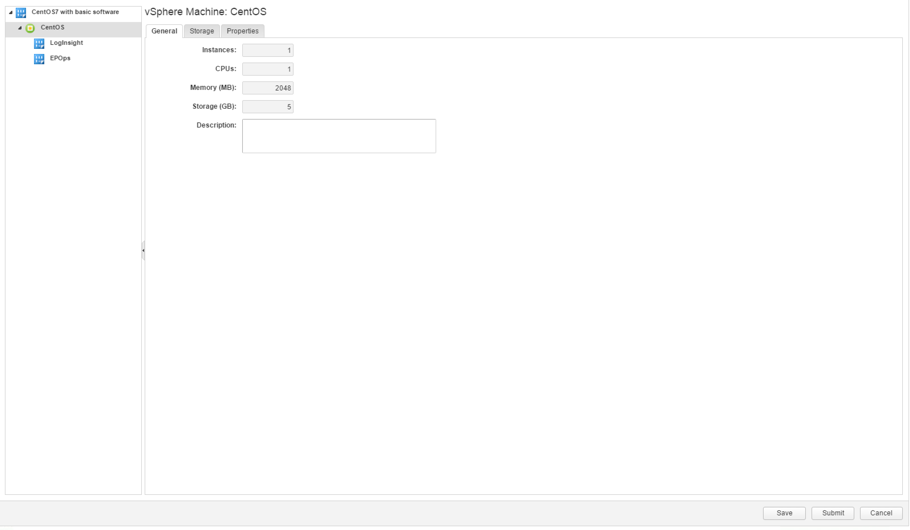
Fig. 9: Blueprint request from the service catalog
Once you have provided all the necessary input, you can submit the request. Saving a request does not start the provisioning – it only saves the request.
14.7 Viewing requests
Once a request has been submitted, vRealize Automation immediately starts the provisioning workflow. You can see its current status by clicking on the Requests menu (see Fig. 10). To keep track of your own requests, you can filter on requests using the dropdown lists Submitter and Filter by State. Furthermore, you can see the provision details of a request, by clicking the View Details button.

Fig. 10: Viewing requests
14.8 Approving requests
If you are a member of an approver group and a machine with an approval policy has been requested, you will be able to see the incoming request within your inbox on the home screen. An approver can open the appropriate links from the inbox and view the details of the request.
14.9 Managing virtual machines
Machines that have been successfully provisioned can be managed via the graphical user interface of vRealize Automation (Items tab). vRealize Automation will show the machines based on the user role membership (user, support user, or business group manager).
By default, users can perform the following actions on a machine:
- Create snapshots
- Configure the machine
- Change the lease time
- Re-provision the machine
- Expire the machine
- Install the VMware tools
- Connect by using RDP
- Connect by using VMware Remote Console
- Connect via SSH
- Power On, Off, Restart
The actual actions available at runtime differ based on the permission granted to the users. You can also provide additional actions via Orchestrator.
14.10 Release a machine
If a machine is not needed anymore, it can be released, even when there is lease time remaining. As mentioned before, there is also a difference between Expire and Destroy. While expiring sets a machine to archive mode (the machine remains switched off until the archive period is finished and eventually gets deleted), destroying a machine means you immediately release all of its resources.
14.11 Summary
This chapter showed us how to configure the service catalog. We also covered the creation of services, how to configure catalog items and set up appropriate permissions. We demonstrated that approval polices are supported in vRealize Automation and which configuration options they offer.
Recent Comments