
In the last chapter, when talking about blueprints, we have seen that the blueprint designer has undergone a substantial facelift in vRealize Auto-mation 7. It now combines the creation of infrastructure blueprints and application blueprints. Big parts of the Application Services (this was a dedicated appliance in vRealize Automation 6) have now been integrated into the vRealize Automation Console.
After having discussed a lot of aspects about infrastructure blue-prints, we want to shift our focus on application authoring and software components. In the remainder of this chapter, we will first explain the basic theory behind software components and then show how to use them to deploy applications and middleware services as well as to in-crease software standardization.
11.1 Foundations of software components
With the new release of vRealize Automation, VMware not only supports the deployment of simple virtual machines, but also the provisioning of complex multi-machine services and multi-tier applications. In the last chapter, we have already shown the new blueprint designer. The same designer is also used to create complex applications.
11.1.1 Benefits of application authoring
Application blueprints can be used to address a bunch of needs in many organizations.
Application deployment acceleration
Deploying new services and applications is a time-consuming issue in many companies. If the application deployment process is not automated, a deployment can even take several weeks to be fully functional working. When using software components, this process can be greatly accelerat-ed and provisioning within minutes or hours is possible. The basic mecha-nism behind the scenes is that vRealize Automation software components trigger scripts once a virtual machine has been successfully deployed. You can use simple scripts as well as complex scripts to install applications like Microsoft SharePoint, Microsoft SQL Server, a MySQL database or something else. If you do not want to implement your own logic, you can use software components to trigger a configuration management tool like Chef or Puppet, which in turn controls the further configuration process on a machine.
Continuous Integration
Application blueprints can also help you with DevOps practices, especially with Continuous Development and Continuous Integration. One of the key characteristics of Continuous Development is the frequent delivery of builds. In addition, we have to ensure code integrity, especially when multiple development teams are working simultaneously on the source code. These requirements can be met by Continuous Integration princi-ples. These principles state using a code repository such as GitHub that maintains different versions of the code and is accessible to the whole development team. Developers in turn commit their code frequently – usually several times a day. Once code is committed, the build phase starts. This involves building, packaging and registering the solution.
The best approach to implement Continuous Integration is – of course – automation. There are already several tools on the market to automate this process by automatically triggering a build phase after a code commit. As a consequence, all the build steps can be run automati-cally.
Such a process is shown in Fig 1. Developers can use GitHub to main-tain their software code. Jenkins is a build server that manages the build phase. There is even a plug-in for vRealize Automation that can trigger the deployments of blueprints and hence push the code rapidly into production.

Fig 1: Automation of a Continuous Development process
Fig 2 shows how Jenkins plug-in for vRealize Automation can trigger a deployment process. We will cover DevOps practices in detail in a later chapter.
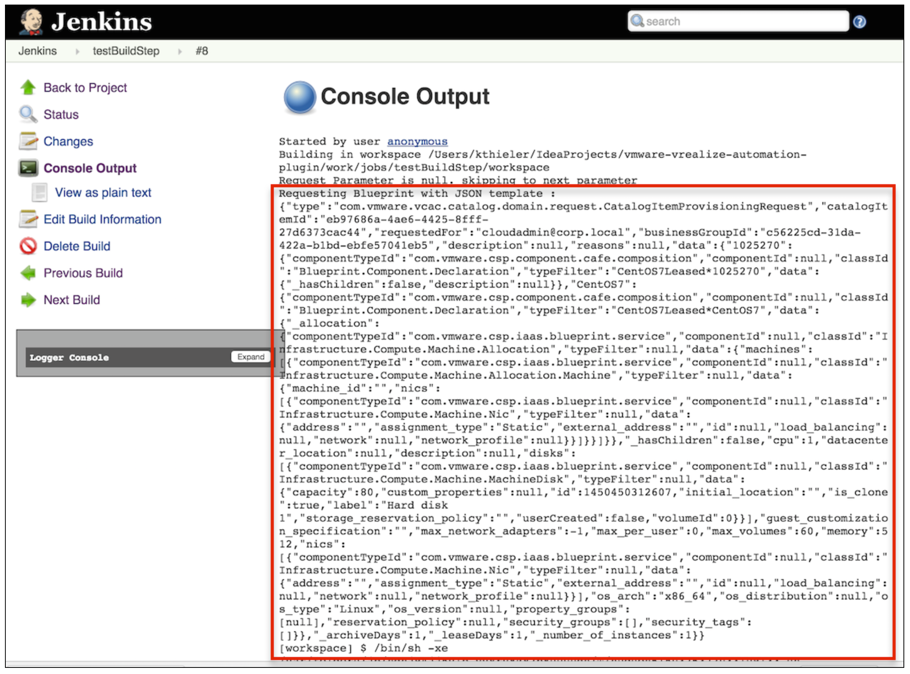
Fig 2: Jenkins plug-in for vRealize Automation
Standardization
Another big benefit of using application blueprints is standardization. Once your application blueprint has been created, users can repeatedly and reliably create, turn-off and re-create their own applications. This results in cost savings, the ability to create multiple environments (for example, for testing, QA and production) and the creation of identical environments for multiple customers.
11.1.2 Prerequisites of authoring software components
The basic idea of creating such applications is easy. First, the software component itself is created. Once finished, a software component can be referenced in a blueprint by dragging it on a virtual machine. Application blueprints can also nest other blueprints. In such cases, the blueprints are also called composite blueprints.
At runtime, vRealize Automation first provisions the virtual machines, and then runs the software components scripts to finish the configura-tion.
However, before being able to create and deploy applications, there are some requirements that must be met:
- First, users need the appropriate permissions (they need at least the infrastructure architect and the software architect permission).
- Second, the virtual machine needs the software bootstrap agent to be installed (we have already described how to install the agent in the last chapter).
11.1.3 Setting up permissions for authoring software components
The first step that is required is to setup the appropriate permissions for software components. We have already described all the vRealize Auto-mation roles in a previous chapter, but it makes certainly sense to recap what kind of roles are important when it comes to blueprint authoring:
- An infrastructure architect creates machine blueprints that can in-clude networking and security settings.
- XaaS architects create and publish XaaS components.
- Software architects are in charge of creating and publishing software components.
- Application architects assemble blueprints and components into applications.
- Catalog administrators add blueprints and applications to services. They also entitle users to request them from the catalog.
Setting up permissions can be done by performing the following steps:
- Navigate to the Administration > Users & Groups > Directory Users and Groups page (alternatively, you can also assign permissions with Custom Groups).
- Within the Search box on the upper right corner, enter the user to that you want to assign permissions for software components and press Enter.
Ensure that the user has Infrastructure Architect, Software Architect and Application Architect permissions. Fig 3 depicts the user interface. - Click Finish to save your changes.
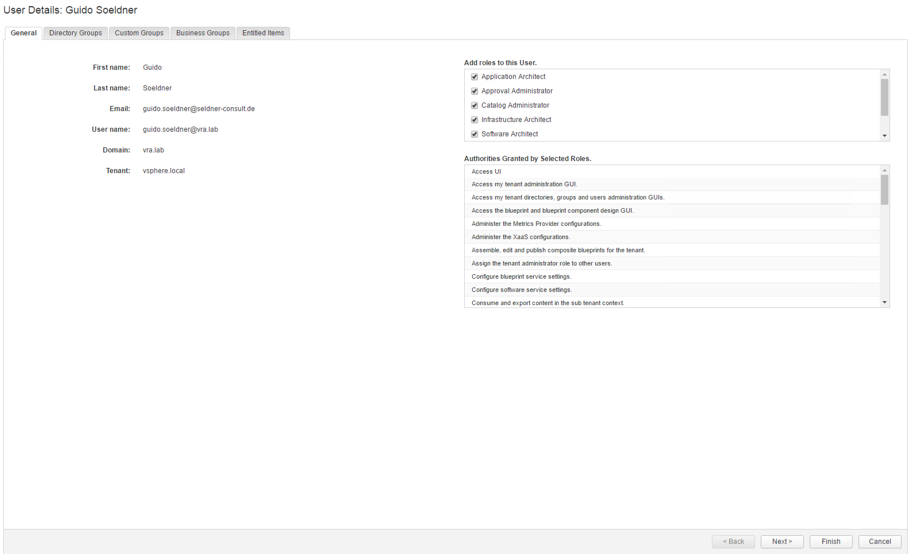
Fig 3: Setting up permissions for authoring software components
11.1.4 Importing existing applications
Before you start to implement your own custom software component, it is always a good idea to check if other people already have done so accord-ingly. Software components can be imported into a vRealize Automation environment, so it is needless to say that a lot of custom effort can be saved. Even if the other software component is not exactly what you are looking for, there might be some inspiration for your own work, because in many ways there is no better way to learn something than to study examples. VMware vRealize Automation already ships with a sample ap-plication – the Dukes Bank for vSphere sample application (we will show how to import and configure the application in the remainder of this chapter).
Besides the already provided Dukes Bank sample applications, there are also other places where you can look for applications:
- VMware has begun to upload sample applications to the VMware Cloud Management Marketplace . At the time of writing this book, there were already four different applications: vRealize Automation LAM + Java Stack, vRealize Automation LAMP Stack, vRealize Automa-tion SharePoint and vRealize Automation Microsoft SQL Server. It is very likely that many other applications will follow (Fig 4 shows the marketplace and Fig 5 shows one of these blueprints).
- Another source for code samples is the VMware sample exchange (which was still under beta at the point of writing this book), which can be found within the VMware Developer Center. Besides service blueprints, you can also find Orchestrator packages, PowerShell scripts and other useful stuff there. The web page itself is depicted in Fig 6.
- VMware also recently started the web page vmware {code} , a web page that primarily deals with DevOps techniques and CloudNative apps. While not primarily related with application blueprints, you might nevertheless find some useful information and inspiration there.
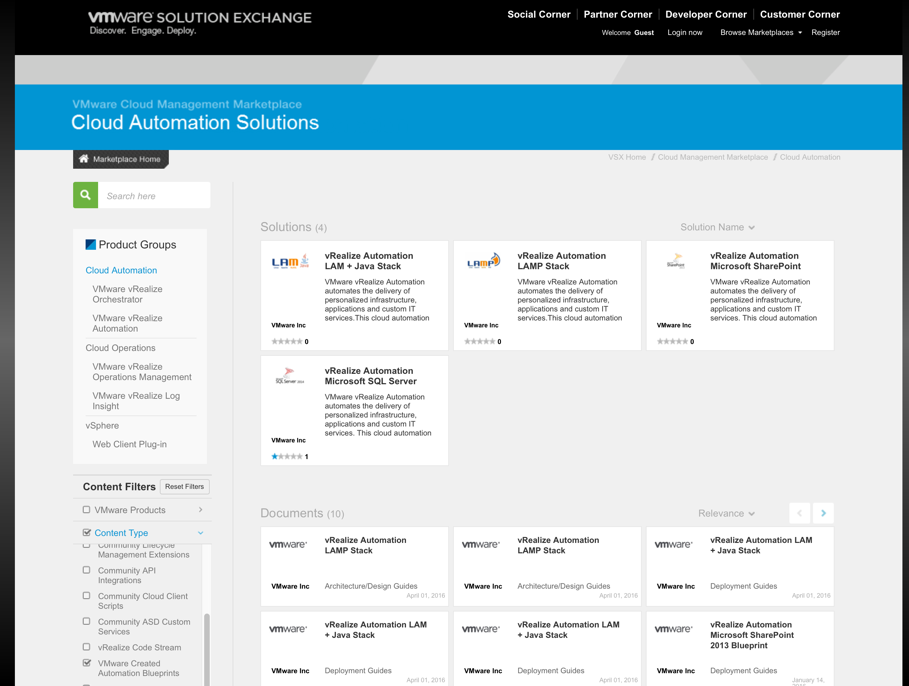
Fig 4: VMware Cloud Management Marketplace
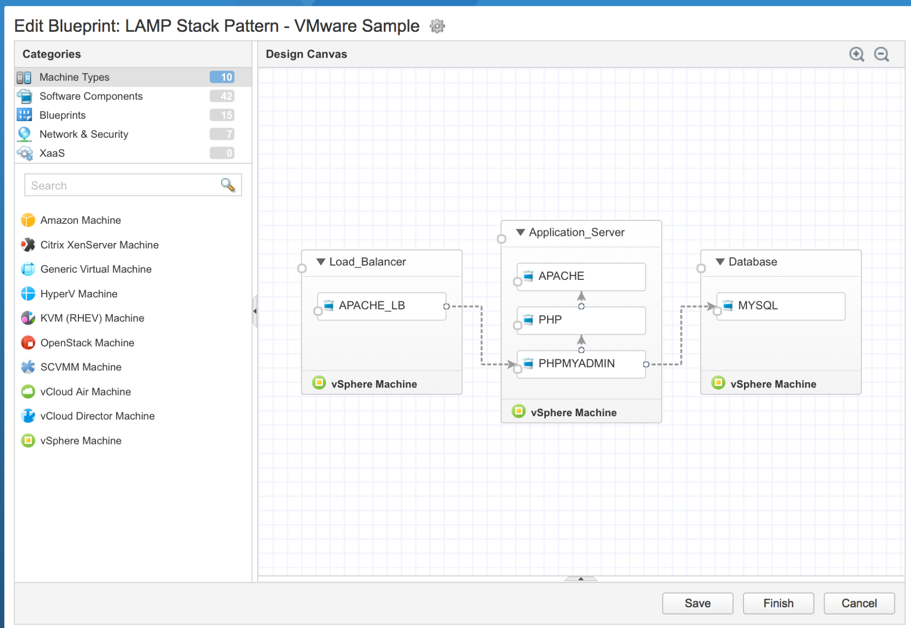
Fig 5: VMware sample LAMP stack
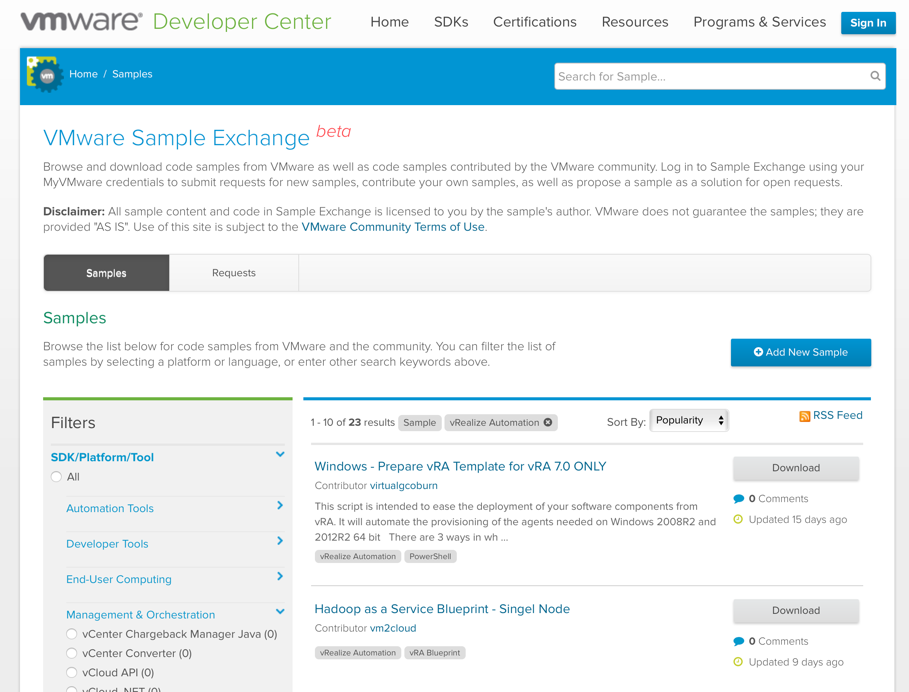
Fig 6: VMware sample exchange
11.1.4.1 Import the Dukes Bank sample application
Now that you have the information where to find sample blueprints, it is now time to take a look on the samples itself. Let’s begin with the Dukes Bank sample application.
However – as always – there are some prerequisites that have to be met before we can begin:
- You need a CentOS 6.x Linux template with a customization specifica-tion. Also don’t forget to install the guest agent as well as the boot-strap agent into the virtual machine template. In chapter 9.2, we al-ready have discussed how to setup a vRealize Automation template, so we will not cover the details here anymore. You also have to disa-ble SELinux on the virtual machine (for information how to do that on CentOS, you will find information on that topic on the CentOS homepage ).
- An external network profile to provide a gateway and a range of IP addresses are needed (we have covered this topic in chapter 7).
- The network profile needs to be associated with your vSphere reser-vation (see chapter 7).
- A business group is needed.
- You need the CloudClient 4.0 installed on your command host. You can download the CloudClient from the VMware Developer Center (please also note that you need Java 1.7 running on your command host in order to start the CloudClient).
Import the Dukes Bank Application
Once all the prerequisites have been met, we can begin with the installa-tion. Perform the following steps:
- Download the Dukes Bank sample application from your vRealize Automation appliance. The URL is https://:5480/blueprints/DukesBankAppForvSphere.zip. Do not unzip the package.
- Run the CloudClient from within the bin-directory.
- Log in as a user with software architect and infrastructure architect privileges (change the command to your environment accordingly):vra login userpass –server https://vra7-app.vra.lab –user configurationadmin@vsphere.local –tenant vsphere.local
- Enter your password.
- Next, before triggering the import process, it is always a good idea to perform a dry-run to validate the content:vra content import –path c:/users/administrator/downloads/DukesBankAppForvSphere.zip –dry-run true –resolution overwrite
- If the dry-run completes successfully, we can import the Dukes Bank sample application:vra content import –path c:/users/administrator/downloads/DukesBankAppForvSphere.zip –dry-run false –resolution overwrite
- Once the import process has been completed (see Fig 7), navigate to the Design > Software components page and check if the import process has been successfully accomplished (see Fig 8).
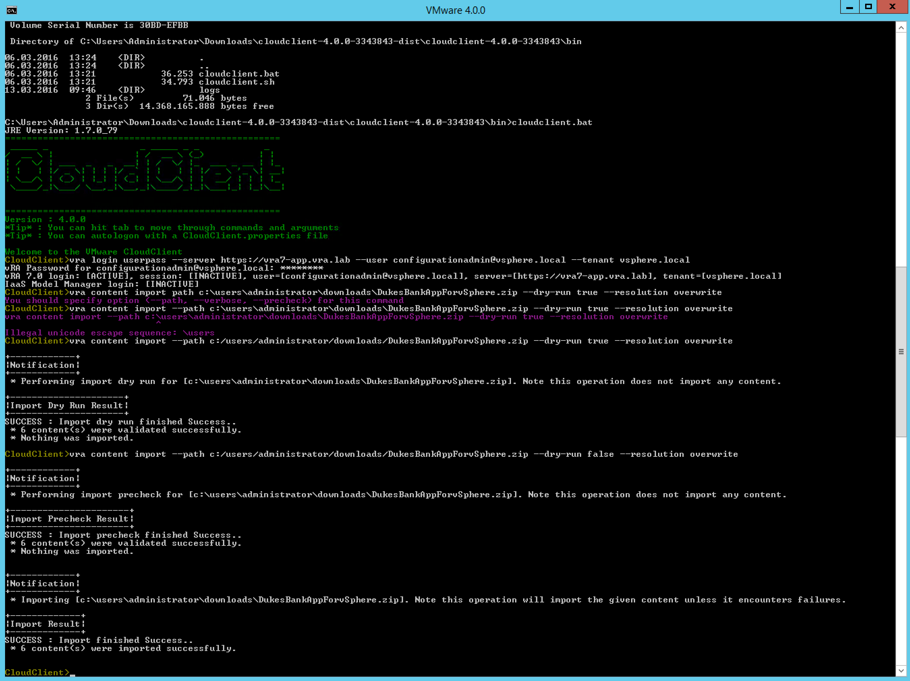
Fig 7: Importing the Dukes Bank sample application
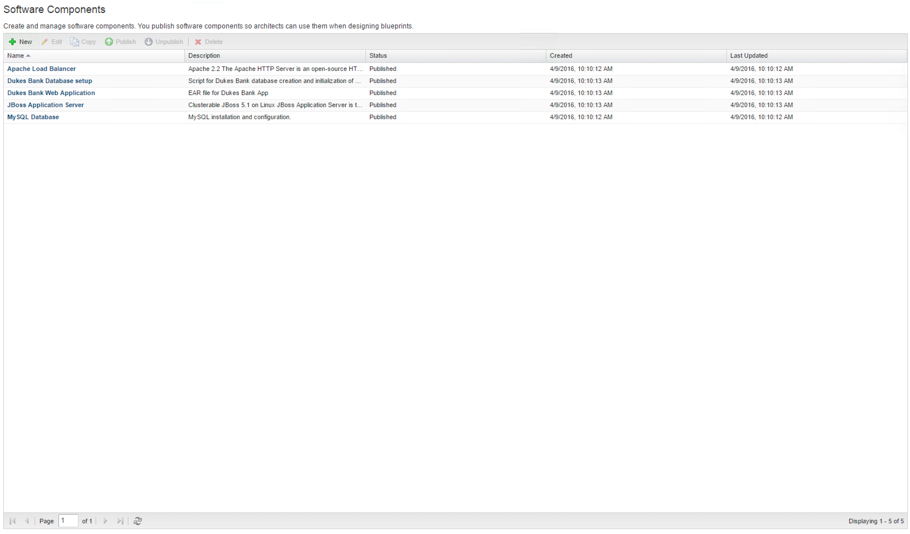
Fig 8: Software components library
Configure the Dukes Bank Application
Once the import has been accomplished, the Dukes Bank must be config-ured. First, we have to map the blueprint machine templates to the vSphere templates in our environment. This can be done as follows:
- Navigate to the Design > Blueprints page and with the Dukes Bank Application for vSphere blueprint selected, click Edit.
- In the design canvas, select the appserver-node template. In the properties section in the bottom of the screen, select the Build Information tab and map the node’s template to your CentOS vSphere template (see Fig 9).
- Switch to the Machine Resources tab and check if the memory settings are at least 2048 MB.
- If you want to test the load balancer functionality, go to the General section and ensure that at least two instances are configured in the Minimum dropdown list.
- Repeat step 2 for the load balancer node and the database node.
- Click Save and Finish.
- Select the Dukes Bank Application for vSphere and click Publish.
- Next, go to Administration > Catalog Management > Services, select the service you want to add the blueprint to and click on Manage catalog items.
- Click on the [+] button and select the Dukes Bank blueprint. Click on Close.

Fig 9: Configuring the Dukes Bank application
Provisioning of a Dukes Bank Application
After having finished the configuration, we can finally trigger the deploy-ment:
- Go to Service Catalog.
- Locate the Dukes Bank Application and click Request.
- In the JBossAppServer and Dukes_Bank_App software component section, provide the FQDN of your vRealize Automation appliance in the app_content_server_ip textbox.
- Click Submit.
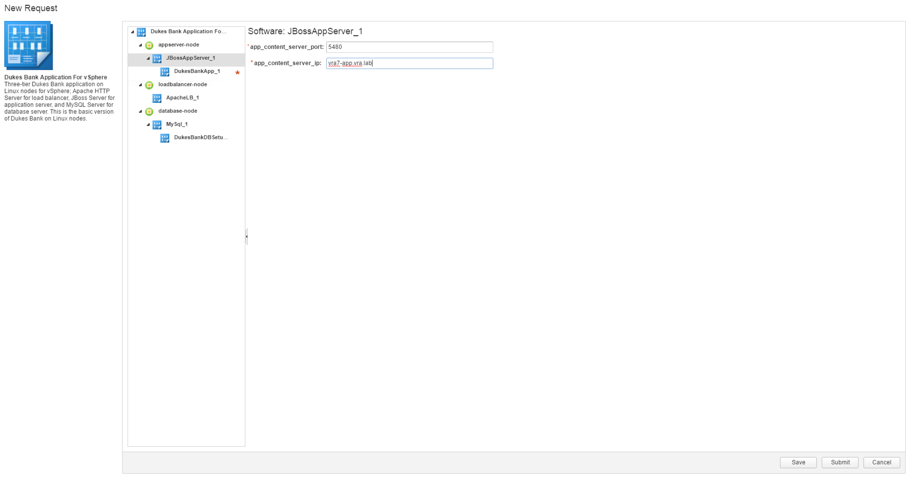
Fig 10: Requesting the Dukes Bank Application
The provisioning will take between 15-20 minutes to complete.
11.2 Designing software components
After having covered the foundations of software components, it is now time to shift the focus on how to create our own software components. From a conceptual point of view, there are three steps that have to be completed when creating a new software component:
- The first step is easy and just defines the name of the software com-ponent and configures if a software component can be directly ap-plied on a machine template or should be nested within another software component.
- The second step lets you define variables that can be used within the software components. Such variables can be pre-defined like the name of a database, but can also be queried from the user at request time (for example, the port on which a website should run on).
- The third step configures the actions that should be run during a machine lifecycle. Currently, software components support four dif-ferent lifecycle stages: Install, Configure, Start and Uninstall. Software components support bash, PowerShell and cmd scripts.
Now, let’s describe the process of creating a software component in detail.
11.2.1 General settings of software components
The first step is easy to accomplish. Perform the following instructions:
- Navigate to Design > Software components and click on the [+ New] button.
- Provide a Name for the software component.The ID will be automatically generated based on the name – however, without blanks.
- Optionally, enter a description for the software component.
- Within the Container dropdown list, select where you want your software component to be applicable. Software components can be directly applied to machine templates or they can be nested within other blueprints. We will talk about nesting later in this chapter.
- Click Next to continue.
11.2.2 Settings properties on software components
The Properties dialog is slightly more difficult to understand, so before continuing with our configuration, we should cover some theory first. Basically, the vRealize Automation uses properties to pass variables to the software component script. For example, if you have a variable named a, and a “Hello $a” script, the script will replace the variable with the pro-vided property before it is invoked.
When creating a property, there are several options available:
- Encrypted: Once a property is encrypted, the value is not shown within the user interface anymore. This is particular useful for sensi-tive information such as passwords.
- Overridable: Setting a property as overridable is useful if you want to set a default value for a property, but still permit application archi-tects to edit that value when they are using the software component to assemble an application blueprint.
- Required: Once activated, setting a value for the property is obligato-ry. If you want the user to provide a custom value for a property, you also have to set the Show in Request option for the corresponding custom property on the blueprint.
- Computed: You can use computed properties to assign values to properties at runtime by implementing the logic in a script. vRealize Automation provides different stages for the execution of software components (INSTALL, CONFIGURE or START) and computed values can be assigned in one of these stages. For example, you can assign a value during the START time and access the property’s value at a later time in the software component’s lifecycle.
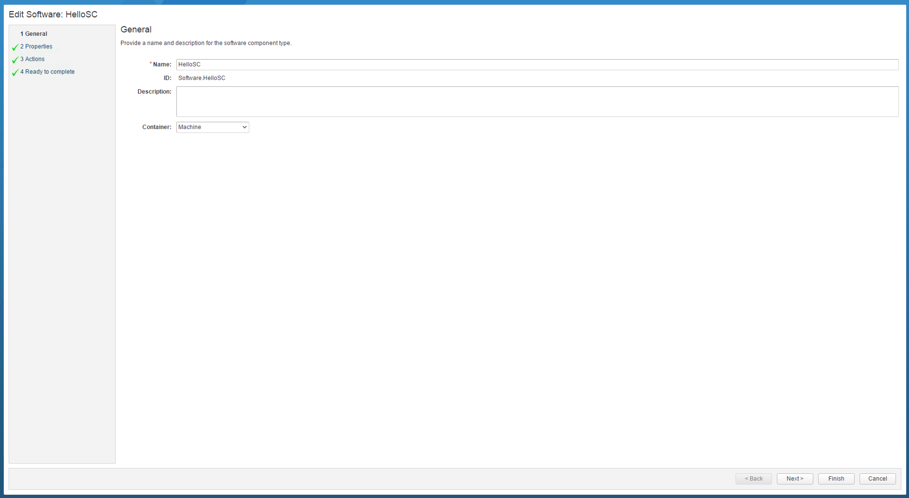
Fig 11: General settings of software components
| How to use the Computed Property
If you select the computed property, you have to leave the value for the custom property blank. However, based on the script type you are using with your soft-ware component, the syntax for the computed property is slightly different. Imagine you are defining a variable named product, then use the following syntax for accessing and setting a value - Bash ($product): export product = “vRealize Automation 7” - Windows CMD (%product%): set product = vRealize Automation 7 - PowerShell ($product): $product = “vRealize Automation 7” |
In addition, you have to configure the datatype for the property. Software components support the String, Integer, Decimal, Boolean, Array and Content datatypes. The Integer, Decimal and Boolean datatypes are straightforward, so there is not too much to discuss about that. The other ones are slightly more interesting, so it certainly makes sense to focus on them a little bit.
Using the String datatype for properties
A String value can be a String or the value bound to another String prop-erty. While the first case is pretty easy, the second option helps you to compute new Strings based on other String values. This can be best ex-plained with a short example. Imagine, you want to construct the JDBC String for a Microsoft SQL Server: As input you need the server name, the database port and the database name. You can configure a property for each of these three input values and define a fourth String property that actually builds your jdbc String. The definition looks like this:
jdbc:jtds:sqlserver://$dbServer:$dbPort/$dbName;
Fig 12 shows the configuration in the vRealize Automation user interface.

Fig 12: Setting up String properties
Using the Array datatype for properties
You can use the array datatype to define an array of String values. Each of the enclosing Strings can be a simple String or a constructed String as shown in the previous example.
Once again, a simple example is most useful to understand the array datatype: We want to invoke a set of simple commands once a machine has been provisioned. Hence, we define an array named script (see Fig 13):
[“yum update”, “yum install httpd”, “systemctl start httpd.service”]
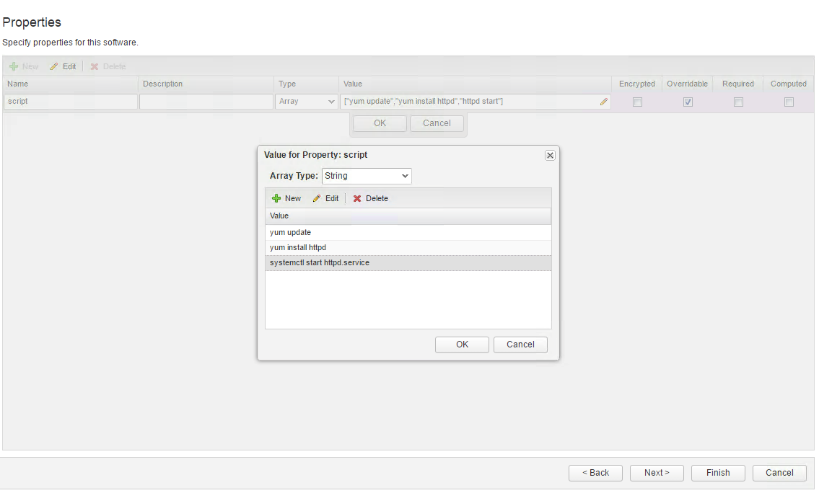
Fig 13: Configuring an array property
Each entry in the array represents a command. Later in the script part, we can extract each value of the array and run it as part of the bootstrap script. But how to reference the array property within the script part?
When using the bash shell, you can type ${script[@]} to access the whole array and ${script[N]} to access an individual element within the script array. In order to run our script line by line we need the following script:
#!/bin/bash

for (( i = 0 ; i < ${#script[@]}; i++ )); do

      ${script[$i]}

done

exit 0
For PowerShell, the syntax is slightly different. To reference the whole array, you can just type the property variable ($script) and to reference a specific element in the array, type $script[N]. In order to invoke some simple commands from an array, we can use the following script:
foreach($c in $script){

       Invoke-Command -ScriptBlock {$c}

}
For the Windows CMD shell, we can reference each element by typing %script_N%. A sample usage looks like this:
for /F "delims== tokens=2" %%A in

 ('set script_') do (

%%A )
Using the Content datatype for Properties
The content datatype is very useful for more complex scripts as it allows you to download the content from an URL to the virtual machine. Once downloaded, the location of the file is passed to the script. Hence, the content datatype can be used for the following use cases:
- You want to download additional software to the virtual machine and install the software once the machine is provisioned. For example, you can define a content property name ep_ops_url for the vRealize Operations EP Ops agent. The artifacts are hosted on a web server and the URL points to that location. The software agent downloads the artifacts from the specified location into the deployed virtual ma-chine.
- You do not want to store the script logic within your software com-ponent. Instead, you host all your scripts on a public webserver such as GitHub or an Amazon AWS S3 repository and download the script at provisioning time. Once downloaded, you can access the permis-sions on the script and run it.
Once again, we will show a short example to clarify things. We will create a file with the following script (for CentOS 7):
#!/bin/bash

yum update

yum -y install httpd

systemctl start httpd.service
Next, upload the file on a web server. In our case we will upload it to Amazon AWS S3. Now we can create a content property that points to the S3 URL as shown in Fig 14.

Fig 14: Configuring a content property
In order to run the script, we also need an action. Fortunately, this is quite easy (bash script is shown):
#!/bin/bash

chmod 777 $script

sh $script

return 0

Fig 15: Configuring actions
11.2.3 Software component actions
After having configured the properties it is now time to implement the actions. There are four different hooks where you can run your actions: Install, Configure, Start and Uninstall. If you want to reboot your virtual machine after having run a script, you can also check the Reboot check-box.
You can implement a script for each of these four different lifecycle hooks. These scripts can also pass state to each other. In such a case, it is best to define a String, Integer or Decimal property (content and array properties are not supported for passing stage) and set its value appro-priately. The subsequent scripts can then read the value of the variable.
| Passing values between software components
Values can also be passed between different software components (once you are using nested blueprints and your software components are assembled to an application blueprint). However, in that case, there must be a dependency de-fined between the components on the blueprint designer (see Fig 17). |
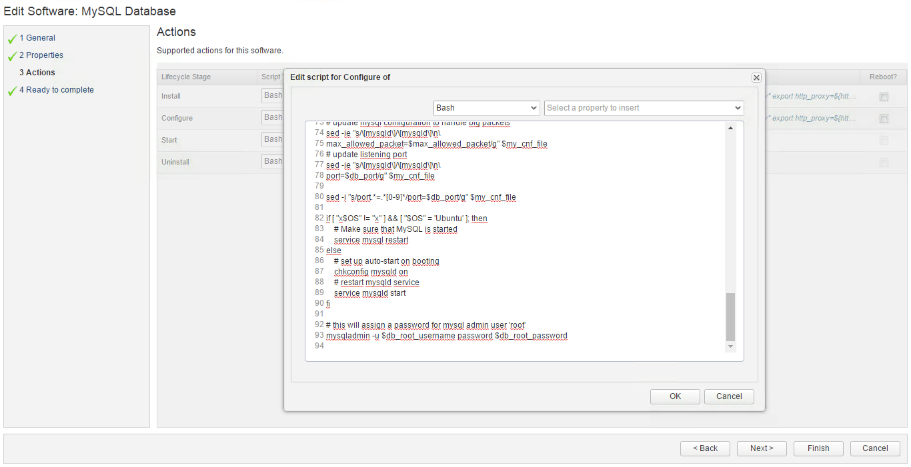
Fig 16: Implementing an action
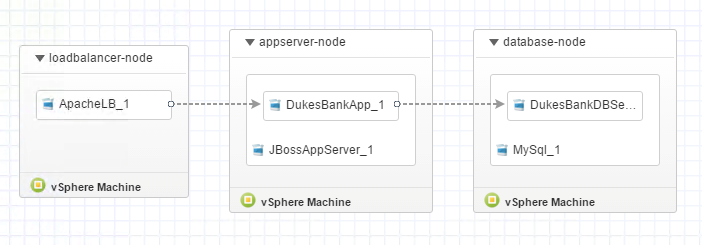
Fig 17: Dependencies between components
Last but not least you should include exit and status codes for your scripts. The following table shows the different exit codes for bash, Pow-erShell and Windows CMD:
| Script type | Success status | Error status |
| Bash | return 0 exit 0 | return non-zero exit non-zero |
| PowerShell | exit 0 | exit non-zero |
| Windows CMD | exit /b 0 | exit /b non-zero |
11.2.4 Assembling application blueprints
Once you have finished the implementation of your software component, you are ready to assemble your application blueprint. This can be done as follows:
- Navigate to the Design > Blueprints page.
- Create an existing blueprint or create a new blueprint.
- From the Categories list on the left upper side, choose Software Components.
- Drag your software component on your machine template (or on an existing software component if you want to nest software components).
- Select your newly added software component and review the Properties section (see Fig 18).
- Optionally, change the property settings (also check if your users should provide input to a software component’s property by checking the Show in Request option).
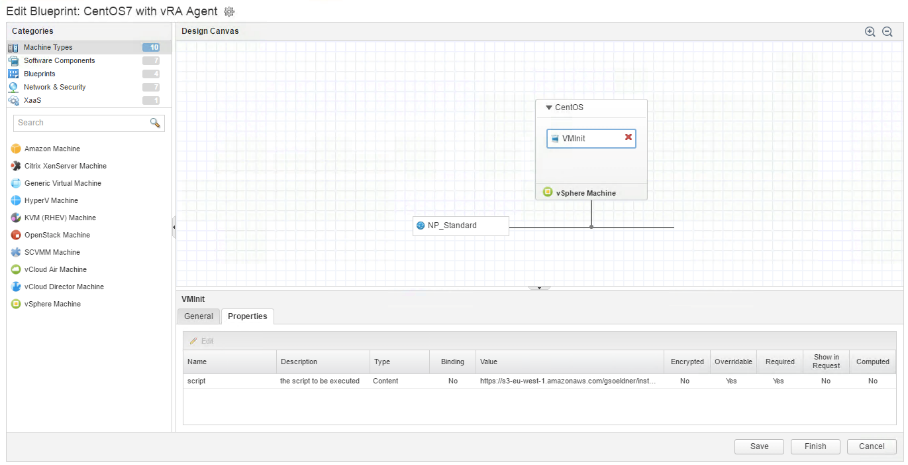
Fig 18: Assembling application blueprints
11.3 Using nested software components and blueprints
When you are creating software components, you might find that you are continually describing the same set of resources in different application blueprints. However, instead of repeatedly adding them to each of your blueprints from scratch, consider using nested software components.
What are nested software components and blueprints
Nesting software components means that you can link a software compo-nent from within another software component. The only thing what you have to do is to create a separate software component that you want to reuse and then drag the software component on the outer software component on the blueprint designer.
Fig 19 shows the Dukes Bank Application with nested software compo-nents. You can see that there are two nested software components: The Dukes Bank Web Application and the Dukes Bank Database setup.
Nested software components can access all the properties from the outer software components. At runtime, vRealize Automation first de-ploys the inner software components and then the outer ones. If you have several software components, you can define the order of execu-tion by setting dependencies as shown in Fig 19.
If you have settings for the same property in the outer and the inner blueprints, the outer settings take precedence over the settings of the inner elements.
When designing nested blueprints, as a best practice to minimize blueprint complexity, limit blueprints to three levels deep, with the top- level blueprint serving as one of the three levels.
From a permission point-of-view, there are other things that should also be considered: If a user is entitled to the top-most blueprint, that user is entitled to all aspects of the blueprint, including nested blueprints. Also, you can apply an approval policy to a blueprint. When approved, the blueprint catalog item and all its components, including nested blue-prints, are provisioned. You can also apply different approval policies to different components. All the approval policies must be approved before the requested blueprint is provisioned.
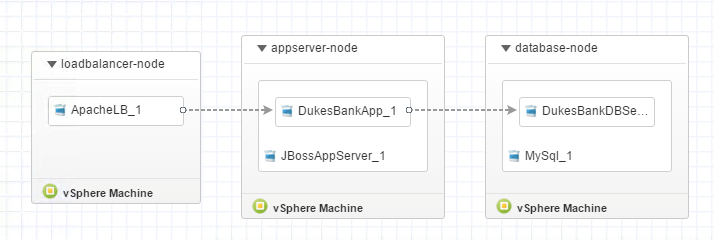
Fig 19: Nested software components
Why using nested software components and blueprints
First of all, as mentioned, nested software components increase the reus-ability, as you don’t need to manually add the resources to every soft-ware component you want to implement.
In addition to being more efficient, nested software components make assigning ownership of software components easier. Because nest-ed software components consist of separate templates, you can have separate owners maintaining separate/particular software components. For example, when using this approach, you can have different maintain-ers for the infrastructure network, the virtual machines, the software running on the machines and the deployed applications.
11.4 Grabbing the application blueprints’ output
Application blueprints are requested the same way as normal blueprints from the service catalog. However, compared to normal blueprints, you can grab the output of the software component’s script. This can be done as described in the following:
- Go to the Requests page, select your request and click View Details.
- On the Request Details page, click the Execution Information button on the upper right hand side of the page.
- In a line with a software component status, click the […] button. The logs for the software component deployment open (see Fig 20).
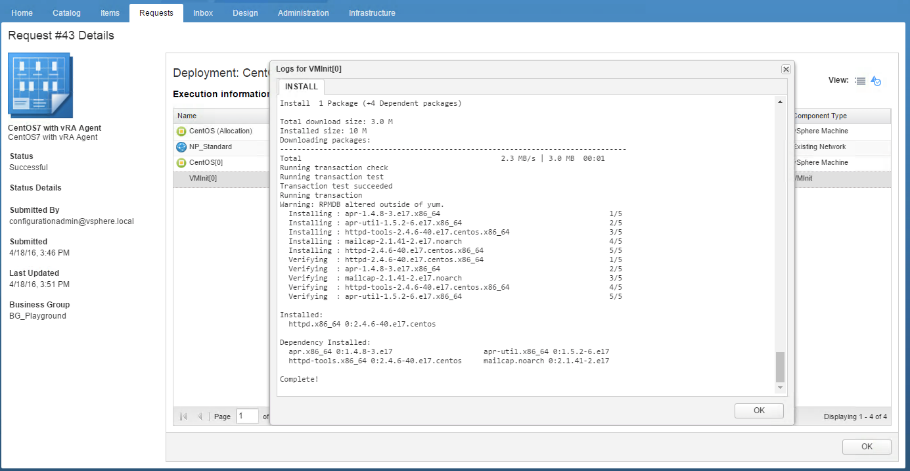
Fig 20: Log output of a software component’s deployment
11.5 Application blueprint use cases
After having described the basic concepts of application blueprints, it is time to use the newly learnt skills and show some use cases. In section 11.1.4, we have already shown how to install the Dukes Bank sample application and also seen that there are other samples available at the VMware cloud management marketplace. We want to conclude this with two additional use cases:
- Installation of the EP Ops agent
- Deployment of the Log Insight agent
11.5.1 Installation of the EP Ops agent
As mentioned in the Blueprint Overview chapter, EP Ops is particularly useful for application monitoring. EP Ops is using an agent-based ap-proach, so additional software must be installed within the virtual ma-chine. However, as each client agent is identified by a uniquely generated EP Ops token, simply putting the EP Ops agent within the template is not an option. Instead, we have to configure the agent at provisioning time.
11.5.1.2 Implementation prerequisites
Before we can implement the software component for the agent in-stallation, there are a set of prerequisites to be fulfilled:
- First, check that vRealize Operation is configured for EP Ops.
- Download the EP Ops agent.
- Look up the vROPs certificate thumbprint.
Let’s discuss in detail how to do that.
Configure vROPs for EP Ops
In order to create a new EP Ops object in the vRealize Operations inven-tory, we have to create a user with permission on the Operating Systems and Remote Checks hierarchy. This can be done as follows:
- Log in into the vRealize Operations user interface (https://<vROP-app.domain.name>/ui) as an administrator.
- Go to the Administration > Access Control menu and either create a new user for EP Ops or configure an existing one.
- On the Review User Information page, provide all required information, then move on to the Assign Groups and Permissions page.
- Click the Objects button.
- From the Select Role menu, choose the AgentManager role.
- In the Pick objects or object hierarchies to assign pane, check the Operating Systems and the Remote Checks checkboxes (see Fig 21).
- Click Finish.
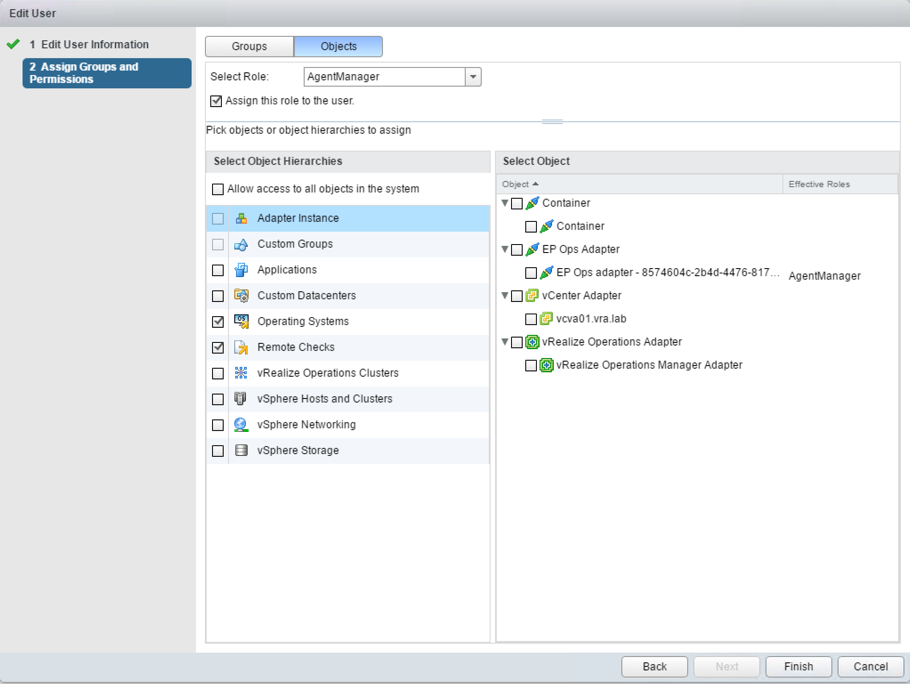
Fig 21: EP Ops user permission in vROPs
Download the EP Ops agent
Next, download the EP Ops agent. There are different versions of the EP agent available – for both Linux and Windows and with or without em-bedded Java and in either 32 or 64 bit. For Linux, you can download the rpm-package or a tar.gz file, for Windows you can choose between a zip file and an exe-installer file. In the remainder, we will show how to install the EP Ops agent on a 64 bit Linux operating system using the tar.gz file.
After the download, you have to decide if you want the agent install files to be part of your template machine or to download them dynamical-ly at provisioning time (preferred approach).
Look up the certificate thumbprint
You can look up the certificate thumbprint by performing the following steps:
- Log in into the vRealize Operations admin user interface (https://<vROP-app.domain.name>/admin) as an administrator.
- On the right upper side of the screen – left to the admin menu – click the golden button. The SSL Certificate dialog box opens.
- Copy the SSL thumbprint information.
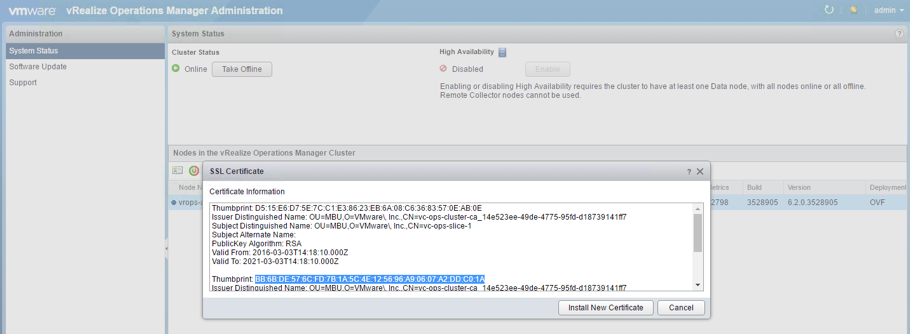
Fig 22: vRealize Operations certificate thumbprint
11.5.1.3 Implementaion of the software component
After having met all the requirements, we can begin with the implemen-tation of the software component.
First, navigate to the Design > Software Components page and create a new software component. Then, provide the following input on the Gen-eral tab and click on Next:
- A Name, e.g. EPOPs.
- An ID.
- A Description.
- The Container (Machine).
In the next step, we’ll define a set of properties (see Fig 23):
- vROPS_address: A String variable that holds the IP address or FQDN of the vRealize Operations server.
- epops: A content property that holds the URL where the EP Ops agent can be downloaded.
- epops_password: The password for the communication with vRealize Operations.
- epops_username: The username for the communication with vReal-ize Operations.
- thumbprint: The vRealize Operations certificate thumbprint.

Fig 23: Properties for the EP Ops software component
Once all properties have been defined, we can move along to the Actions page. We will use two different lifecycle stages (Install and Configure), but basically you could also cope with just one lifecycle stage.
For the Install script, provide the following code:
mkdir /opt/epops
 tar -zxvf $epops -C /opt/epops
 exit 0
For the Configure script, provide the following input:
/opt/epops/epops-agent-6.2.0/bin/ep-agent.sh set-property agent.setup.serverLogin $epops_username
/opt/epops/epops-agent-6.2.0/bin/ep-agent.sh set-property agent.setup.serverPword $epops_password
/opt/epops/epops-agent-6.2.0/bin/ep-agent.sh set-property ac-cept.unverified.certificates true
/opt/epops/epops-agent-6.2.0/bin/ep-agent.sh set-property agent.setup.serverIP $vROPS_address
/opt/epops/epops-agent-6.2.0/bin/ep-agent.sh agent.setup.serverSSLPort 443
/opt/epops/epops-agent-6.2.0/bin/ep-agent.sh set-property agent.setup.serverCertificateThumbprint $thumbprint
/opt/epops/epops-agent-6.2.0/bin/ep-agent.sh setup
exit 0
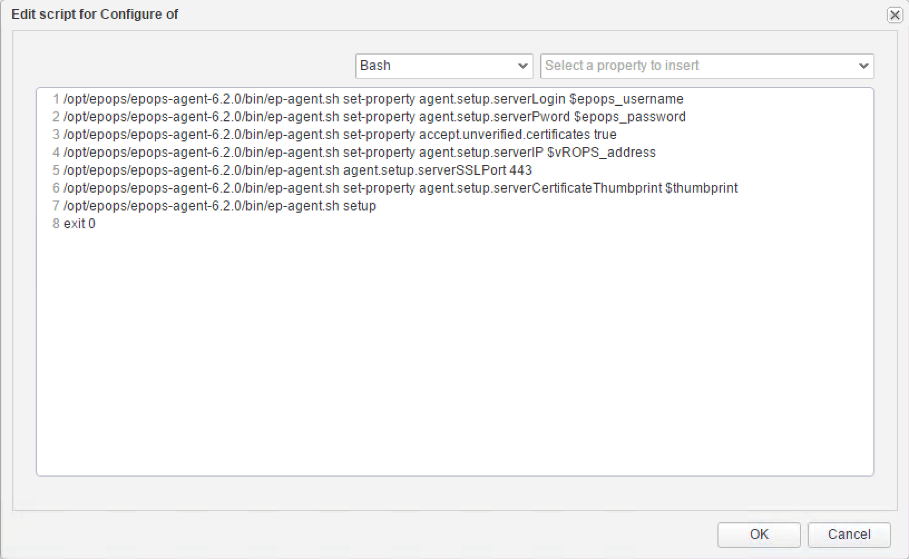
Fig 24: Configure script for the EP Ops software component
After having saved the component, we can apply it on a machine blue-print. Once this has been done and a corresponding machine has been requested, the machine will appear within vROPs ready to be monitored.
11.5.2 Installation of the Log Insight Agent
Setting up the software component for Log Insight is similar to the EP Ops one, albeit a little bit easier, as no SSL certificate thumbprint must be taken into consideration. Let’s discuss how to trigger the installation of a Linux Log Insight agent.
First, we have to download the agent. You can find the agent on the Log Insight appliance itself, on the Administration > Agents page. The software component that we implement will download the agent at runtime from a public web server. So before beginning the implementa-tion, make sure that the agent can be downloaded to the virtual machine to be provisioned.
Now let’s implement the software component. First, navigate to the Design > Software Components page and create a new software compo-nent. Then, provide the following input on the General tab and click on Next:
- A Name, e.g. LogInsight.
- An ID.
- A Description.
- The Container (Machine).
In the next step, we’ll define a set of properties (see Fig 23):
- loginsight_server: A String variable that holds the IP address or FQDN of the vRealize Operations server.
- loginsight_agent: A content property, that holds the URL where the Log Insight agent can be downloaded.
Once all properties have been defined, we can move along to the Actions page. For the Install script, provide the following code:
#!/bin/bash
SERVERHOST=$loginsight_server rpm -i $loginsight_agent
exit 0
Now we can save the component and add it to the blueprint (see Fig 25). Once everything is completed, we can deploy machines with the Log Insight agent.
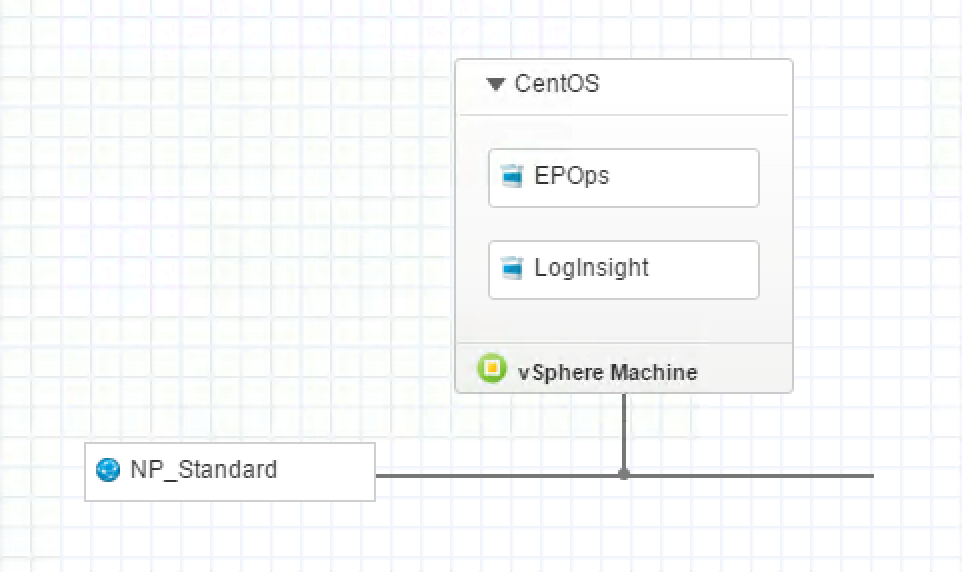
Fig 25: Adding the software component to the machine blueprint
11.6 Common issues with software components
If an application deployment fails, it is time for troubleshooting. While many things can go wrong in a deployment process, there are neverthe-less some common errors that can be identified quickly. In the following section, we will show how to address some of these issues.
11.6.1 Checking the software bootstrap agent
When configuring the virtual machine template, we should first check if the software bootstrap agent works correctly. Quite often the software agent is not working due to the following reasons:
- There is no connection to the Manager Service possible from the virtual machine.
- Java is not configured properly, in particular the PATH-variable does not incorporate the bin-directory of the Java working directory.
- If you are working with Linux templates, verify that all the required commands have been properly installed.
11.6.2 Troubleshooting deployment issues
The software bootstrap agent creates virtual machine-specific logs and an overall deployment log to aid in troubleshooting. These logs can be re-trieved from the vRealize Automation user interface (see section 11.4).
In addition, you can also log in to the virtual machine and access these files directly. Depending on the operating system, you will find these files in the following locations:
- Linux-based virtual machine: /opt/vmware-appdirector/agent/log.
- Windows-based virtual machine: \opt\vmware-appdirector\agent\log.
You can also find the temporary files created by the software component bootstrap agent:
- Linux-based virtual machine: /tmp/<run-id>
- Windows-based virtual machine: \Users\darwin\AppData\Local\Temp
11.7 Summary
This chapter gave an overview as well as an in-depth explanation of soft-ware components. We first introduced the basic concept of software components and then showed how to import some samples to gain a better understanding. Then, we showed how to implement and deploy custom software as well as explained how to troubleshoot them.
Recent Comments