
In the last chapter, we have given a brief overview of the basic principles and the implementation of machine blueprints. In addition, we will now show how to setup a template for provisioning including all the necessary tools such as guest agent, software bootstrap agent or Log Insight Agent.
10.1 Template creation process
Setting up templates for your vRealize Automation environment is not a one-time effort, but an ongoing task. This is due to the fact that you should always keep your templates up-to-date for your end-users. Changes within your template comprise security updates, service packs, updates of your base software or any other changes needed by the end-users. Hence, it is useful to define how a base template looks like and how your template should be updated.
Fig 1 shows such a basic template creation process for a vSphere environment. The basic idea is to maintain a base virtual machine in vSphere, which incorporates the latest changes needed in your cloud environment. Whenever you want to roll-out a new version for your vRealize cloud management portal, a template can be created from the base virtual machine. This template can be published to vRealize Automation in a second step. Based on your template strategy, you might replace the current template in vRealize Automation or you might offer different versions of the template side by side for a certain time.
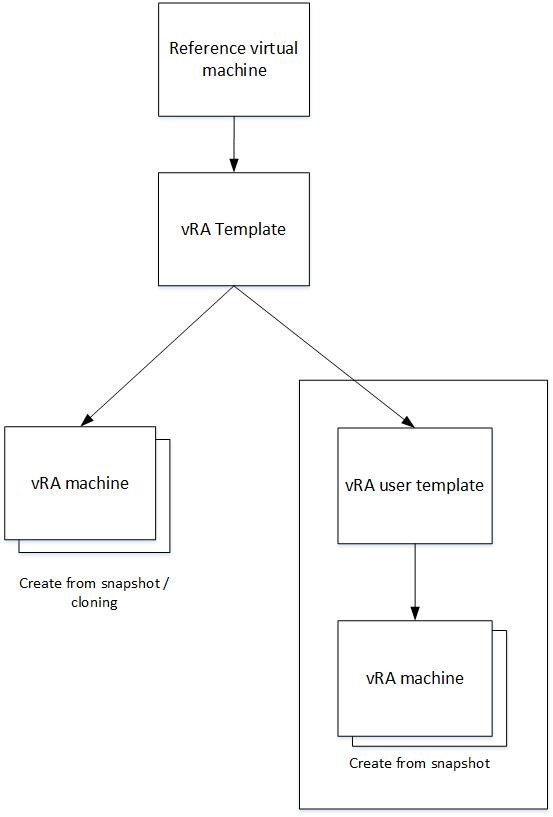
Fig. 1: Basic template creation process.
Usually, users create new machines based on the published template.
Another strategy might also be to just incorporate the basic tools in a template and let users manage their own templates in the vRealize cloud management portal. This is a valid approach, as users can also create snapshots on their own from the vRealize Automation graphical user interface (of course, you’ll have to give them the permission to do so in advance).
10.2 Creating a provisioning template
As discussed in the blueprint introduction chapter, having the right strategy for setting up machine templates is crucial within a cloud environment. Finding the right template configuration strategy takes time and some experimentation. The factors that you certainly want to take into account are build time, boot time and shelf time. Regardless of what kind of advanced software you want to have included within your template, there are some tools that you should consider to incorporate in your template in order to form some kind of base template:
- The VMware tools (if you operate in a vSphere environment)
- The guest agent
- Software bootstrap agent
- vRealize Log Insight agent
- Software bootstrap agent
- EP Ops agent
- Puppet / Chef (optionally)
| Installing tools at provisioning time
In case you don’t want to include the agents in your base templates, you can also install them at provisioning time (of course, this extends the period of time before the machine will be ready for your end users). On his blog, Gary Coburn provides Orchestrator workflows[1] to achieve this. |
10.2.1 Installing the guest agent and the software bootstrap agent
These two tools are certainly the most important ones and should not be missed in a base template. In the following, we will show the installation for both Linux and Windows.
10.2.1.1 Prepare a Linux reference machine
When setting up a machine template, you can either install the guest agent and the software bootstrap agent manually, or use a single script that installs the supported Java Runtime environment, the guest agent and the software bootstrap agent on your Linux reference machine. The script is supported in a vSphere, vCloud Director, vCloud Air and Amazon environment.
However, if you want to setup the agents manually, you will find all the necessary download links on the vRealize Automation appliance (URL: https://<vra7-app.domain.name>:5480/installer).
In the following, we will show how to prepare the template using the single script provided by VMware. Before you start, check the following pre-requisites:
- You have a fully functional CentOS machine running.
- Your virtual machine has network connectivity and can reach the vRA Appliance as well as the IaaS Manager service.
- If you are working in a vSphere environment and use Clones or Linked Clones, validate that your guest customizations are working correctly.
There are some software requirements as well:
- wget
- unzip
- sha256sum
- grep
- sed
- setsid
- awk
- ifconfig
- apt-get
- yum
- dmidecode
- perl
Once you have ensured that all the prerequisites are met, we can start the installation from the reference machine command prompt with root privileges:
- Download the installation script from your vRealize Automation virtual appliance:
wget –no-check-certificate
https://<vra7-app.domain.name>:5480/service/software/download
/prepare_vra_template.sh
- Make the script executable by issueing the following command:
chmod +x prepare_vra_template.sh
- Run the prepare_vra_template script and follow the instruction at the command prompt (see Fig 2).
- Shut down the virtual machine.
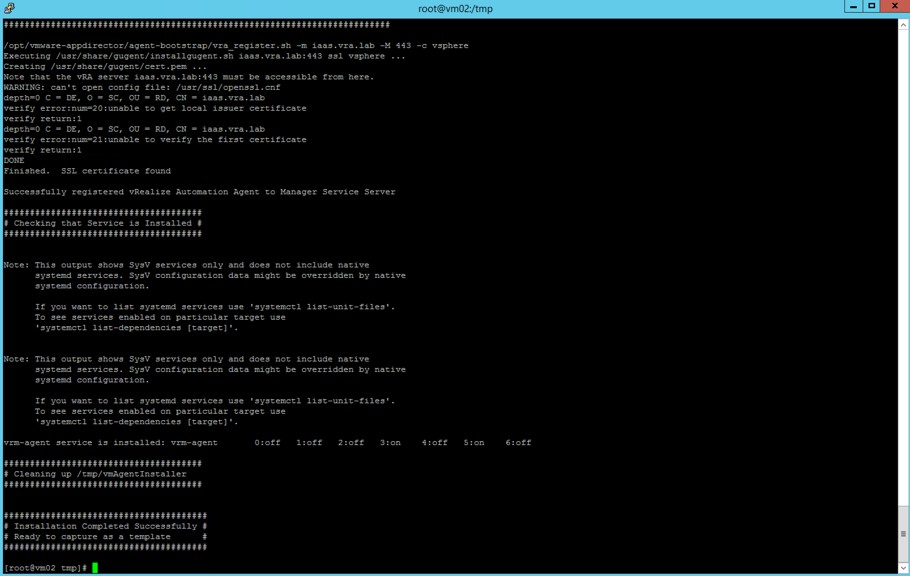
Fig. 2: vRealize Automation agent installation
| Hint: CentOS 7
If you are using CentOS 7, there is an issue with the software bootstrap agent. Luckily, there is a workaround that is described on Ryan Kelly’s blog[2]. |
10.2.1.2 Prepare a Windows reference machine
The following steps must be performed to create a Windows reference machine:
- Log in into your Windows reference machine as an administrator and open a command prompt.
- Download the supported Java version from the vRealize Automation appliance. It can be found at the URL https://<vra7-app.domain.name>:5480/service/software/index.html.
- Unzip the installation files in \opt\vmware-jre.
- Download the guest agent from https://<vra7-app.domain.name>:5480/installer and unzip it in C:\ (a C:\VRMGuestAgent folder is produced).
- From within the guest agent folder execute the following command with elevated priviliges:
winservice -i -h Manager_Service_Hostname_fdqn:portnumber -p ssl
- The default port is 443.
- If you are using a load balancer for the manager service, specify the FQDN of the load balancer instead.
- If you are preparing a template for Amazon EC2, append the –c ec2 option.
- Download the software bootstrap agent from https://<vra7-app.domain.name>:5480/service/software/index.html.
- On the zip file, right click Properties and then General.
- Click Unblock.
- From the command prompt, run the following command:
install.bat password=Password managerServiceHost=manager_service_machine.mycompany.com managerServicePort=443 httpsMode=true cloudProvider=ec2|vca|vcd|vsphere
- Next, check if the installer has created a user name called darwin_user, that the user belongs to the Administrator group and that the password expiry is disabled.
- Shut down the virtual machine.
| Hint: Automate the Windows Installation
Compared to the Linux installation, setting up a Windows machine is quite a laborious process. Fortunately, Gary Coburn, a cloud specialist from VMware has provided a script that works in the same way as the preparation script within Linux. The script and the documentation on how to use it can be found on his blog extendingclouds.com[3] |
10.2.2 Log Insight
If you have Log Insight running in your environment, it certainly makes sense to integrate the Log Insight agent in your provisioned templates as well. Once the agent is deployed and running within your virtual machine, you can instantly begin analyzing logs from the new server.
There are different ways to configure the agent on the server:
- Use custom properties to trigger the installation.
- Use a software component.
- Install the agent with Orchestrator.
When using custom properties for the installation, please ensure you have the guest agent installed on the template in advance. If you want to use a software component for the installation, you need the software bootstrap agent running on the template as well.
The installation itself consists of two steps:
- First, you have to download the installer. You can find the installation files on the Log Insight user interface by navigating to the Administration page (the link on the upper right of the screen) and then clicking on Agents within the left navigation pane (see Fig 3).
- Second, you have to trigger the installation. For Windows, there is a MSI packet available, for Linux you have the choice between the binaries and a packet installation.

Fig. 3: Download Log Insight agent
10.2.3 EP Ops
EP Ops is part of vRealize Operations (from version 6.1 onwards) and allows the monitoring of operating systems as well as applications. Fig 4 shows an OS monitored that has a Tomcat server installed.
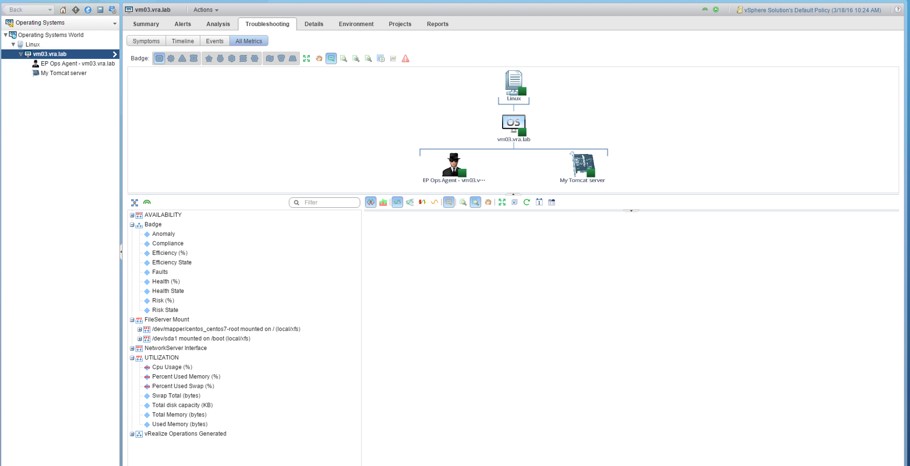
Fig. 4: Monitoring with EP Ops
In order to integrate EP Ops, an agent must be installed on the operating system instance. However, the agent must be configured individually on each provisioned instance at provisioning time. This can be achieved by one of the following means:
- Use custom properties and the guest agent to trigger the installation.
- You can have a software component configured that performs the installation.
- An orchestrator workflow can connect to the virtual machine at runtime to configure the EP Ops agent.
In order to setup the EP Ops agent, you have to perform the following steps:
- You need the setup files stored on the provisioned machine. You can either download them at runtime or have them already stored on the machine template.
- The vROPS certificate must be downloaded from the appliance and stored on the provisioned machine itself in order to establish a connection with the vROPS server. The certificate can be downloaded by using a browser and navigating to the https://<vrops-app.domain.name>/admin
- The installation script must be triggered by means of one of the aforementioned mechanism. We will discuss all the different approaches in the next chapters (when talking about software components, custom properties and Orchestrator).
The EP Ops installation script provides the option to perform an unattended installation, so starting the installation is not difficult. The following snippet shows how to install the agent on Windows:
epops-agent-x86-64-win-6.1.0-3030162.exe /VERYSILENT -username USERNAME -password PASSWORD-serverAddress VROPS-FQDN -serverCertificateThumbprint “CERTIFICATE”
10.2.4 Puppet / Chef
Many corporations use configurations tools like Puppet or Chef for the customization of machines. Setting up such a solution involves several steps:
- First, the configuration server is needed. Puppet and Chef both come in two flavors: A commercial enterprise edition (Puppet Enterprise and Chef) and a free distribution (Puppet Open Source and Chef Solo).
- The agent must be installed on the machine in order to perform any customizations.
- Before being able to perform any customizations, the client agent must be authenticated to the server in order to communicate with it.
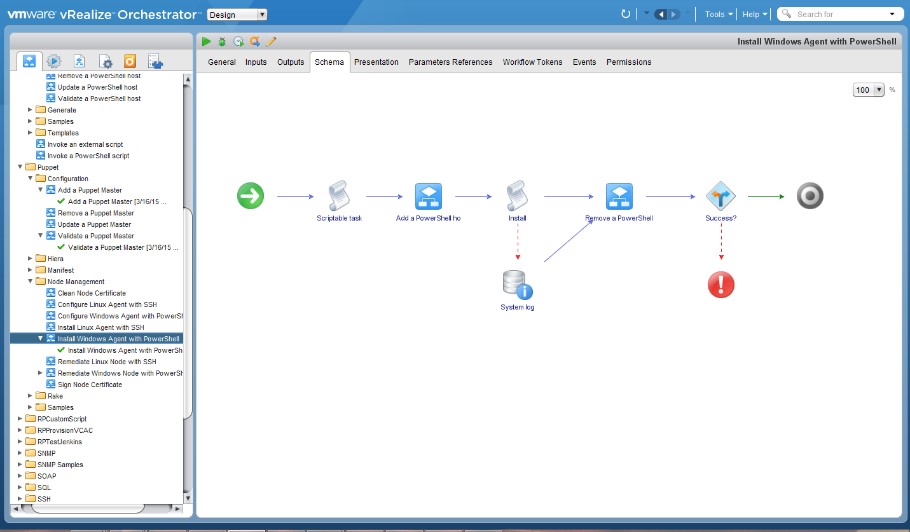
Fig. 5: Orchestrator Puppet plug-in
Fortunately, VMware provides Orchestrator plug-ins for both the integration of Puppet and Chef. Fig 5 shows the Puppet plug-in. We will discuss how to install and configure the plug-in later in the extensibility section of the book.
10.3 Summary
Before using machine templates in the blueprint designer, you should prepare the virtual machine which will be used as a template. This includes installing the guest agent, the software bootstrap agent, an EP Ops agent or support for shipping logs to vRealize Log Insight.
[1] http://extendingclouds.com/?p=1352
[2] http://www.vmtocloud.com/vra7-software-agent-gotcha-for-centos7-or-rhel7/
[3] http://extendingclouds.com/?p=1321
Recent Comments