
After spinning up your VMC on AWS SDDC, you might want to connect your SDDC to your on-prem datacenter using a Route Based IPSec VPN. This post will explain the required configuration step by step. We will connect the VMC on AWS SDDC to a Palo Alto PA3020 firewall.
Create the VPN in the SDDC
Go to the SDDC using the cloud console and select Networking & Security -> VPN -> Route Based. Now click ADD VPN and fill in the blanks:
- Name: VPN-to-on-prem (not significant, choose whatever you like)
- Local Ip Address: select the public IP for the VPN.
- Remote Public IP: The internet facing IP of your firewall. In case the firewall is behind a NAT device, use the public IP of the NAT device.
- BGP Local IP/Prefix Lenght: The IP address in this field must be in the same network as the BGP Remote IP. We use 169.254.111.34/30 in this example.
- BGP Remote IP: specify an IP address in the same network as the BGP Local IP/Prefix Lenght.
- BGP Neighbor ASN: The BGP ASN of your firewall.
- Remote Private IP: If your on-prem firewal is behind a NAT device, use the private IP of the firewall that will be used. Otherwise leave this field blank and the Remote Public IP will be used. The Remote Private IP configured in here must match the Local ID sent by your on-prem firewall.
- Preshared Key: type in a key, you need to configure the same key in your on-prem firewall.
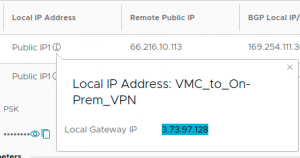
In this example we leave everything else to the default. Click SAVE. In hte column Local IP Address you can now click the icon i sourrounded by a circle. A pop up will apear that permits you to copy the VMC on AWS public IP. Make a note of this IP, you will need it when configuring your on-prem firewall.
The default Local ASN is 65000. You can change it by clicking on EDIT LOCAL ASN, but keep in mind that this will apply to all configured VPNs.
Configure the on-prem PA
Create an IKE Profile
Log in to your firewall and go to Network -> Network Profiles -> IKE Crypto and click Add at the bottom of the screen. Specify a Name and set the other fields according to the VMC on AWS defaults:

Create an IPSec Profile
Go to Network -> Network Profiles -> IPSec Crypto and click Add at the bottom of the screen. Specify a Name and set the other fields according to the VMC on AWS defaults:

Create an IKE Gateway
Go to Network -> Network Profiles -> IKE Gateways and click Add at the bottom of the screen. Fill in the blanks:
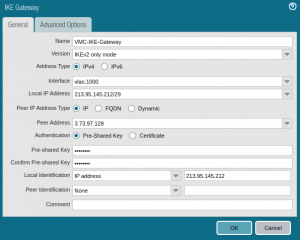
- Name: not significant, choose whatever you like
- Version: IKEv2 only mode
- Interface and Local IP Address: choose the local interface and IP that will be used to connect to VMC on AWS
- Peer IP Address Type: IP
- Peer Address: This is the public IP that you copied when you configured the VPN in the cloud
- Authentication: Pre-shared Key
- Pre-shared Key: The same key that you cofigured in the cloud. Repeat it in the bext field.
- Local Identification: choose IP address and specify the IP address that you configured as Remote Private IP in the cloud. If this field was not specified when configuring the cloud VPN endpoint, use your firewall public IP, don’t leave it blank
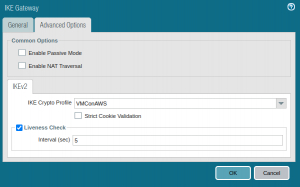
Then click the tab Advanced Options and select the IKE Crypto Profile you created earlier. If your firewall is behind a NAT device, make sure to check the box Enable NAT Traversal.
Configure a tunnel interface
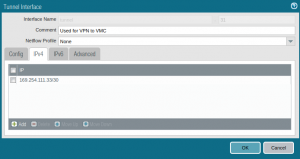
Go to Network -> Interfaces -> Tunnel and create a new tunnel interface:
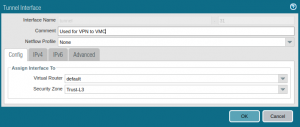
Select the virtual router you will use to configure BGP and the security zone of that interface.
Then go to the IPv4 tab and add the local tunnel IP and prefix length. The IP must match the IP you configured as BGP Remote IP and the prefix lenght must match the prefix lenght you used in the field BGP Local IP/Prefix Length in the cloud.
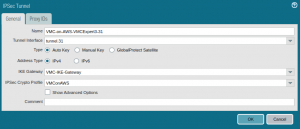
Configure an IPSec Tunnel
Go to Network -> IPSec Tunnels and click Add at the bottom of the screen.
Specify a name, select the tunnel interface, IKE Gateway and IPSec Crypto profile according to the following screenshot:
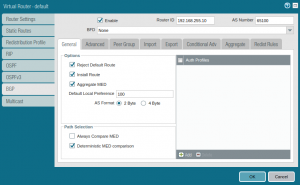
Configure BGP
Go to Network -> Virtual Routers and click the name of the virtual router you specified on the tunnel interface.
In the General tab, set your Router ID and local AS Number. The local AS Number must match the value you configured as the BGP Neighbor ASN in the cloud. Change other settings according to your requirements.
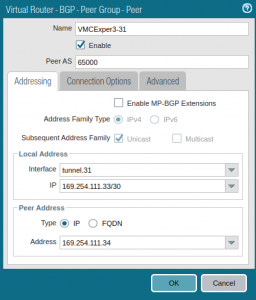
Now click the tab Peer Group and click Add at th bottom of the window. Choose a name, make sure the checkbos Enable is checked and the Type is set to EBGP. Uncheck the box Remove Private AS.
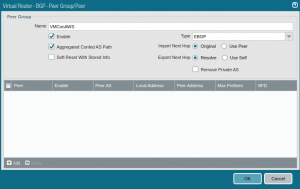
Click Add at the bottom of the window and add your peer. Select the tunnel interface and IP you created earlier and specify the Peer Address with Type IP. The Peer Address must match the address you configured as the BGP Local IP in the cloud:
Click OK three times.
Commit changes
You now have to click Commit in the upper right area of your firewall. When the commit succeded, go to Network -> IPSec Tunnels and verify that the Status and in the second column and the status below IKE Gateway/Sattelite is green
Back in the cloud console, click the refresh button in the last column of your VPN.
The columns BGP Remote IP and Status should both be green now.

Recent Comments